Celestial Drift Cloud Pillow Free Pattern – Knit a Dreamy Starry Night Cushion
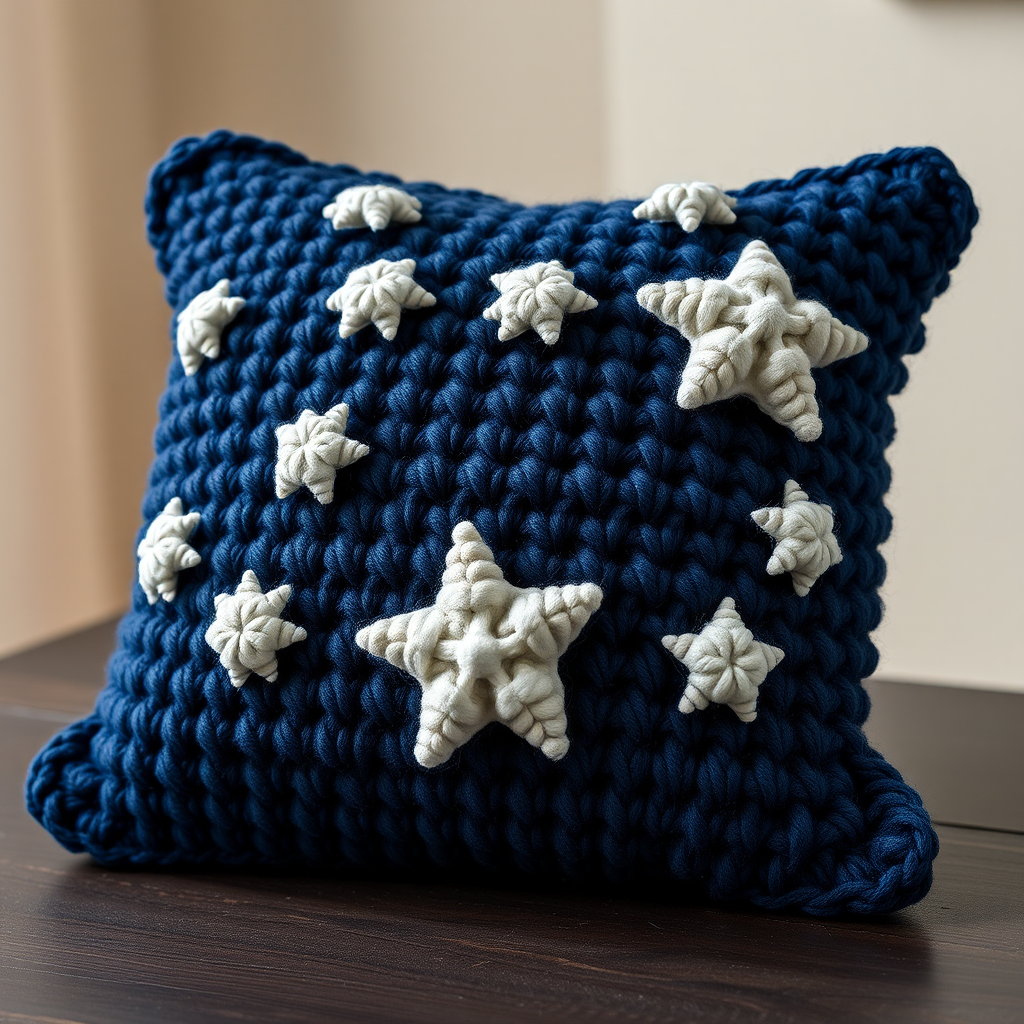
Celestial Drift Cloud Pillow: A Dreamy Starry Night Knitting Project
Imagine sinking into a cloud of midnight blue, sprinkled with shimmering stars. That's the magic of the Celestial Drift Cloud Pillow. This plush, textured cushion brings the serene beauty of a starry night into your living space, blending cozy comfort with celestial charm. Knitted in soft, chunky yarn, this pillow features a unique bobble star pattern that adds a delightful three-dimensional texture. Whether you're a seasoned knitter looking for a quick, satisfying project or a beginner eager to learn new techniques, this free pattern is your ticket to creating a stunning, handmade accent for any modern home.
This pattern is designed to be approachable and rewarding. We'll walk you through every step, from casting on to the final seam, ensuring you can recreate this beautiful piece with confidence. Let's get started on crafting your own piece of the night sky.
Materials Needed
Before you begin, gather the following materials to ensure a smooth and enjoyable knitting experience:
- Yarn: Super bulky weight yarn (size 6). You will need approximately 300g in a deep navy blue (MC) for the main body and 100g in a soft silver or white (CC) for the stars. This yarn weight ensures a quick knit and a wonderfully plush, chunky texture.
- Needles: US 13 (9mm) knitting needles. These large needles are perfect for super bulky yarn and help create a soft, drapey fabric.
- Notions: A tapestry needle for seaming and weaving in ends.
- Pillow Form: One 18-inch square pillow form to stuff your finished cover.
Gauge
For the best results, match the gauge: 10 stitches x 14 rows = 4 inches in stockinette stitch. This ensures your pillow panels are the correct size and your finished pillow fits the form perfectly. Always take a moment to knit a small swatch to check your tension.
Step-by-Step Instructions
This pillow is knitted flat in two identical panels, which are then seamed together. The star pattern is created using bobbles and simple knit and purl stitches, making it an excellent project for practicing new skills. Let's break it down.
Panel 1 (Make 2)
Follow these instructions to create one panel, then repeat to make the second.
Cast On and Base Rows
- Cast on: With your main color (MC), cast on 40 stitches.
- Row 1 (RS): Knit all stitches. This is the right side of your work.
- Row 2 (WS): Purl all stitches. This is the wrong side.
- Rows 3-4: Repeat Rows 1 and 2. This creates a neat, stable base for your pattern.
Begin Star Pattern (Rows 5-20)
This is where the magic happens! We'll create the bobble stars. The bobble is made by working multiple stitches into one, then decreasing them back down.
- Row 5 (RS): Knit 5 stitches in MC. *Now, make a bobble (MB) with CC: (k1, p1, k1, p1, k1) all into the same stitch. You will now have 5 loops on your right needle. Then, pass the 4th, 3rd, 2nd, and 1st stitches over the 5th stitch to close the bobble. This creates a neat, puffy star. After the bobble, knit 10 stitches in MC.* Repeat from * to * 2 more times, then knit the final 5 stitches in MC. You will have made a total of 3 bobbles on this row.
- Row 6 (WS): Purl all stitches with MC.
- Row 7 (RS): Knit all stitches with MC.
- Row 8 (WS): Purl all stitches with MC.
- Row 9 (RS): Knit 10 stitches in MC. *Make a bobble (MB) with CC as before, then knit 10 stitches in MC.* Repeat from * to * 2 more times. You will have made 3 bobbles, but they are now offset from the previous row, creating a staggered star pattern.
- Row 10 (WS): Purl all stitches with MC.
- Row 11 (RS): Knit all stitches with MC.
- Row 12 (WS): Purl all stitches with MC.
- Rows 13-20: Repeat Rows 5-12 once more. This completes the first block of stars.
Continue in Stockinette
- Rows 21-30: Knit all stitches on the right side and purl all stitches on the wrong side. This is the stockinette stitch, which creates a smooth, flat background for the stars.
Repeat Star Pattern
- Rows 31-46: Repeat Rows 5-20 exactly. This adds another set of stars to your panel.
- Rows 47-56: Work in stockinette stitch with MC (knit on RS, purl on WS).
Final Star Pattern and Finish
- Rows 57-72: Repeat Rows 5-20 one final time. This completes the third and final set of stars.
- Rows 73-80: Work in stockinette stitch with MC (knit on RS, purl on WS). This creates a balanced border at the top of the panel.
- Bind off: Bind off all stitches loosely with MC. This prevents the edge from being too tight and keeps the pillow's shape.
Finishing Your Pillow
Once both panels are complete, it's time to assemble your cloud pillow.
- Block the panels: Gently wet block or steam block both panels to the same size, approximately 18x18 inches. This ensures they match perfectly and the stitches relax into a beautiful, even texture.
- Seam the panels: Place the two panels with their right sides (the sides with the stars) facing each other. Using your tapestry needle and MC yarn, sew three sides together using a mattress stitch or a simple whip stitch. The mattress stitch creates an invisible seam, while a whip stitch is quicker and easier for beginners.
- Insert the pillow form: Turn the pillow cover right side out. Carefully insert the 18-inch pillow form into the opening.
- Close the fourth side: Sew the remaining side closed using the same technique. Make sure your stitches are secure and neat.
- Weave in all ends: Use your tapestry needle to weave in any loose yarn ends from your color changes and seams. This gives your pillow a professional, polished finish.
And there you have it—your very own Celestial Drift Cloud Pillow! This plush, starry creation is sure to become a cherished piece in your home, offering both comfort and a touch of handmade magic. Enjoy your beautiful new decor, and happy knitting!


