Emberwood Cocoon Poncho Free Pattern – A Knitted Autumn Hearth Wrap

Wrap Yourself in Autumn: Introducing the Emberwood Cocoon Poncho
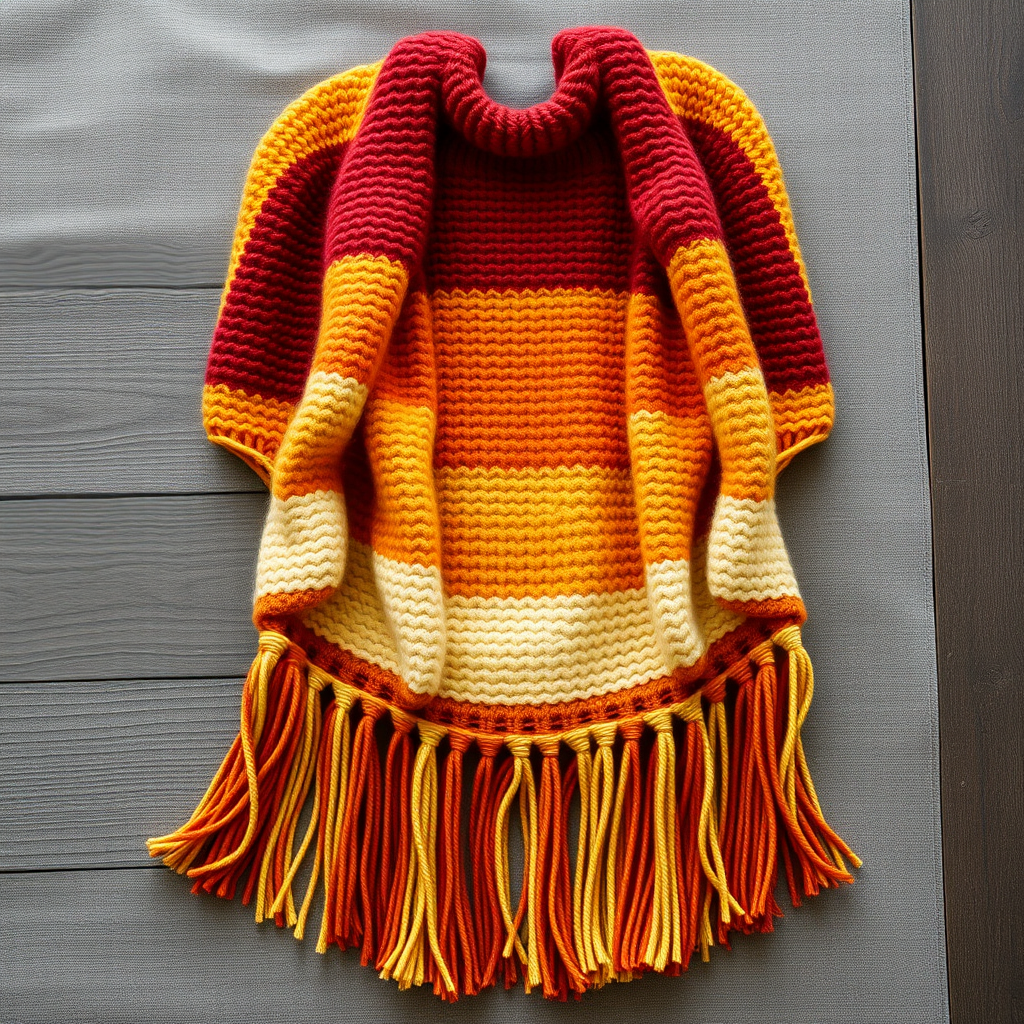
There is a specific kind of magic that arrives with the first crisp autumn day—the desire to wrap yourself in something warm, textured, and deeply comforting. The Emberwood Cocoon Poncho is exactly that: a wearable blanket designed to capture the crackling glow of a hearth. This oversized, textured wrap is knitted in a rich gradient of burnt sienna, deep amber, and smoky charcoal, creating a visual journey that mirrors the falling leaves outside your window.
This free knitting pattern is perfect for intermediate beginners who are ready to move beyond simple scarves. The construction is surprisingly simple—knitted flat in one piece from the bottom up, then seamed at the shoulders. The magic lies in the repeating pattern of knits, purls, and slipped stitches, which creates a woven, heathered effect that looks far more complex than it actually is. The result is a cloud-soft, chunky cocoon that you will reach for all season long.
Materials Needed: Gathering Your Hearthside Supplies
Before you begin, ensure you have all your materials ready. The beauty of this project is that it uses super bulky yarn, meaning it works up quickly and is incredibly forgiving for beginners.
Yarn & Colors
This pattern uses Lion Brand Wool-Ease Thick & Quick (super bulky weight, category 6). You will need 2 skeins each of the following colors:
- Color A: Burnt Sienna
- Color B: Amber
- Color C: Charcoal
Tools & Notions
- Needle: US 13 (9 mm) circular knitting needle, 32-inch length (used for both flat and circular knitting)
- Stitch markers (to mark the center decreases)
- Tapestry needle (for seaming and weaving in ends)
- Crochet hook (optional, for adding fringe)
Gauge
To ensure your poncho drapes correctly, match this gauge: 8 stitches and 12 rows = 4 inches in stockinette stitch (unblocked). Always knit a swatch first to check your tension.
Step-by-Step Instructions: Knitting Your Emberwood Cocoon
This poncho is knitted flat in one piece from the bottom up, then seamed at the shoulders. It features a repeating textured pattern of knits, purls, and slipped stitches that creates a woven, heathered effect.
Abbreviations
- CO: Cast on
- K: Knit
- P: Purl
- Sl: Slip stitch purlwise
- K2tog: Knit two together (decrease)
- Rep: Repeat
- St(s): Stitch(es)
- RS: Right side
- WS: Wrong side
The Pattern Stitch (Multiple of 4 + 2)
This is the heart of the design. The slipped stitches create the beautiful woven texture.
- Row 1 (RS): K2, *Sl 2, K2; rep from * to end.
- Row 2 (WS): Purl all stitches.
- Row 3 (RS): K2, *K2, Sl 2; rep from * to end.
- Row 4 (WS): Purl all stitches.
Bottom Border
With Color A, CO 86 sts. Knit 6 rows in garter stitch (K every row). This creates a sturdy, non-curling edge.
Main Body
Switch to Color B. Begin the Pattern Stitch, working all rows as written. Continue in pattern, changing colors every 8 rows in this order: B, C, A, B, C, A. Work until the piece measures 24 inches from the cast-on edge, ending with a WS row.
Neck Shaping: Creating the Cocoon Silhouette
Now we will shape the neck by decreasing stitches at the center. This creates the distinctive cocoon shape. Place a stitch marker on either side of the center 4 stitches to help you keep track.
Note: For each decrease row, you will work in pattern to the first marker, K2tog twice (removing the center 4 sts), then continue in pattern to the end.
- Row 1 (RS): Work in pattern across first 30 sts, then K2tog, K2tog (center 4 sts), work in pattern across remaining 30 sts. You now have 82 sts. Continue in pattern for 4 more rows.
- Row 2 (RS): Work in pattern across first 28 sts, K2tog, K2tog (center 4 sts), work in pattern across remaining 28 sts. You now have 78 sts. Continue in pattern for 4 more rows.
- Row 3 (RS): Work in pattern across first 26 sts, K2tog, K2tog (center 4 sts), work in pattern across remaining 26 sts. You now have 74 sts. Continue in pattern for 4 more rows.
- Row 4 (RS): Work in pattern across first 24 sts, K2tog, K2tog (center 4 sts), work in pattern across remaining 24 sts. You now have 70 sts. Continue in pattern for 4 more rows.
- Row 5 (RS): Work in pattern across first 22 sts, K2tog, K2tog (center 4 sts), work in pattern across remaining 22 sts. You now have 66 sts. Continue in pattern for 4 more rows.
- Row 6 (RS): Work in pattern across first 20 sts, K2tog, K2tog (center 4 sts), work in pattern across remaining 20 sts. You now have 62 sts. Continue in pattern for 4 more rows.
- Row 7 (RS): Work in pattern across first 18 sts, K2tog, K2tog (center 4 sts), work in pattern across remaining 18 sts. You now have 58 sts. Continue in pattern for 4 more rows.
- Row 8 (RS): Work in pattern across first 16 sts, K2tog, K2tog (center 4 sts), work in pattern across remaining 16 sts. You now have 54 sts. Continue in pattern for 4 more rows.
- Row 9 (RS): Work in pattern across first 14 sts, K2tog, K2tog (center 4 sts), work in pattern across remaining 14 sts. You now have 50 sts. Continue in pattern for 4 more rows.
- Row 10 (RS): Work in pattern across first 12 sts, K2tog, K2tog (center 4 sts), work in pattern across remaining 12 sts. You now have 46 sts. Continue in pattern for 4 more rows.
- Row 11 (RS): Work in pattern across first 10 sts, K2tog, K2tog (center 4 sts), work in pattern across remaining 10 sts. You now have 42 sts. Continue in pattern for 4 more rows.
- Row 12 (RS): Work in pattern across first 8 sts, K2tog, K2tog (center 4 sts), work in pattern across remaining 8 sts. You now have 38 sts. Continue in pattern for 4 more rows.
- Row 13 (RS): Work in pattern across first 6 sts, K2tog, K2tog (center 4 sts), work in pattern across remaining 6 sts. You now have 34 sts. Continue in pattern for 4 more rows.
- Row 14 (RS): Work in pattern across first 4 sts, K2tog, K2tog (center 4 sts), work in pattern across remaining 4 sts. You now have 30 sts. Continue in pattern for 4 more rows.
- Row 15 (RS): Work in pattern across first 2 sts, K2tog, K2tog (center 4 sts), work in pattern across remaining 2 sts. You now have 26 sts. Continue in pattern for 4 more rows.
- Final Row (RS): K2tog across all sts (13 sts). Cut yarn, leaving a long tail. Thread tail through remaining sts and pull tight to gather. Secure.
Finishing: Seaming and Shaping
Fold the piece in half lengthwise, with the right sides together. Sew the side seams from the bottom edge up to the armhole openings, leaving about 10 inches open on each side for armholes. Weave in all ends.
Collar: The Cozy Finish
With Color C, pick up and knit 60 sts evenly around the neck opening. Knit in the round for 6 inches. Bind off loosely. Fold collar over for a cozy, rolled look.
Fringe (Optional)
Cut 12-inch strands of Color A, B, and C. Attach fringe along the bottom edge, alternating colors, using a crochet hook. Trim evenly for a polished, rustic edge.
Your Emberwood Cocoon Poncho is now complete. Slip it on, pour yourself a warm drink, and enjoy the handcrafted comfort of your new favorite autumn companion.