Heirloom Willow Lace Baby Blanket Free Pattern – Knit with Cascading Leaf Motifs
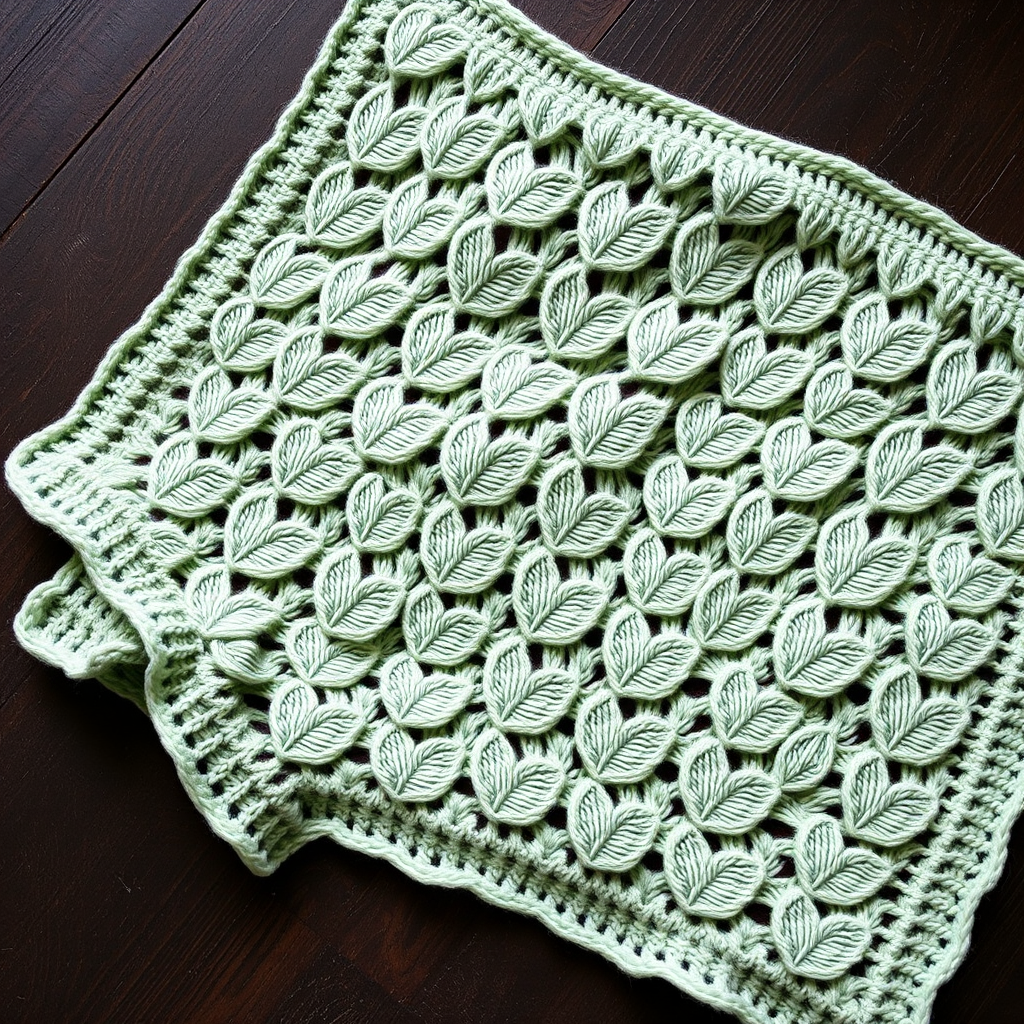
Heirloom Willow Lace Baby Blanket: A Free Knitting Pattern for a Timeless Keepsake
There are certain projects that transcend mere craft and become true heirlooms—pieces meant to be passed down, wrapped around generation after generation. The Heirloom Willow Lace Baby Blanket is precisely that kind of project. With its delicate, cascading leaf motifs set against a soft, cloud-like field of stitches, this blanket captures the essence of timeless elegance while remaining wonderfully approachable for knitters ready to explore lacework.
This pattern blends the airy beauty of lace with the practicality of a sturdy garter stitch border, creating a piece that is both visually stunning and durable enough for everyday snuggles. Whether you're crafting a gift for a new arrival or creating a cherished keepsake for your own nursery, this blanket promises to be a labor of love that will be treasured for years to come.
In this comprehensive guide, we'll walk you through every step—from gathering the perfect materials to mastering the 12-row lace repeat—so you can create this heirloom-quality blanket with confidence.
Why You'll Love This Pattern
Before we dive into the technical details, let's talk about what makes this pattern so special:
- Stunning Visual Impact: The cascading leaf motifs create a sophisticated, organic pattern that looks far more complex than it actually is.
- Beginner-Friendly Lace: While lace knitting can seem intimidating, this pattern uses only basic increases (yarn overs) and decreases (knit togethers and slip-slip-knits), making it accessible to confident beginners.
- Perfectly Portable: Worked flat on a circular needle, this project is easy to take with you wherever you go.
- Heirloom Quality: The cotton-bamboo blend yarn and timeless design ensure this blanket will be a cherished keepsake for generations.
Materials Needed
To create your own Heirloom Willow Lace Baby Blanket, you'll need the following materials. Each item has been carefully selected to ensure the best possible result for your finished piece.
Yarn
DK Weight (Light Worsted) Cotton-Bamboo Blend – Approximately 1000 yards (915 meters)
We recommend Lion Brand Coboo in 'Willow' or 'Soft Sage' for the perfect combination of drape, softness, and stitch definition. The cotton-bamboo blend creates a fabric that is gentle against a baby's delicate skin while still showcasing the lace pattern beautifully. The slight sheen of bamboo adds a touch of luxury to the finished piece.
Needles
US Size 6 (4.0 mm) Circular Knitting Needle – 32-inch (80 cm) length
The circular needle is essential here—it allows you to accommodate the 150 stitches comfortably while working flat. The longer cable prevents the stitches from bunching up, making your knitting experience much more pleasant.
Additional Supplies
- Stitch markers (optional, but helpful for keeping track of pattern repeats)
- Tapestry needle for weaving in ends
- Blocking mats and rust-proof pins
- Gentle wool wash (for blocking)
- Measuring tape
Gauge
20 stitches and 28 rows = 4 inches (10 cm) in stockinette stitch (after blocking)
Gauge is crucial for achieving the correct finished size. We recommend knitting a swatch before beginning to ensure your tension matches. If your gauge is off, adjust your needle size accordingly—smaller needles for tighter gauge, larger needles for looser gauge.
Finished Size & Abbreviations
Before we begin, let's review the key details you'll need throughout the pattern.
Finished Size
Approximately 30 inches wide x 36 inches long (76 cm x 91 cm) after blocking. The blocking process is essential—it opens up the lace pattern and gives the blanket its beautiful, airy quality.
Abbreviations
Familiarize yourself with these standard knitting abbreviations before you begin:
- CO: Cast on
- K: Knit
- P: Purl
- Yo: Yarn over (creates an increase and a decorative hole)
- K2tog: Knit two together (right-leaning decrease)
- SSK: Slip, slip, knit (left-leaning decrease)
- K3tog: Knit three together (double decrease)
- Sl: Slip
- St(s): Stitch(es)
- RS: Right side (the front of the work)
- WS: Wrong side (the back of the work)
- Rep: Repeat
Pattern Notes: Essential Information Before You Start
Understanding these key notes will make your knitting experience smooth and enjoyable:
- Construction: The blanket is worked flat from the bottom up, starting with a cast-on edge and finishing with a bind-off edge.
- Lace Repeat: The lace pattern is a 12-row repeat, with a 6-stitch garter border on each side for stability and a clean, finished look.
- Edge Stitch: Always slip the first stitch of each row purlwise with yarn in front. This creates a neat, chain-like edge that makes seaming and finishing look professional.
- Stitch Count: The stitch count remains consistent throughout the lace pattern—each yarn over is paired with a corresponding decrease, so you'll always have 150 stitches on your needle.
Step-by-Step Instructions
Now, let's get to the heart of the pattern. Follow these instructions carefully, and you'll be amazed at how quickly the beautiful leaf pattern emerges.
Step 1: Cast On
CO 150 stitches loosely.
Use a loose cast-on method such as the long-tail cast-on or the knitted cast-on, being careful not to pull your stitches too tightly. A loose cast-on edge is essential for a stretchy, comfortable bind-off at the end and ensures the bottom edge of your blanket has the same give as the rest of the fabric.
Step 2: Border Setup (Rows 1–6)
These first six rows establish the garter stitch border at the bottom of the blanket. The garter stitch (knitting every row) creates a sturdy, non-curling edge that frames the lace beautifully.
Row 1 (RS): Sl 1, K5, P138, K5, Sl 1. (150 sts)
Explanation: Slip the first stitch purlwise with yarn in front. Knit the next 5 stitches (this creates your garter border). Purl across the next 138 stitches (the main body of the blanket). Knit the final 5 stitches (the other garter border), and slip the last stitch.
Row 2 (WS): Sl 1, K5, K138, K5, Sl 1. (150 sts)
Explanation: Slip the first stitch, then knit all remaining stitches across the row. This creates the garter stitch texture on both borders.
Repeat Rows 1–2 two more times (for a total of 6 rows).
After completing these six rows, you'll have a lovely garter stitch border at the bottom of your blanket, ready for the lace pattern to begin.
Step 3: The Lace Pattern (12-Row Repeat)
This is where the magic happens! The lace pattern consists of 12 rows that you'll repeat until your blanket reaches the desired length. Each 12-row repeat creates one full set of cascading leaves.
Row 1 (RS): Sl 1, K5, *K1, Yo, K2, SSK, K3, K2tog, K2, Yo, K1; rep from * to last 6 sts, K5, Sl 1.
Detailed Walkthrough: Slip the first stitch. Knit 5 (border). Now begin the pattern repeat: Knit 1, yarn over (this creates a hole and adds a stitch), knit 2, slip-slip-knit (decrease two stitches into one, leaning left), knit 3, knit two together (decrease two stitches into one, leaning right), knit 2, yarn over, knit 1. This completes one pattern repeat. Repeat this sequence across the row until you have 6 stitches remaining. Knit those 6 stitches (5 border stitches + slip the last stitch).
Row 2 (WS): Sl 1, K5, Purl to last 6 sts, K5, Sl 1.
Explanation: Slip the first stitch, knit 5 (border), purl across the main body until you have 6 stitches left, knit those 6 stitches (5 border + slip the last). The purl row creates the stockinette background that makes the lace pattern pop.
Row 3 (RS): Sl 1, K5, *K2, Yo, K1, SSK, K1, K2tog, K1, Yo, K2; rep from * to last 6 sts, K5, Sl 1.
Detailed Walkthrough: Slip the first stitch, knit 5. Begin repeat: Knit 2, yarn over, knit 1, slip-slip-knit, knit 1, knit two together, knit 1, yarn over, knit 2. Repeat across, then finish with the border stitches.
Row 4 (WS): Sl 1, K5, Purl to last 6 sts, K5, Sl 1.
Explanation: Same as Row 2—purl the main body, knit the borders.
Row 5 (RS): Sl 1, K5, *K3, Yo, SSK, K1, K2tog, Yo, K3; rep from * to last 6 sts, K5, Sl 1.
Detailed Walkthrough: Slip the first stitch, knit 5. Begin repeat: Knit 3, yarn over, slip-slip-knit, knit 1, knit two together, yarn over, knit 3. Repeat across, then finish with the border stitches.
Row 6 (WS): Sl 1, K5, Purl to last 6 sts, K5, Sl 1.
Explanation: Purl the main body, knit the borders.
Row 7 (RS): Sl 1, K5, *K1, K2tog, Yo, K1, Yo, SSK, K1, Yo, K2tog, K1; rep from * to last 6 sts, K5, Sl 1.
Detailed Walkthrough: Slip the first stitch, knit 5. Begin repeat: Knit 1, knit two together, yarn over, knit 1, yarn over, slip-slip-knit, knit 1, yarn over, knit two together, knit 1. Repeat across, then finish with the border stitches. Notice how this row has three yarn overs—this creates the widening of the leaf shape.
Row 8 (WS): Sl 1, K5, Purl to last 6 sts, K5, Sl 1.
Explanation: Purl the main body, knit the borders.
Row 9 (RS): Sl 1, K5, *K2, K2tog, Yo, K1, Yo, SSK, K2, Yo, K1; rep from * to last 6 sts, K5, Sl 1.
Detailed Walkthrough: Slip the first stitch, knit 5. Begin repeat: Knit 2, knit two together, yarn over, knit 1, yarn over, slip-slip-knit, knit 2, yarn over, knit 1. Repeat across, then finish with the border stitches.
Row 10 (WS): Sl 1, K5, Purl to last 6 sts, K5, Sl 1.
Explanation: Purl the main body, knit the borders.
Row 11 (RS): Sl 1, K5, *K1, Yo, K2, SSK, K3, K2tog, K2, Yo, K1; rep from * to last 6 sts, K5, Sl 1.
Detailed Walkthrough: This row is identical to Row 1. Slip the first stitch, knit 5. Begin repeat: Knit 1, yarn over, knit 2, slip-slip-knit, knit 3, knit two together, knit 2, yarn over, knit 1. Repeat across, then finish with the border stitches.
Row 12 (WS): Sl 1, K5, Purl to last 6 sts, K5, Sl 1.
Explanation: Purl the main body, knit the borders. This completes one full 12-row lace repeat.
Step 4: Repeating the Lace Pattern
Repeat Rows 1–12 until the blanket measures approximately 34 inches (86 cm) from the cast-on edge, ending with a WS row.
Continue working the 12-row lace repeat, always ending with a wrong-side row (Row 2, 4, 6, 8, 10, or 12) before moving on to the border finish. This ensures that your final border rows begin on the right side of the work.
Pro Tip: Use stitch markers between pattern repeats if you find it helpful. Place a marker after the first 6 border stitches and before the last 6 border stitches. You can also place markers every 12 stitches within the pattern to help you keep track of where you are in the repeat.
Step 5: Border Finish (Rows 1–6)
Once your blanket reaches the desired length, it's time to create the matching garter stitch border at the top. This mirrors the bottom border, creating a symmetrical, finished look.
Row 1 (RS): Sl 1, K5, P138, K5, Sl 1. (150 sts)
Explanation: Slip the first stitch, knit 5 (border), purl across the main body (138 stitches), knit 5 (border), slip the last stitch.
Row 2 (WS): Sl 1, K5, K138, K5, Sl 1. (150 sts)
Explanation: Slip the first stitch, then knit all remaining stitches across the row.
Repeat Rows 1–2 two more times (for a total of 6 rows).
After completing these six rows, you'll have a beautiful garter stitch border at the top of your blanket, perfectly matching the bottom.
Step 6: Bind Off
Bind off all stitches loosely on the RS.
Use a loose bind-off method to ensure the edge remains stretchy and matches the cast-on edge. The suspended bind-off or Jeny's surprisingly stretchy bind-off are excellent choices for lace projects. To work a suspended bind-off: Knit the first two stitches, then insert the left needle into the first stitch on the right needle, pull it over the second stitch and off the needle. Knit one more stitch, then repeat the process of pulling the previous stitch over the newly knitted one. Continue across the row until all stitches are bound off.
Step 7: Weave in Ends
Weave in all ends using a tapestry needle. Thread the needle with your yarn tail and weave it through the purl bumps on the wrong side of the work, following the path of the yarn. Weave in at least 4-6 inches of yarn to


