Moss & Lichen Lion Cub Snuggle Sack Knitting Free Pattern
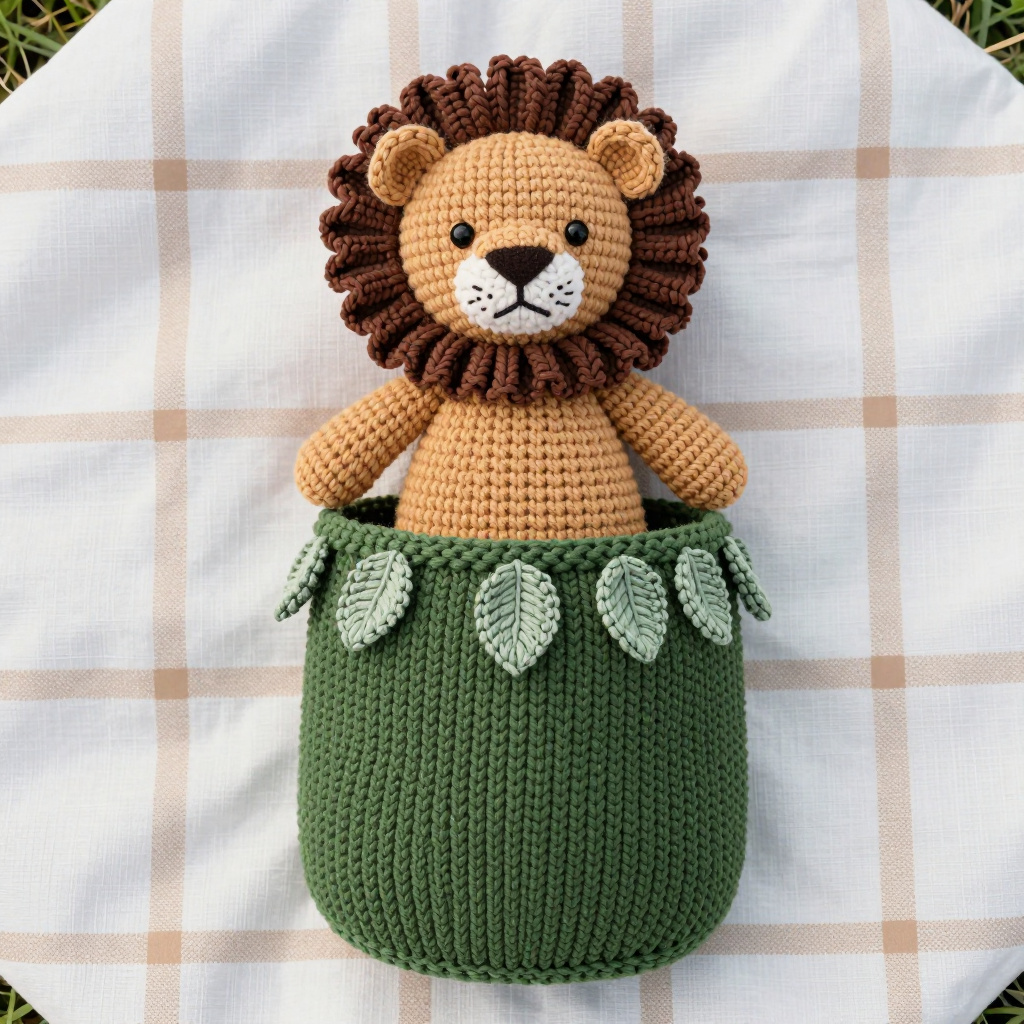
Moss & Lichen Lion Cub Snuggle Sack Knitting Free Pattern
Introduction
Welcome to one of the coziest little projects you will ever make! This Moss & Lichen Lion Cub Snuggle Sack is a woodland-inspired companion set: a soft, chubby lion cub doll tucked inside its own open-topped knitted sack. It is perfect for anyone who has mastered the very basics of knitting and wants to try simple shaping, textured stitches, and a few small sewn-on details. The finished cub is a rounded, plush little friend about 4–5 inches tall, with a ruffled dark brown mane and two tiny ears, all worked in bumpy seed stitch that feels wonderful in chenille yarn. The sack is a straight, open cylinder about 10 inches tall, trimmed with six little knitted leaves in a soft grey-green. Together they look like a tiny lion napping in an autumn woodland — and they feel as soft as a cloud.
Materials Needed
- Yarn: Chenille plush yarn, super bulky (weight category 6), approximately 200g total:
- 100g moss green (MC) — for the snuggle sack
- 50g lichen grey-green (CC1) — for the leaf motifs
- 30g warm tan (CC2) — for the lion cub body, head, and ears
- 20g dark brown (CC3) — for the mane (and optional embroidered stems)
- Needles: US 10 (6.0mm) double-pointed needles (set of 4) for the doll, and a US 10 (6.0mm) 24-inch circular needle for the sack and mane — or whatever size you need to obtain gauge.
- Stitch markers: at least 4, to mark the beginning of rounds and section divisions.
- Tapestry needle: a blunt-tipped yarn needle for sewing pieces together and weaving in ends.
- Scissors for cutting yarn.
- Polyester fiberfill for stuffing the body and head.
- Finished sizes: Lion cub doll approximately 4–5 inches (10–12.5cm) tall and 3 inches (7.5cm) wide; head about 3 inches (7.5cm) in diameter; mane band about 1.5 inches (4cm) wide and 10 inches (25cm) long; each ear about 1 inch (2.5cm) wide and 1.5 inches (4cm) tall. Snuggle sack approximately 10 inches (25cm) tall and 10 inches (25cm) in circumference. Each leaf about 2 inches (5cm) long and 1 inch (2.5cm) wide.
Abbreviations and Beginner Glossary
- st / sts — stitch / stitches. One loop on your needle is one stitch.
- k — knit stitch. Insert the right needle into the front of the stitch from left to right, wrap the yarn around, and pull the loop through.
- p — purl stitch. Insert the right needle into the front of the stitch from right to left, wrap the yarn around the front, and pull the loop through.
- Kfb — knit front and back. Knit into the front of the stitch as normal, then, without removing it, knit into the back of the same stitch. This makes two stitches from one — an increase.
- K2tog — knit two stitches together. Insert the right needle through two stitches at once and knit them as one. This makes one stitch from two — a decrease.
- Sl1 — slip one stitch. Move one stitch from the left needle to the right needle without knitting it.
- psso — pass slipped stitch over. Lift the slipped stitch over the stitch you just worked and off the needle. Used with Sl1 and K2tog to make a centered decrease.
- Rnd / Rnds — round / rounds. One complete circuit of knitting when working in the round (in a tube).
- Row / Rows — one line of knitting worked back and forth on flat needles.
- Seed stitch — a textured pattern of alternating knit and purl stitches that creates a bumpy, nubby fabric. When working flat: knit the purls and purl the knits on every row. When working in the round: [k1, p1] around, and on the next round knit the purls and purl the knits.
- Cast on — creating the first loops on your needle to begin knitting.
- Bind off — finishing the edge so stitches do not unravel. Knit (or work in pattern) two stitches, then lift the first over the second; repeat across.
- Join in the round — after casting on, bring the first and last stitches together to form a circle, being careful not to twist them, then knit the first stitch.
- MC / CC1 / CC2 / CC3 — main color (moss green) / contrast color 1 (lichen grey-green) / contrast color 2 (warm tan) / contrast color 3 (dark brown).
- Fasten off — cut the yarn and pull the tail through the last loop to secure it.
Gauge
12 stitches and 16 rows = 4 inches (10cm) in seed stitch with 6.0mm needles.
Gauge matters because it tells you how big your finished piece will be. If your stitches are tighter than this, your cub and sack will come out smaller than described; if looser, they will be bigger. To check your gauge, cast on about 20 stitches and work in seed stitch for about 20 rows. Lay the swatch flat, place a ruler across the middle, and count how many stitches fit in 4 inches and how many rows fit in 4 inches. If you have more stitches than 12, try a larger needle; if fewer, try a smaller needle. Chenille yarn is stretchy, so measure gently without pulling.
Beginner Tips Before You Start
- Use stitch markers. Place one at the beginning of every round so you always know where you are, and use extra markers to separate the stitches on each of your three double-pointed needles.
- Do not pull the yarn too tight. Chenille yarn is fluffy and easy to over-tighten. Keep your tension relaxed so the fabric stays soft and the stitches stay easy to work.
- Count your stitches at the end of every increase and decrease round. The stitch counts in parentheses are your checkpoints — if they match, you are on track.
- Stuff firmly but gradually. Add small handfuls of fiberfill as you close up the body and head so the cub stays round and smooth, not lumpy.
- Work seed stitch carefully. Remember: knit the purls and purl the knits. If you lose your place, look at the stitch below — a bump means purl, a smooth V means knit.
- Keep your cast-on edge untwisted when joining in the round, or your tube will spiral.
Step-by-Step Instructions
Body (Lion Cub Doll)
With CC2 (warm tan), cast on 6 sts onto three double-pointed needles (2 sts per needle). Join in the round, being careful not to twist.
Rnd 1: Kfb in each st around. (12 sts)
Rnd 2: Knit. (12 sts)
Rnd 3: [Kfb, k1] around. (18 sts)
Rnd 4: Knit. (18 sts)
Rnd 5: [Kfb, k2] around. (24 sts)
Rnd 6: Knit. (24 sts)
Rnd 7: [Kfb, k3] around. (30 sts)
Rnd 8: Knit. (30 sts)
Rnd 9: [Kfb, k4] around. (36 sts)
Rnds 10–24: Work in seed stitch as follows: [k1, p1] around, ending with k1. (36 sts)
Rnd 25: [K2tog, k4] around. (30 sts)
Rnd 26: Seed stitch. (30 sts)
Rnd 27: [K2tog, k3] around. (24 sts)
Rnd 28: Seed stitch. (24 sts)
Rnd 29: [K2tog, k2] around. (18 sts)
Rnd 30: Seed stitch. (18 sts)
Stuff the body firmly with polyester fiberfill now, before the opening gets too small.
Rnd 31: [K2tog, k1] around. (12 sts)
Rnd 32: [K2tog] around. (6 sts)
Cut yarn, thread the tail through the remaining 6 sts, pull tight, and secure.
Head (Lion Cub Doll)
With CC2, cast on 6 sts onto three double-pointed needles. Join in the round.
Rnd 1: Kfb in each st around. (12 sts)
Rnd 2: Knit. (12 sts)
Rnd 3: [Kfb, k1] around. (18 sts)
Rnd 4: Knit. (18 sts)
Rnd 5: [Kfb, k2] around. (24 sts)
Rnd 6: Knit. (24 sts)
Rnd 7: [Kfb, k3] around. (30 sts)
Rnd 8: Knit. (30 sts)
Rnds 9–18: Work in seed stitch. (30 sts)
Rnd 19: [K2tog, k3] around. (24 sts)
Rnd 20: Seed stitch. (24 sts)
Rnd 21: [K2tog, k2] around. (18 sts)
Rnd 22: Seed stitch. (18 sts)
Stuff the head firmly.
Rnd 23: [K2tog, k1] around. (12 sts)
Rnd 24: [K2tog] around. (6 sts)
Cut yarn, thread through the remaining 6 sts, pull tight, and secure.
Mane (Lion Cub Doll)
With CC3 (dark brown), cast on 40 sts onto the circular needle.
Rows 1–6: Work in seed stitch (knit the purls and purl the knits on every row). (40 sts)
Bind off loosely. Sew the mane around the base of the head, gathering it slightly as you sew to create a ruffled effect.
Ears (make 2)
With CC2, cast on 4 sts.
Row 1: Kfb, k2, kfb. (6 sts)
Row 2: Purl. (6 sts)
Row 3: Kfb, k4, kfb. (8 sts)
Row 4: Purl. (8 sts)
Bind off. Fold each ear in half and sew to the top of the head.
Snuggle Sack
With MC (moss green), cast on 60 sts onto the circular needle. Join in the round, being careful not to twist.
Rnds 1–4: Work in seed stitch. (60 sts)
Rnd 5: [K1, p1] around, ending with k1. (60 sts)
Rnds 6–40: Continue in seed stitch (approximately 10 inches / 25cm from the cast-on edge). (60 sts)
Bind off loosely in seed stitch pattern.
Leaf Motifs (make 6)
With CC1 (lichen grey-green), cast on 3 sts.
Row 1: Kfb, k1, kfb. (5 sts)
Row 2: Purl. (5 sts)
Row 3: Kfb, k3, kfb. (7 sts)
Row 4: Purl. (7 sts)
Row 5: K2tog, k3, k2tog. (5 sts)
Row 6: Purl. (5 sts)
Row 7: K2tog, k1, k2tog. (3 sts)
Row 8: Purl. (3 sts)
Row 9: Sl1, k2tog, psso. (1 st)
Fasten off. Sew the leaves evenly around the top edge of the sack, alternating with small CC3 embroidered stems if desired.
Assembly and Finishing
Sew the head to the body. Thread a tapestry needle with a long tail of CC2. Hold the head against the top of the body so the openings meet, and stitch around the join with small, even stitches, catching one stitch from each piece as you go. Pull gently so the seam disappears into the fluffy chenille.
Attach the ears. Fold each ear in half so it forms a small triangle, and sew the base of the fold to the top of the head, one on each side, using matching CC2 yarn.
Sew on the mane. Wrap the mane band around the base of the head and pin or hold it in place. Sew along its lower edge with CC3 yarn, gathering the band slightly as you stitch so it ruffles. Sew the short ends together to close the ring.
Attach the leaves. Space the six leaves evenly around the top edge of the sack and sew each one in place with a few small stitches through its center. If you like, embroider a short CC3 stem beneath each leaf with simple straight stitches.
Weave in all ends. Thread each yarn tail onto the tapestry needle and run it through the inside of the fabric for about an inch, then trim close to the surface.
Blocking. Lightly mist the finished pieces with water, shape them gently with your hands, and let them dry flat. Do not press with a hot iron — chenille can flatten and lose its fluff. Once dry, place the lion cub inside the snuggle sack.
Pro Tips and Variations
- Change the colors. Try a golden-yellow cub with a rust mane for a classic lion look, or a cream cub with a grey mane for a snowy woodland version. The sack can be any earthy shade you love.
- Adjust the size. To make a larger sack, cast on in multiples of 2 (seed stitch needs an even stitch count in the round) — for example, 72 sts will give a wider sack. Add or remove rounds to change the height, keeping the seed stitch pattern going.
- Substitute yarn. Any super bulky (category 6) yarn will work, but chenille gives the softest, plushest result. Always knit a gauge swatch with your substitute yarn, since different fibers behave differently.
- Add extra leaves or a little acorn. Sew on more leaf motifs, or knit a tiny acorn-shaped bobble in CC3 and attach it to the sack for an extra woodland touch.


