Oatmeal Acorn Newborn Hat Free Crochet Pattern
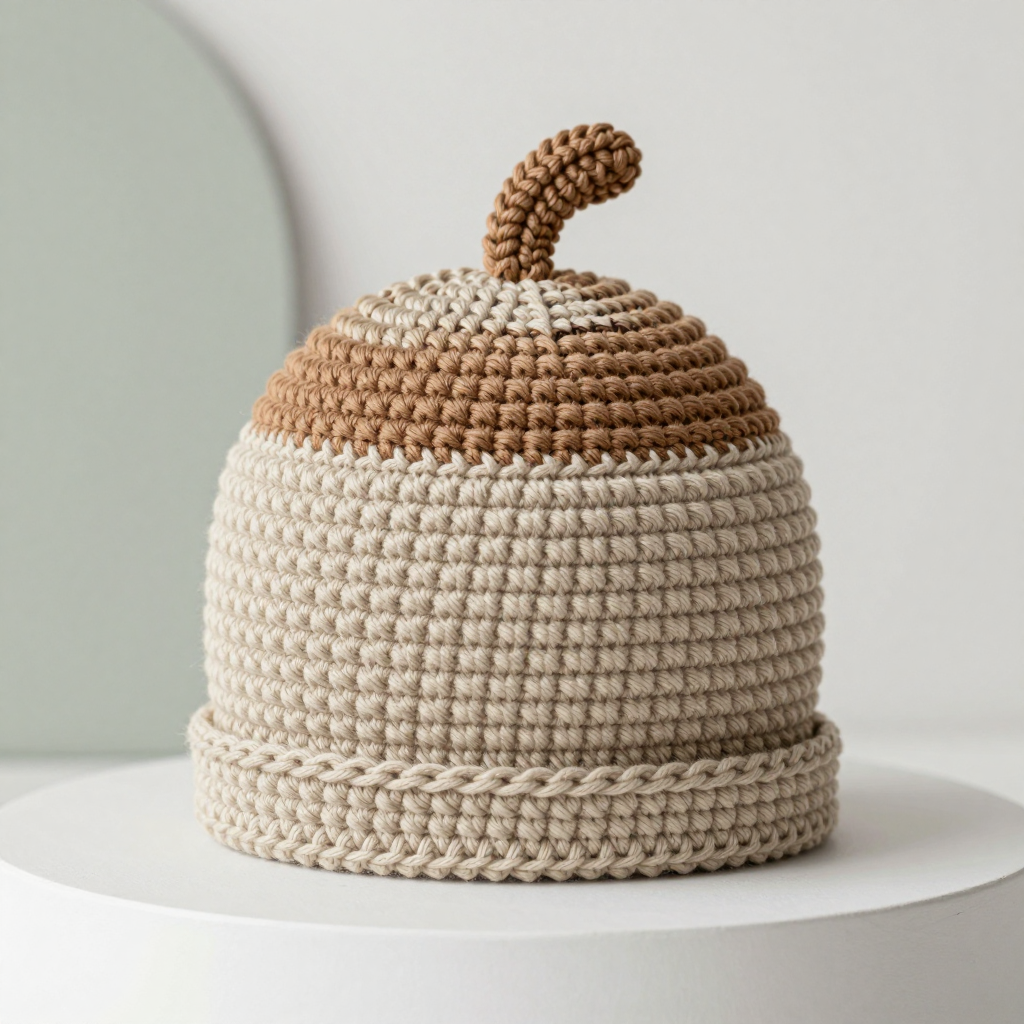
Oatmeal Acorn Newborn Hat — Free Beginner Crochet Pattern
Introduction
This little acorn hat is the perfect first project for anyone who has just picked up a crochet hook. It is worked almost entirely in single crochet — the very first stitch most people learn — so you only need one skill to make something that looks genuinely special. The finished hat is a soft, rounded egg shape in calm oatmeal cream, topped with a warm brown textured cap and a tiny curved stem, giving it that quiet, Japandi-inspired look that photographs beautifully. It feels gentle and squishy in the hand, with a neat rolled brim that sits snugly on a newborn's head. Whether you are making it for your own baby, a baby shower gift, or a photo prop, this is a small, forgiving project you can finish in an evening.
Materials Needed
- Yarn (main color, MC): Worsted weight (category 4) acrylic or cotton-blend yarn in oatmeal cream — approximately 60 yd / 55 m.
- Yarn (contrast color, CC): Worsted weight (category 4) yarn in warm medium brown — approximately 25 yd / 23 m.
- Crochet hook: H/8 (5.0 mm) for the hat body, brim, and stem.
- Crochet hook: I/9 (5.5 mm) for the brown cap.
- Stitch marker (one is enough; a safety pin or scrap of yarn works too).
- Tapestry needle (a blunt, large-eyed needle for sewing seams and hiding ends).
- Scissors.
- Finished size: About 12 in / 30.5 cm circumference and 5.5 in / 14 cm tall. It fits a newborn head of 13–14 in / 33–35.5 cm with a slight stretch. The brown cap measures about 4.5 in / 11.5 cm across and 2.5 in / 6.5 cm deep. The stem is about 1.5 in / 4 cm long.
Abbreviations and Beginner Glossary
- ch — chain. Make a loop of yarn on your hook, wrap the yarn over the hook, and pull it through the loop. That is one chain.
- sc — single crochet. Insert your hook into the stitch, wrap yarn over the hook, pull up a loop (2 loops on hook), wrap yarn over again, and pull through both loops. One loop remains.
- 2 sc in next st — work two single crochets into the same stitch. This is an increase and makes the circle grow.
- sc2tog — single crochet 2 together. Insert hook into the first stitch, pull up a loop, insert hook into the next stitch, pull up a loop (3 loops on hook), wrap yarn over and pull through all 3 loops. This is a decrease. (Listed for reference; not used in this pattern.)
- sl st — slip stitch. Insert hook into the stitch, wrap yarn over, and pull it through both the stitch and the loop on your hook in one motion. It makes a flat, tidy edge.
- st(s) — stitch or stitches.
- rnd — round. One complete circle of stitches worked around.
- BLO — back loop only. Every stitch has two loops at the top (a front loop facing you and a back loop behind it). Working in the back loop only means you insert your hook under just the loop farther from you, which creates a visible ridge.
- Magic ring — an adjustable loop you make with your yarn, then crochet into. It lets you pull the center hole completely closed. If it feels tricky, you can chain 2 and work your first round into the second chain from the hook instead.
- Whipstitch — a simple sewing stitch: bring the needle up through both layers, then over the edge and back up, repeating in small even stitches.
- Right side — the outside of the hat that people see. Wrong side — the inside.
Gauge
Gauge: 16 single crochet stitches and 18 rounds = 4 in / 10 cm using the H/8 (5.0 mm) hook.
Gauge simply means how big your stitches turn out. If your stitches are larger than the pattern's, the hat will be too big; if smaller, it will be too small for a newborn. To check, crochet a small square about 4 in / 10 cm wide in single crochet, lay a ruler across the middle, and count the stitches in 4 inches. If you have more than 16, switch to a larger hook; if fewer, switch to a smaller hook. It is worth the ten minutes — a hat that fits is a hat that gets worn.
Beginner Tips Before You Start
- Use your stitch marker every round. Because the hat is worked in a spiral, the first stitch of each round shifts. Clip the marker into the first stitch of the round so you always know where you are.
- Do not pull your yarn tight. Tension is the number one beginner struggle. Let the yarn flow; if your hook squeaks or your stitches feel stiff, you are pulling too hard.
- Count after every increase round. The stitch counts in parentheses are your safety net. If a round ends with the wrong number, fix it before moving on.
- Keep your magic ring tail long. You will pull it snug at the end, and a longer tail is easier to hold.
- Work the brown cap with the larger hook as written. The bigger hook makes the cap slightly looser so it drapes over the crown instead of fighting it.
- Try the hat on (or measure) before seaming. Once the cap is sewn on, adjusting is harder.
Step-by-Step Instructions
Hat Body (oatmeal cream, H/8 / 5.0 mm hook)
Worked in continuous rounds — do not join or turn at the end of each round. Place your stitch marker in the first stitch of every round.
Rnd 1: Make a magic ring, work 6 sc into the ring. Pull the tail to close the hole. (6 sc)
Rnd 2: 2 sc in each st around. (12 sc)
Rnd 3: [Sc in next st, 2 sc in next st] around. (18 sc)
Rnd 4: [Sc in next 2 sts, 2 sc in next st] around. (24 sc)
Rnd 5: [Sc in next 3 sts, 2 sc in next st] around. (30 sc)
Rnd 6: [Sc in next 4 sts, 2 sc in next st] around. (36 sc)
Rnd 7: [Sc in next 5 sts, 2 sc in next st] around. (42 sc)
Rnd 8: [Sc in next 6 sts, 2 sc in next st] around. (48 sc)
Rnd 9: [Sc in next 7 sts, 2 sc in next st] around. (54 sc)
Rnd 10: [Sc in next 8 sts, 2 sc in next st] around. (60 sc)
The crown (the flat circle you have just made) should measure about 4 in / 10 cm across. If it is much bigger or smaller, check your gauge before continuing.
Rnds 11–24: Sc in each st around. (60 sc)
Do not fasten off yet.
Brim (oatmeal cream, H/8 / 5.0 mm hook)
Rnd 25: Working in the BLO (back loop only), sc in each st around. (60 sc) — this creates a crisp fold line for the rolled brim.
Rnd 26: Sc in each st around. (60 sc)
Rnd 27: Sl st in each st around for a neat rolled edge. Fasten off and weave in the ends. The hat body should now measure about 5.5 in / 14 cm from crown to brim.
Brown Cap (warm medium brown, I/9 / 5.5 mm hook)
Worked in continuous rounds; do not join or turn.
Rnd 1: Make a magic ring, work 6 sc into the ring. (6 sc)
Rnd 2: 2 sc in each st around. (12 sc)
Rnd 3: [Sc in next st, 2 sc in next st] around. (18 sc)
Rnd 4: [Sc in next 2 sts, 2 sc in next st] around. (24 sc)
Rnd 5: [Sc in next 3 sts, 2 sc in next st] around. (30 sc)
Rnd 6: [Sc in next 4 sts, 2 sc in next st] around. (36 sc)
Rnd 7: [Sc in next 5 sts, 2 sc in next st] around. (42 sc)
Rnd 8: [Sc in next 6 sts, 2 sc in next st] around. (48 sc)
Rnd 9: [Sc in next 7 sts, 2 sc in next st] around. (54 sc)
Rnd 10: [Sc in next 8 sts, 2 sc in next st] around. (60 sc)
Rnds 11–14: Sc in each st around. (60 sc)
Rnd 15: Sl st in each st around. Fasten off, leaving a 24 in / 60 cm tail for seaming. The cap should measure about 4.5 in / 11.5 cm across and 2.5 in / 6.5 cm deep.
Stem (warm medium brown, H/8 / 5.0 mm hook)
Leave a 6 in / 15 cm starting tail. Ch 7.
Row 1: Sc in the 2nd ch from the hook and in each ch across. (6 sc)
Rows 2–3: Ch 1, turn, sc in each st across. (6 sc)
Fasten off, leaving a 6 in / 15 cm tail. The stem measures about 1.5 in / 4 cm long and 0.5 in / 1.3 cm wide. Fold it in half lengthwise and whipstitch the long edges together to form a small curved stem; set aside.
Assembly and Finishing
- Turn the hat body right side out. Turn the brown cap wrong side out (so the seam side faces the hat).
- Center the cap over the crown. Slide it down until the cap's edge sits about 1 in / 2.5 cm above the brim line. Pin in place at four evenly spaced points first, then fill in between so the fullness is spread evenly.
- Whipstitch the cap edge to the hat body. Thread the long brown tail onto your tapestry needle. Working through both layers, bring the needle up through the cap edge and the hat, then over the edge and back up, making small, even stitches all the way around. Ease any extra fabric in as you go. Remove the pins.
- Attach the stem. Sew the folded stem to the very top center of the cap with a few secure stitches, curving it slightly to one side so it looks natural.
- Weave in all ends. Thread each tail onto the tapestry needle, run it through the inside of several stitches, then back through a few more in the opposite direction to lock it, and trim close to the fabric.
- Block lightly. Hold a steam iron a few inches above the brown cap only (never touch the iron to the yarn) and let the steam settle the texture. Avoid steaming the brim so it keeps its snug roll. Lay flat to dry. Do not tumble dry.
Pro Tips and Variations
- Change the palette. Swap the oatmeal cream for soft sage, dusty rose, or pale grey, and the brown for charcoal or deep mustard. Keep the contrast gentle for that calm, Japandi feel.
- Adjust the size. For a slightly larger hat, add one more increase round (Rnd 11: [sc in next 9 sts, 2 sc in next st] around = 66 sc) and work one extra plain round in both the body and the cap. For a preemie size, stop the increases at Rnd 9 (54 sc) and shorten the body by two rounds.
- Substitute yarn. Any worsted weight (category 4) yarn works — cotton blends give a crisper stitch definition, while acrylics feel softer and wash easily. Always swatch first, since fiber changes gauge.
- Make the cap removable. Instead of seaming, crochet a short chain loop inside the cap and attach a small button to the hat crown, so the cap can be taken off for washing or swapped for a different color.


