Snuggle Sloth Heart Applique Free Pattern – Crochet a Cozy Love Token
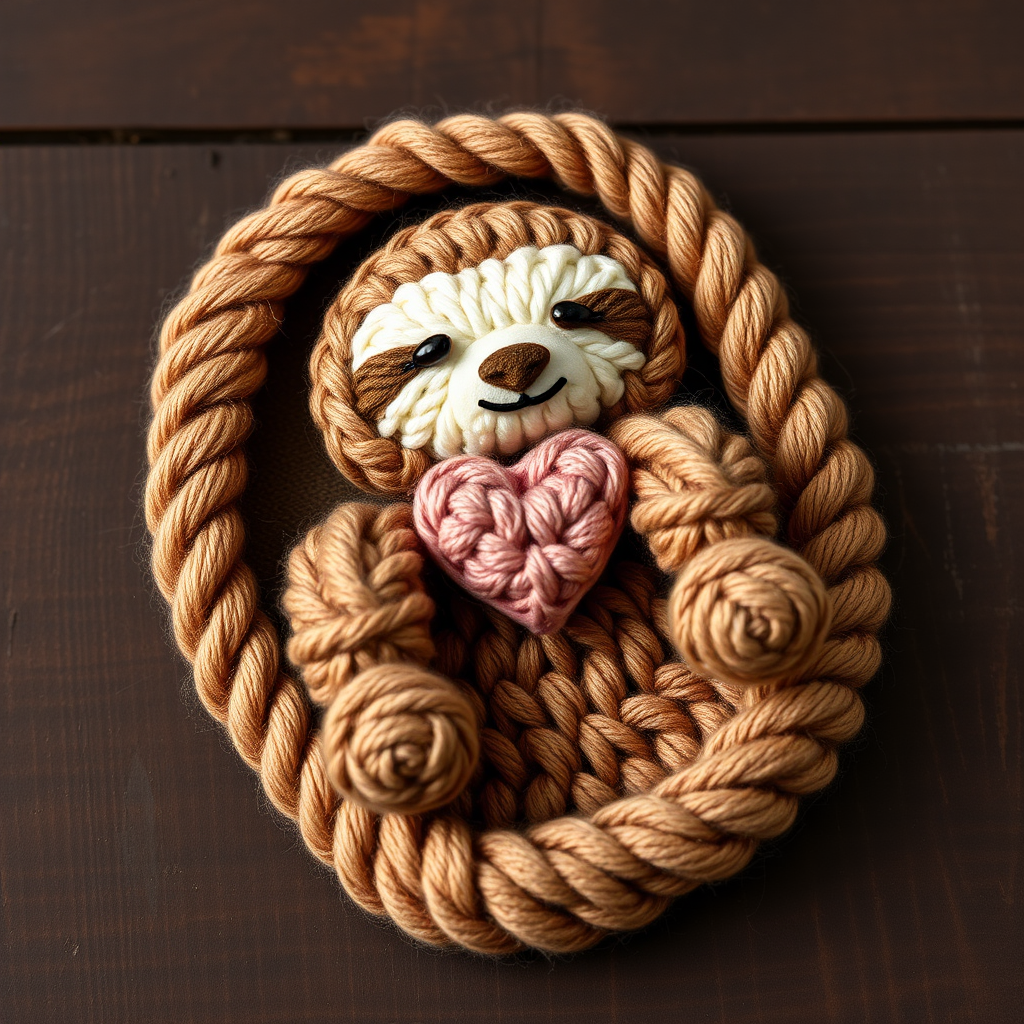
Snuggle Sloth Heart Applique Free Pattern – Crochet a Cozy Love Token
Looking for a quick, heartfelt crochet project that's perfect for beginners? This adorable sloth clutching a dusty rose heart is the ideal way to add a touch of woodland whimsy to bags, blankets, cards, or even as a standalone gift tag. The soft, textured yarn and sweet, sleepy expression make this applique a truly special handmade token of affection. Best of all, it works up in just an evening, using basic single crochet stitches and simple shaping.
Whether you're crafting for Valentine's Day, a baby shower, or just because, this cozy sloth is sure to bring a smile. Let's gather our supplies and get started!
Materials Needed
Before you begin, make sure you have the following materials on hand. This project is wonderfully portable and requires very little yarn, making it perfect for using up scraps from your stash.
- Yarn: Worsted weight cotton or acrylic yarn in three colors:
- Warm brown (for the body, head, arms, and legs)
- Cream (for the face mask)
- Dusty rose (for the heart)
- Crochet Hook: 3.5mm (E) crochet hook
- Other Supplies: Yarn needle, stitch marker, fiberfill stuffing, and small amount of dark brown yarn or embroidery floss for the face details.
Gauge: 4 sc x 4 rows = 1 inch. Gauge is not critical for this project, but maintaining consistent tension will ensure your sloth looks neat and even.
Step-by-Step Instructions
This pattern is worked in continuous rounds unless otherwise stated. Pro tip: Use a stitch marker to track the beginning of each round—this will save you from counting headaches later!
Sloth Body (make 1)
We'll start with the plump little body that forms the base of your applique.
- Round 1: With warm brown yarn, make a magic ring, work 6 sc into the ring. (6)
- Round 2: 2 sc in each stitch around. (12)
- Round 3: *Sc in next stitch, 2 sc in next stitch* repeat around. (18)
- Round 4: *Sc in next 2 stitches, 2 sc in next stitch* repeat around. (24)
- Round 5-7: Sc in each stitch around. (24)
- Round 8: *Sc in next 2 stitches, sc2tog* repeat around. (18)
- Round 9: *Sc in next stitch, sc2tog* repeat around. (12)
- Stuff the body firmly with fiberfill. Make sure it's plump but not so stuffed that it distorts the stitches.
- Round 10: Sc2tog around. (6)
- Fasten off, leaving a long tail. Thread the tail through a yarn needle, weave it through the front loops of the remaining 6 stitches, and pull tight to close the hole. Weave in the end securely.
Sloth Head (make 1)
The head is worked similarly to the body, creating a slightly larger round shape for that adorable, sleepy look.
- Round 1: With warm brown yarn, make a magic ring, work 6 sc into the ring. (6)
- Round 2: 2 sc in each stitch around. (12)
- Round 3: *Sc in next stitch, 2 sc in next stitch* repeat around. (18)
- Round 4: *Sc in next 2 stitches, 2 sc in next stitch* repeat around. (24)
- Round 5-7: Sc in each stitch around. (24)
- Round 8: *Sc in next 2 stitches, sc2tog* repeat around. (18)
- Round 9: *Sc in next stitch, sc2tog* repeat around. (12)
- Stuff the head firmly with fiberfill.
- Round 10: Sc2tog around. (6)
- Fasten off, leaving a long tail. Weave the tail through the front loops of the remaining stitches and pull tight to close. Weave in the end.
Sloth Face Mask (make 1)
This cream-colored oval gives the sloth its characteristic sweet face. It's worked in rows, not rounds.
- With cream yarn, ch 5.
- Row 1: Sc in 2nd ch from hook and in each ch across. (4)
- Row 2: Ch 1, turn, 2 sc in first stitch, sc in next 2 stitches, 2 sc in last stitch. (6)
- Row 3: Ch 1, turn, 2 sc in first stitch, sc in next 4 stitches, 2 sc in last stitch. (8)
- Row 4: Ch 1, turn, sc in each stitch across. (8)
- Fasten off, leaving a long tail for sewing.
Attaching the Face Mask: Position the face mask onto the head, slightly below the top. Sew it in place using the long tail and a yarn needle. Once secure, embroider two small dark brown eyes and a tiny nose using yarn or embroidery floss. For the eyes, make small French knots or a few straight stitches. For the nose, make a small vertical line or a tiny triangle.
Sloth Arms (make 2)
These stubby little arms are designed to curve inward and gently hug the heart.
- Round 1: With warm brown yarn, make a magic ring, work 6 sc into the ring. (6)
- Round 2: Sc in each stitch around. (6)
- Round 3: *Sc in next 2 stitches, 2 sc in next stitch* repeat around. (8)
- Round 4-5: Sc in each stitch around. (8)
- Fasten off, leaving a long tail. Do not stuff. Flatten the arm so the opening is closed, and sew the opening shut with a few whip stitches. Sew the arms to the sides of the body, slightly below the head, angling them so they curve inward toward the chest.
Sloth Legs (make 2)
These tiny legs anchor the bottom of the sloth and complete the silhouette.
- Round 1: With warm brown yarn, make a magic ring, work 6 sc into the ring. (6)
- Round 2: Sc in each stitch around. (6)
- Round 3: *Sc in next 2 stitches, 2 sc in next stitch* repeat around. (8)
- Round 4: Sc in each stitch around. (8)
- Fasten off, leaving a long tail. Do not stuff. Flatten the leg and sew the opening closed. Sew the legs to the bottom front of the body, spaced slightly apart.
Heart (make 1)
This little dusty rose heart is the star of the show—the love token your sloth is hugging!
- Round 1: With dusty rose yarn, make a magic ring, work 6 sc into the ring. (6)
- Round 2: 2 sc in each stitch around. (12)
- Round 3: *Sc in next stitch, 2 sc in next stitch* repeat around. (18)
- Round 4: Sc in each stitch around. (18)
- Round 5: *Sc in next 2 stitches, sc2tog* repeat around. (12)
- Round 6: *Sc in next stitch, sc2tog* repeat around. (8)
- Fasten off, leaving a long tail. Stuff lightly with fiberfill. Sew the heart to the front of the sloth's body, between where the arms will be positioned, as if it is hugging it.
Assembly
Now it's time to bring your sloth to life!
- Sew the head to the top of the body, making sure it's centered and secure.
- Position the arms so they curve inward, gently overlapping the edges of the heart. Sew them in place securely.
- Weave in all ends carefully to ensure nothing comes loose with use.
- Optional: Add a small loop of yarn at the top of the head for hanging. Simply chain 10-12 stitches, fasten off, and sew the ends to the top of the head.
And there you have it—your very own Snuggle Sloth Heart Applique! This charming piece is perfect for sewing onto a tote bag, adorning a baby blanket, or even framing as a tiny piece of art. The flat back makes it incredibly versatile, and the sweet, sleepy expression is sure to melt hearts wherever it goes.
Happy crocheting, and don't forget to share your cozy creation with fellow crafters!


