Sun-Kissed Seashell Gnome Free Pattern – Crochet a Coastal Summer Companion
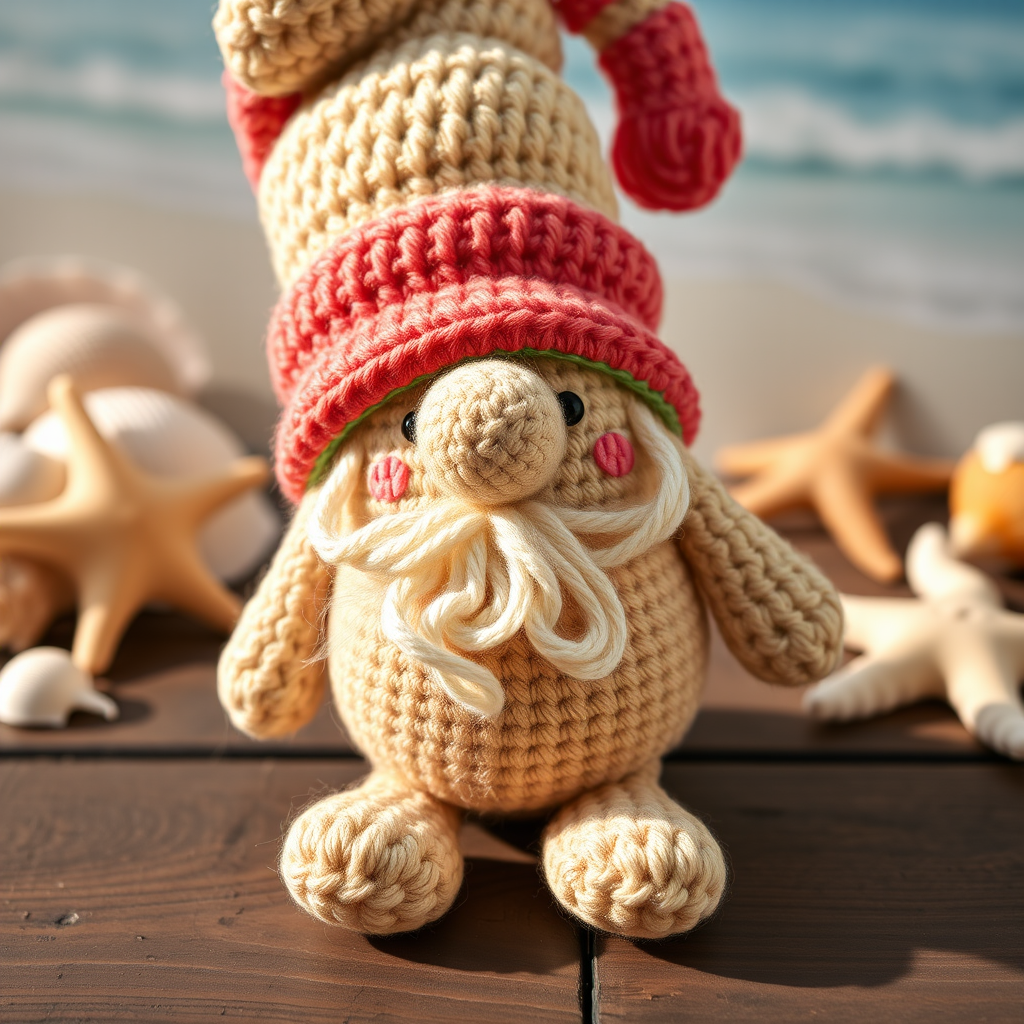
Sun-Kissed Seashell Gnome Free Pattern – Crochet a Coastal Summer Companion
Bring the beach to your living room with this adorable crochet gnome dressed in a seashell-inspired hat and sandy-toned tunic. Perfect for summer crafting, this little traveler adds a whimsical, coastal touch to any shelf or tabletop. Whether you're a seasoned crocheter or just starting your amigurumi journey, this pattern is designed to be approachable, detailed, and incredibly rewarding. Let's dive into creating your very own sun-kissed companion!
Materials Needed
Before you begin, gather the following supplies to ensure a smooth and enjoyable crafting session:
- Yarn: Worsted weight cotton yarn in the following colors:
- Sand (for body, arms, legs, and nose)
- Coral (for the hat)
- Seafoam (for the hat trim)
- White (for the beard)
- Black (for eyes and smile)
- Pink (for cheeks)
- Hook: 3.5 mm (E) crochet hook
- Stuffing: Polyester fiberfill stuffing
- Notions: Yarn needle, stitch marker, scissors
Gauge note: 4 sc x 4 rows = 1 inch. Gauge is not critical for amigurumi, but maintaining consistent tension throughout will ensure a neat, professional finish.
Abbreviations
- MR: Magic ring
- sc: Single crochet
- inc: Increase (2 sc in same stitch)
- dec: Decrease (invisible decrease)
- sl st: Slip stitch
- ch: Chain
- st(s): Stitch(es)
- rnd: Round
Step-by-Step Instructions
Head & Body (Worked in One Piece, Starting from Top of Head)
We'll begin with the head, which seamlessly transitions into the body. This creates a sturdy, well-proportioned gnome.
- Rnd 1: With Sand yarn, make a MR, work 6 sc in ring. (6 sts)
- Rnd 2: inc in each st around. (12 sts)
- Rnd 3: (sc in next st, inc) around. (18 sts)
- Rnd 4: (sc in next 2 sts, inc) around. (24 sts)
- Rnd 5: (sc in next 3 sts, inc) around. (30 sts)
- Rnd 6: (sc in next 4 sts, inc) around. (36 sts)
- Rnd 7-12: sc in each st around. (36 sts) – This forms the head height.
- Rnd 13: (sc in next 4 sts, dec) around. (30 sts)
- Rnd 14: (sc in next 3 sts, dec) around. (24 sts)
- Rnd 15: (sc in next 2 sts, dec) around. (18 sts) – Start stuffing the head firmly here.
- Rnd 16: (sc in next st, dec) around. (12 sts)
- Rnd 17: dec around. (6 sts) – Close the opening, fasten off, and weave in the end.
Body (Start from Bottom, Work Upward)
Now we'll create the plump body that gives our gnome his charming silhouette.
- Rnd 1: With Sand yarn, MR, 6 sc in ring. (6 sts)
- Rnd 2: inc in each st around. (12 sts)
- Rnd 3: (sc in next st, inc) around. (18 sts)
- Rnd 4: (sc in next 2 sts, inc) around. (24 sts)
- Rnd 5: (sc in next 3 sts, inc) around. (30 sts)
- Rnd 6-10: sc in each st around. (30 sts) – This forms the body height.
- Rnd 11: (sc in next 3 sts, dec) around. (24 sts)
- Rnd 12: (sc in next 2 sts, dec) around. (18 sts) – Stuff the body firmly.
- Rnd 13: (sc in next st, dec) around. (12 sts)
- Rnd 14: dec around. (6 sts) – Fasten off, leaving a long tail for sewing. Attach the body to the head by positioning it underneath and sewing around the edge securely.
Nose
The nose is a signature feature of any gnome. Let's make it nice and round.
- Rnd 1: With Sand yarn, MR, 6 sc in ring. (6 sts)
- Rnd 2: inc in each st around. (12 sts)
- Rnd 3-4: sc in each st around. (12 sts) – Stuff lightly.
- Rnd 5: dec around. (6 sts) – Fasten off, leaving a tail. Sew the nose to the center of the face, about 2/3 down from the top of the head.
Beard (Worked in Rows, Back and Forth)
This fluffy beard with curly edges adds character and charm. Follow carefully to create the curls.
- Row 1: With White yarn, ch 11, sc in 2nd ch from hook and in each ch across. (10 sc)
- Row 2: ch 1, turn, sc in each st across. (10 sts)
- Row 3: ch 1, turn, sc in next 2 sts, (sc, ch 2, sl st in same st) in next st – this creates a small curl, sc in next 4 sts, (sc, ch 2, sl st in same st) in next st, sc in last 2 sts. (10 sc + 2 curls)
- Row 4: ch 1, turn, sc in each st across, working 2 sc in each ch-2 space. (14 sc)
- Row 5: ch 1, turn, sc in next 3 sts, (sc, ch 2, sl st in same st) in next st, sc in next 6 sts, (sc, ch 2, sl st in same st) in next st, sc in last 3 sts. (14 sc + 2 curls)
- Row 6: ch 1, turn, sc in each st across, working 2 sc in each ch-2 space. (18 sc)
- Fasten off, leaving a long tail. Sew the beard to the face, just below the nose, curving gently around the mouth area.
Hat (Worked in Rounds, Starting from Top)
The iconic pointed hat is what makes this gnome instantly recognizable. We'll add a playful tilt later.
- Rnd 1: With Coral yarn, MR, 6 sc in ring. (6 sts)
- Rnd 2: inc in each st around. (12 sts)
- Rnd 3: (sc in next st, inc) around. (18 sts)
- Rnd 4: (sc in next 2 sts, inc) around. (24 sts)
- Rnd 5: (sc in next 3 sts, inc) around. (30 sts)
- Rnd 6-10: sc in each st around. (30 sts) – This forms the hat height.
- Rnd 11: (sc in next 3 sts, dec) around. (24 sts)
- Rnd 12: (sc in next 2 sts, dec) around. (18 sts)
- Rnd 13: (sc in next st, dec) around. (12 sts) – Stuff the hat lightly.
- Rnd 14: dec around. (6 sts) – Fasten off, leaving a long tail. Sew the hat to the top of the head, slightly tilted to one side for a playful look.
Hat Trim (Worked in Rounds)
The seafoam trim adds a lovely coastal contrast to the coral hat.
- With Seafoam yarn, ch 24, sl st to the first ch to form a ring.
- Rnd 1: ch 1, sc in each ch around. (24 sts)
- Rnd 2: (sc in next 3 sts, inc) around. (30 sts)
- Rnd 3: sc in each st around. (30 sts)
- Fasten off, leaving a long tail. Sew the trim around the base of the hat, just above the brim.
Arms (Make 2)
Short and stubby arms complete the cute, chubby look.
- Rnd 1: With Sand yarn, MR, 6 sc in ring. (6 sts)
- Rnd 2: (sc in next st, inc) around. (9 sts)
- Rnd 3-6: sc in each st around. (9 sts) – Stuff lightly.
- Rnd 7: dec, sc in next 7 sts. (8 sts)
- Rnd 8: sc in each st around. (8 sts) – Fasten off, leaving a tail. Sew the arms to the sides of the body, just below the neck.
Legs (Make 2)
These little legs will help your gnome sit or stand proudly.
- Rnd 1: With Sand yarn, MR, 6 sc in ring. (6 sts)
- Rnd 2: inc in each st around. (12 sts)
- Rnd 3-4: sc in each st around. (12 sts) – Stuff lightly.
- Rnd 5: dec around. (6 sts) – Fasten off, leaving a tail. Sew the legs to the bottom of the body, spaced slightly apart for stability.
Face Details
Now for the finishing touches that bring your gnome to life!
- Eyes: With Black yarn, embroider two small eyes (French knots or satin stitches) above the nose.
- Cheeks: With Pink yarn, embroider two small circles for cheeks on either side of the nose.
- Smile: With Black yarn, embroider a small smile below the nose.
Finishing
Weave in all ends carefully to ensure a clean finish. For an extra coastal flair, optionally add a small seashell charm or a tiny starfish to the hat. Your Sun-Kissed Seashell Gnome is now ready to brighten your shelf, tabletop, or gift for a loved one. Enjoy your handmade summer companion!


