The Aurora Dune Throw Pillow Free Pattern – A Knitted Textured Cushion with Woven Stripes
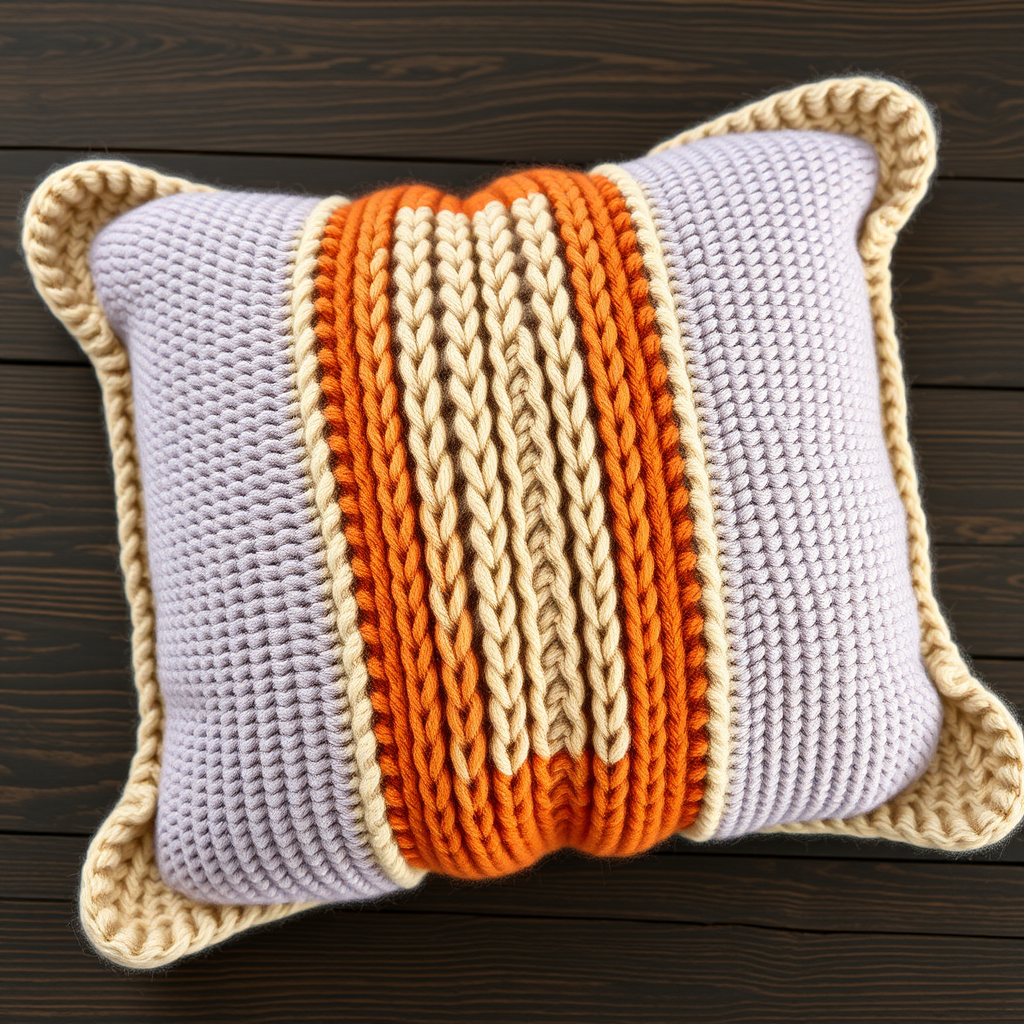
The Aurora Dune Throw Pillow Free Pattern – A Knitted Textured Cushion with Woven Stripes
Bring the serene beauty of desert dunes at twilight into your living space with this richly textured knitted pillow cover. The interplay of soft cables and woven stripes creates a tactile, modern heirloom piece that will elevate any room. Whether you're an experienced knitter looking for a satisfying project or a confident beginner ready to tackle cables, this pattern offers a rewarding journey with stunning results. The Aurora Dune pillow combines warm, earthy tones with sophisticated texture, making it a perfect accent for sofas, armchairs, or beds.
This pattern is designed to be approachable while still delivering that "wow" factor. The front panel features a beautiful cable pattern that mimics rolling sand dunes, while the back uses a simple envelope closure for a clean, professional finish. With three complementary colors that evoke a desert sunset—warm sand, twilight lavender, and glowing ember—this pillow will become a cherished piece in your home decor collection.
Materials Needed
Before you begin, gather the following materials to ensure a smooth knitting experience:
Yarn
- Color A (Dune Sand – warm beige): Approximately 300 yards of worsted weight yarn
- Color B (Twilight Sky – dusty lavender): Approximately 300 yards of worsted weight yarn
- Color C (Ember Glow – burnt orange): Approximately 300 yards of worsted weight yarn
Note: Any high-quality worsted weight yarn will work beautifully. Look for yarns with good stitch definition to showcase the cable work, such as wool or wool-blend yarns.
Needles and Tools
- US 7 (4.5 mm) knitting needles (straight or circular, whichever you prefer)
- Cable needle
- Tapestry needle for weaving in ends and seaming
- Stitch markers (optional, but helpful for keeping track of pattern repeats)
- Scissors
- Measuring tape
Additional Supplies
- 16x16 inch pillow form (for the finished cover)
Gauge
18 stitches and 24 rows = 4 inches in stockinette stitch
Always take time to check your gauge before starting. If your gauge is off, adjust your needle size accordingly. A proper gauge ensures your pillow cover will fit the 16x16 inch pillow form perfectly.
Step-by-Step Instructions
This pillow cover is knitted flat in one piece and seamed, with a simple envelope closure on the back. Follow these detailed instructions carefully, and you'll have a beautiful, professional-looking pillow in no time.
Panel 1 (Front – Textured Dune)
Setup: With Color A (Dune Sand), cast on 80 stitches using your preferred method. A long-tail cast-on works well for this project.
Garter Stitch Border:
Rows 1-6: Work in garter stitch (knit all stitches on both right and wrong sides). This creates a neat, non-curling border at the bottom of your pillow.
Cable Pattern Begins:
Row 7 (Right side): Knit 4, *purl 2, knit 6, purl 2, knit 4; repeat from * to end of row. This establishes the cable pattern repeat.
Row 8 (Wrong side): Purl 4, *knit 2, purl 6, knit 2, purl 4; repeat from * to end of row. This row creates the reverse side of the pattern, maintaining the ribbed texture around the cables.
Row 9 (Right side – Cable row): Knit 4, *purl 2, slip next 3 stitches to cable needle and hold in front, knit next 3 stitches, then knit the 3 stitches from the cable needle, purl 2, knit 4; repeat from * to end of row. This creates the cable twist that forms the "dune" texture. Holding the stitches in front creates a cable that leans to the left.
Row 10 (Wrong side): Repeat Row 8.
Rows 11-14: Repeat Rows 7 and 8 twice. This completes one full cable pattern repeat (Rows 7-14).
Continue the Pattern: Repeat Rows 7-14 until the piece measures 12 inches from the cast-on edge, ending with a wrong-side row. This ensures you're ready to switch colors on a right-side row for a clean transition.
Color Transition – Twilight Sky Section:
Switch to Color B (Twilight Sky – dusty lavender). Work in stockinette stitch (knit on right side, purl on wrong side) for 2 inches. This smooth, flat section provides a beautiful contrast to the textured cable work.
Ember Glow Stripe:
Switch to Color C (Ember Glow – burnt orange). Work in garter stitch for 1 inch. The garter stitch creates a raised, bumpy texture that adds visual interest and a bold pop of color.
Return to Twilight Sky:
Switch back to Color B (Twilight Sky). Work in stockinette stitch for 2 inches. This mirrors the earlier stockinette section, creating a balanced, symmetrical design.
Final Cable Section:
Switch back to Color A (Dune Sand). Repeat the cable pattern (Rows 7-14) until the piece measures 20 inches total from the cast-on edge. End with a wrong-side row to prepare for the finishing border.
Garter Stitch Border:
Work 6 rows of garter stitch (knit all stitches). This mirrors the bottom border and creates a finished edge at the top of the front panel.
Bind Off: Bind off all stitches loosely. Weave in all loose ends with your tapestry needle.
Panel 2 (Back – Envelope Closure)
Setup: With Color A (Dune Sand), cast on 80 stitches.
Main Body: Work in stockinette stitch (knit on right side, purl on wrong side) for 10 inches. This creates the main body of the back panel.
Creating the Envelope Opening:
At the beginning of the next two rows, bind off 20 stitches each. This leaves 40 stitches on your needle. This step creates the overlapping flap that will form the envelope closure.
Continue the Flap: Continue in stockinette stitch on these remaining 40 stitches for 8 inches. This extended flap will overlap the front panel, creating the envelope opening for inserting the pillow form.
Bind Off: Bind off all stitches loosely. Weave in all loose ends.
Finishing and Assembly
Step 1 – Prepare the Panels: Lay the front panel flat with the right side facing up. Ensure the cable pattern is centered and the garter stitch borders are at the top and bottom.
Step 2 – Position the Back Panel: Place the back panel on top of the front panel, right side down (wrong sides together). Align the cast-on edge of the back panel with the bottom edge of the front panel. The bound-off edge of the back panel (with the 40-stitch flap) will overlap the top of the front panel, creating the envelope opening.
Step 3 – Seam the Sides and Bottom: Using your tapestry needle and a length of Color A yarn, sew the side seams and the bottom seam together. Use a mattress stitch or whip stitch for a neat, invisible seam. Be sure to sew through both layers securely.
Step 4 – Turn Right Side Out: Carefully turn the pillow cover right side out through the envelope opening. Gently push out the corners for a crisp, professional look.
Step 5 – Insert the Pillow Form: Insert a 16x16 inch pillow form through the envelope opening. Adjust the pillow form so it sits evenly inside the cover.
Step 6 – Final Adjustments: Smooth out any wrinkles and ensure the cable pattern is centered on the front. The envelope flap should lie flat against the back, creating a clean, finished appearance.
Tips for Success
- Count Your Stitches: The cable pattern repeat is 18 stitches (4 knit + 2 purl + 6 knit + 2 purl + 4 knit). With 80 stitches, you'll have 4 full repeats plus 8 extra stitches (4 at each edge). This creates a balanced, symmetrical design.
- Use Stitch Markers: Place markers between pattern repeats to help you keep track of where you are in the cable sequence.
- Keep Your Tension Even: When working cables, be careful not to pull too tightly on the cable needle stitches. This will keep your cables looking smooth and defined.
- Block Your Panels: Before seaming, consider blocking your panels to even out the stitches and ensure accurate measurements. This will make the final assembly much easier.
- Weave in Ends as You Go: When switching colors, weave in the ends immediately to avoid a tangled mess at the end of your project.
Your Aurora Dune Throw Pillow is now complete! This beautiful, textured piece will add warmth and sophistication to any space. The combination of cables, stockinette, and garter stitch creates a visually stunning design that's both modern and timeless. Enjoy your new handcrafted home decor, and don't be surprised if it becomes your new favorite knitting project to gift to friends and family!


