The Creamy Gnome Hanging Towel Free Pattern – A Knitted Nordic Kitchen Companion
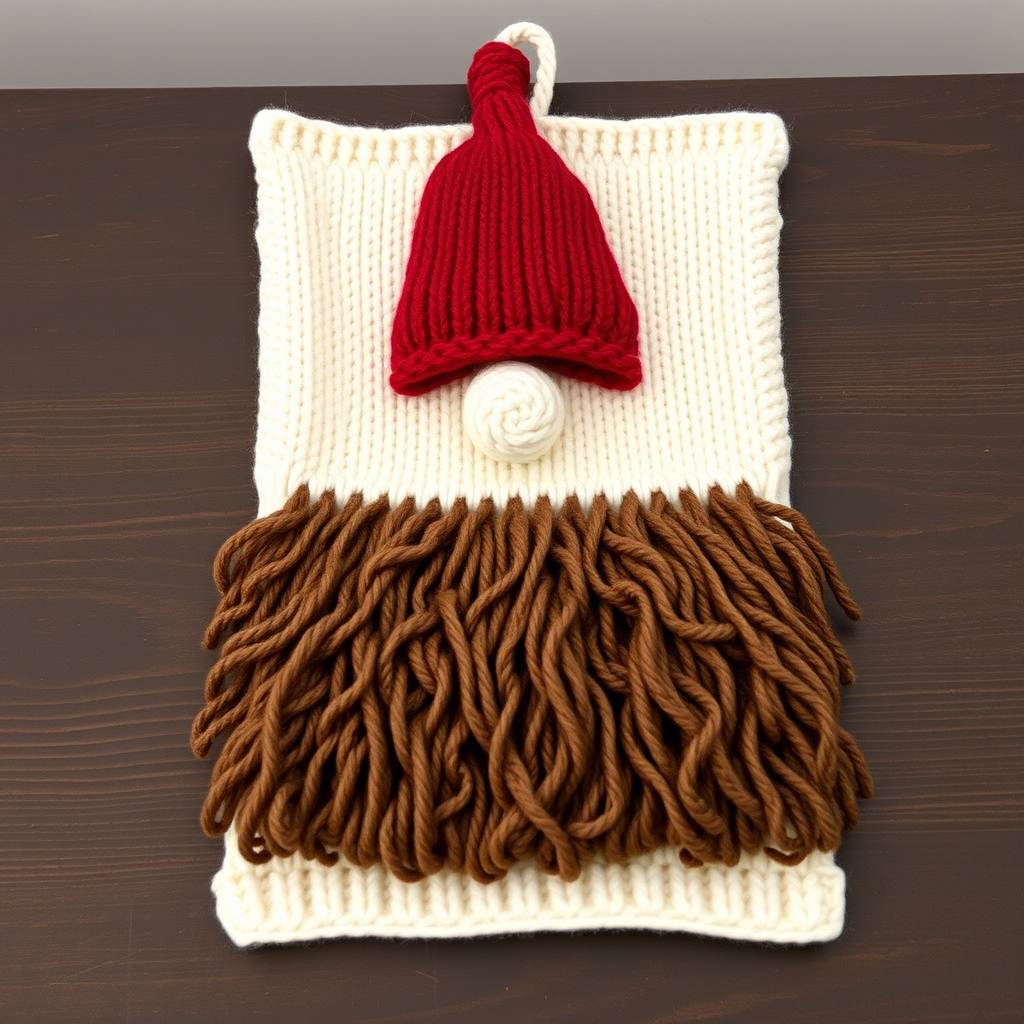
The Creamy Gnome Hanging Towel: A Free Knitted Nordic Kitchen Companion
Bring a touch of whimsy to your kitchen with this charming knitted gnome towel, complete with a textured beard and a cozy hanging loop. This quick and satisfying project adds rustic Nordic charm to any home. Whether you're a seasoned knitter or a curious beginner, this pattern is designed to be approachable, rewarding, and utterly delightful. The combination of a soft cream body, a fluffy brown beard, and a cheerful red hat creates a functional piece of art that will make you smile every time you reach for it.
This pattern is perfect for using up small amounts of worsted weight cotton yarn from your stash, and the result is a sturdy, absorbent towel that's as beautiful as it is practical. The textured beard is created with a simple combination of knit and purl stitches, giving it a dimensional, fluffy look that mimics a gnome's iconic facial hair. Let's dive into this enchanting project!
Materials Needed
Before you begin, gather the following materials. Having everything ready will make your knitting experience smooth and enjoyable.
Yarn
- Main Color (MC) – Cream: Worsted weight cotton yarn. You'll need approximately 100g for the towel body and hanging loop.
- Contrast Color 1 (CC1) – Soft Brown: Worsted weight cotton yarn. Approximately 50g for the gnome's beard.
- Contrast Color 2 (CC2) – Warm Red: Worsted weight cotton yarn. Approximately 50g for the gnome's hat.
Total yarn needed: approximately 200g.
Needles & Notions
- Knitting Needles: US Size 6 (4.0 mm) knitting needles. Straight needles are perfect for this flat-knit project.
- Tapestry Needle: For weaving in ends and sewing the hanging loop.
- Scissors: For cutting yarn.
- Stitch Markers (optional): Helpful for keeping track of rows, though not strictly necessary.
Gauge
20 stitches and 26 rows = 4 inches in stockinette stitch. It's always a good idea to knit a small swatch to check your gauge, but for a towel, slight variations won't ruin the project. Just aim for a fabric that's firm but not stiff.
Step-by-Step Instructions
This pattern is worked flat from the top down. The towel features a garter stitch border, a stockinette body, and a textured beard section using a combination of knit and purl stitches. Follow along carefully, and you'll have a beautiful gnome towel in no time.
Abbreviations
- K: Knit
- P: Purl
- K2tog: Knit two together (decrease)
- Kfb: Knit into front and back of stitch (increase)
- St(s): Stitch(es)
- MC: Main color (cream)
- CC1: Contrast color 1 (brown)
- CC2: Contrast color 2 (red)
Hanging Loop
We'll start with the hanging loop, which is a simple garter stitch strip.
- With MC (cream), cast on 10 stitches.
- Row 1: Knit all stitches.
- Row 2: Knit all stitches.
- Repeat Rows 1-2 until the loop measures 6 inches from the cast-on edge. This will create a sturdy, stretchy loop.
- Bind off all stitches loosely. Cut the yarn, leaving a 6-inch tail for sewing. Set this piece aside.
Towel Body
Now we'll create the main body of the towel in a soothing stockinette stitch.
- With MC (cream), cast on 40 stitches.
- Rows 1-6: Knit all stitches. This creates a neat garter stitch border at the top of the towel.
- Row 7 (Right side): Knit all stitches.
- Row 8 (Wrong side): Purl all stitches.
- Repeat Rows 7-8 until the towel measures 12 inches from the cast-on edge, ending with a wrong-side row (a purl row). This means your last row should be a purl row, so you're ready to start the beard on a right-side row.
Beard Section
This is where the magic happens! We'll switch to the brown yarn and create the gnome's textured beard.
- Switch to CC1 (brown).
- Row 1 (Right side): With CC1, knit all stitches.
- Row 2 (Wrong side): Purl all stitches.
- Row 3: K1, *K1, P1* repeat from * to * until the last stitch, K1. This creates a seed stitch texture.
- Row 4: K1, *P1, K1* repeat from * to * until the last stitch, K1. This alternates the seed stitch pattern.
- Row 5: Knit all stitches.
- Row 6: Purl all stitches.
- Row 7 (Decrease row): K1, *K2tog, K1* repeat from * to * until the last stitch, K1. You will now have 27 stitches on your needle.
- Row 8: Purl all stitches.
- Row 9 (Decrease row): K1, *K2tog* repeat from * to * until the last stitch, K1. You will now have 14 stitches on your needle.
- Row 10: Purl all stitches.
- Cut CC1, leaving a long tail (about 12 inches). Thread the tail through a tapestry needle, then thread it through the remaining 14 stitches on your knitting needle. Slide the stitches off the needle, pull the tail tight to gather the bottom of the beard, and secure with a knot. Weave in the end.
Gnome Hat
Time for the iconic red hat! We'll pick up stitches along the top edge of the beard and shape the hat with increases and decreases.
- With CC2 (red), pick up and knit 14 stitches along the top edge of the beard section. This is the bound-off edge of the towel body where the beard begins. Insert your needle into the edge stitches and knit them up.
- Row 1 (Wrong side): Purl all stitches.
- Row 2 (Right side, increase row): K1, *Kfb, K1* repeat from * to * until the last stitch, K1. You will now have 20 stitches.
- Row 3: Purl all stitches.
- Row 4 (Increase row): K1, *Kfb, K2* repeat from * to * until the last stitch, K1. You will now have 26 stitches.
- Row 5: Purl all stitches.
- Row 6: Knit all stitches.
- Row 7: Purl all stitches.
- Row 8 (Decrease row): K1, *K2tog, K2* repeat from * to * until the last stitch, K1. You will now have 20 stitches.
- Row 9: Purl all stitches.
- Row 10 (Decrease row): K1, *K2tog, K1* repeat from * to * until the last stitch, K1. You will now have 14 stitches.
- Row 11: Purl all stitches.
- Row 12 (Decrease row): K1, *K2tog* repeat from * to * until the last stitch, K1. You will now have 8 stitches.
- Cut CC2, leaving a long tail (about 12 inches). Thread the tail through a tapestry needle, then thread it through the remaining 8 stitches on your knitting needle. Slide the stitches off the needle, pull the tail tight to close the top of the hat, and secure with a knot. Do not weave in this end yet—you'll use it to attach the pompom.
Finishing
Almost done! Just a few final touches to bring your gnome to life.
- Weave in all loose ends: Use your tapestry needle to weave in any remaining yarn tails from the color changes and cast-on edges. Be sure to weave them in securely on the wrong side of the towel.
- Attach the hanging loop: Fold the hanging loop in half so the ends meet. Position the loop at the top center of the towel body (the cast-on edge). Sew the ends of the loop securely to the towel using the tail you left earlier. Make sure it's centered and firmly attached.
- Add a pompom (optional but adorable): Using CC2 (red), create a small pompom. You can use a pompom maker, a piece of cardboard, or even a fork for a tiny pompom. Once your pompom is made, use the tail from the top of the hat to sew it securely to the tip. Fluff the pompom and trim any uneven strands.
And there you have it—a charming, handmade Creamy Gnome Hanging Towel! This project is a wonderful way to add a personal, rustic touch to your kitchen or to give as a heartfelt handmade gift. The combination of textures and the cheerful gnome design make it a truly special piece. Enjoy your new kitchen companion, and happy knitting!


