Whispering Willow Hooded Baby Cardigan Free Pattern – Knit a Soft Forest Dream
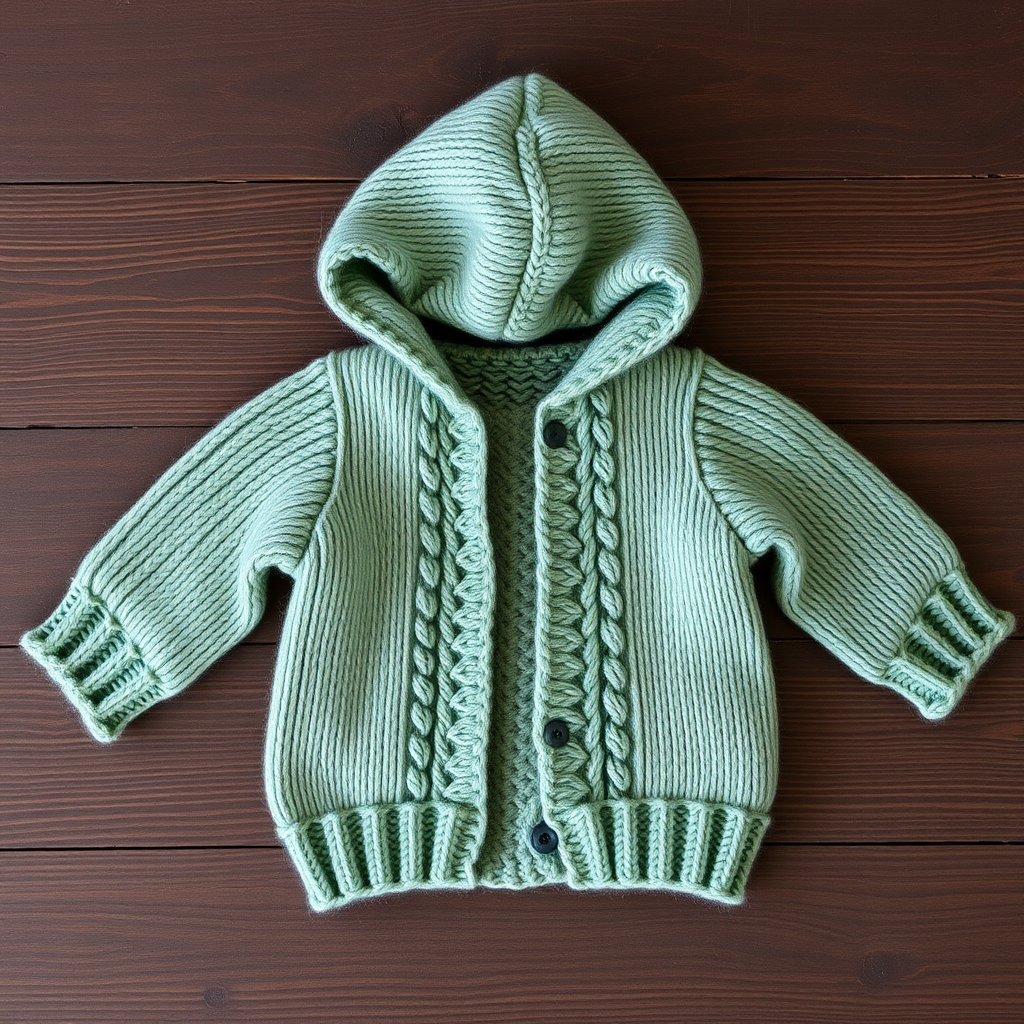
Whispering Willow Hooded Baby Cardigan – Free Knitting Pattern
Wrap your little one in the gentle embrace of the Whispering Willow, a hooded cardigan knitted with a delicate leaf lace pattern that cascades down the back. This heirloom-quality design combines cozy warmth with a touch of woodland magic, perfect for autumn strolls and snuggly naps. The soft forest green color evokes a peaceful woodland atmosphere, and the classic baby cardigan shape with a rounded hem and soft, drapey feel makes it a timeless addition to any baby's wardrobe.
Whether you're a seasoned knitter looking for a new challenge or a beginner ready to tackle your first garment, this pattern is designed to guide you through every step with clarity and ease. The result is a beautiful, functional piece that will be treasured for years to come.
Materials Needed
Before you begin, gather the following materials to ensure a smooth knitting experience:
- Yarn: DK weight (light worsted) yarn in a soft forest green (e.g., Cascade 220 Superwash in 'Spruce') – 400 (450, 500) yards for sizes 0-3 (3-6, 6-12) months
- Needles: US 6 (4.0 mm) circular needles 24-inch or longer, plus a set of double-pointed needles for sleeves (or use magic loop)
- Gauge: 22 stitches and 30 rows = 4 inches in stockinette stitch, after blocking
- Notions: Stitch markers, tapestry needle for weaving in ends, buttons (5-6 for the button band), scissors
Sizes and Measurements
This pattern is available in three sizes to fit growing babies:
- 0-3 months: Finished chest 16 inches
- 3-6 months: Finished chest 18 inches
- 6-12 months: Finished chest 20 inches
Yardage requirements are listed above for each size. The cardigan is designed with a relaxed, cozy fit, perfect for layering over onesies or light clothing.
Abbreviations
Familiarize yourself with these standard knitting abbreviations before starting:
- k = knit
- p = purl
- k2tog = knit two together (right-leaning decrease)
- ssk = slip slip knit (left-leaning decrease)
- yo = yarn over (increase creating an eyelet)
- pm = place marker
- sm = slip marker
- st(s) = stitch(es)
- RS = right side
- WS = wrong side
Special Stitch – Leaf Lace Panel
The signature leaf lace panel is worked over 12 stitches and creates the beautiful botanical motif that runs down the back and along the front edges. Follow this chart carefully, repeating rows 1-12 as needed:
Leaf Lace Panel (worked over 12 sts):
Row 1 (RS): k2, yo, ssk, k4, k2tog, yo, k2
Row 2 and all WS rows: purl all sts
Row 3: k3, yo, ssk, k2, k2tog, yo, k3
Row 5: k4, yo, ssk, k2tog, yo, k4
Row 7: k3, k2tog, yo, k2, yo, ssk, k3
Row 9: k2, k2tog, yo, k4, yo, ssk, k2
Row 11: k1, k2tog, yo, k6, yo, ssk, k1
Row 12: purl all sts
Tip: Place a marker on each side of the leaf panel to help you keep track of where the pattern begins and ends.
Step-by-Step Instructions
Body (Worked in One Piece to Armholes)
Step 1: Cast on 132 (148, 164) stitches using the long-tail cast-on method. Work in garter stitch (knit every row) for 6 rows. This creates a sturdy, non-rolling edge for the bottom of the cardigan.
Step 2: On the next row (RS), set up the pattern as follows:
k5 (button band), pm, work leaf lace panel over next 12 sts, pm, k98 (114, 130) sts in stockinette, pm, work leaf lace panel over next 12 sts, pm, k5 (button band).
Step 3: Continue in this pattern, keeping the 5 edge stitches in garter stitch (knit every row) and the leaf panels as charted. Work the center section in stockinette stitch (knit on RS, purl on WS). Continue until the piece measures 6 (7, 8) inches from the cast-on edge, ending with a wrong-side row.
Divide for Armholes
Step 4: On the next row (RS), work 32 (36, 40) stitches (right front), bind off 6 stitches, work 56 (64, 72) stitches (back), bind off 6 stitches, work 32 (36, 40) stitches (left front). Place each section on separate stitch holders or waste yarn.
Back
Step 5: Continue working the back section in stockinette stitch, with the leaf panel in the center if desired (or simply work in stockinette for a cleaner look). Work until the armhole measures 4 (4.5, 5) inches from the divide.
Step 6: Shape the shoulders: bind off 8 (9, 10) stitches at the beginning of the next 4 rows. Bind off the remaining 24 (28, 32) stitches for the neck.
Right Front
Step 7: With the RS facing, rejoin yarn to the right front section. Work in pattern (keeping the 5-stitch button band in garter stitch) until the armhole measures 3.5 (4, 4.5) inches, ending at the neck edge (the edge closest to the center of the cardigan).
Step 8: Shape the neck: bind off 6 stitches at the neck edge once, then bind off 2 stitches at the neck edge every other row 2 times, then decrease 1 stitch at the neck edge every other row 2 times (using k2tog on RS rows).
Step 9: Work even until the armhole matches the back. Shape the shoulder: bind off 8 (9, 10) stitches at the armhole edge twice.
Left Front
Step 10: Work as for the right front, but mirror the shaping. The neck edge is at the end of RS rows. Use ssk for decreases at the neck edge to maintain symmetry.
Sleeves (Make 2)
Step 11: Cast on 36 (40, 44) stitches. Work in garter stitch for 4 rows. Switch to stockinette stitch.
Step 12: Increase 1 stitch at each edge every 6 rows until you have 48 (54, 60) stitches. To increase, use the bar increase (kfb) or make-one (M1) method for a clean edge.
Step 13: Work even until the sleeve measures 6 (7, 8) inches from the cast-on edge. Bind off all stitches loosely.
Hood
Step 14: With the RS facing, pick up and knit 20 (22, 24) stitches from the right front neck, 24 (28, 32) stitches from the back neck, and 20 (22, 24) stitches from the left front neck. Total: 64 (72, 80) stitches.
Step 15: Work in stockinette stitch with a garter stitch edge (first and last 3 stitches knit every row) until the hood measures 6 (7, 8) inches from the pick-up row.
Step 16: Fold the hood in half and graft the top seam using the Kitchener stitch for an invisible, seamless finish.
Finishing
Step 17: Sew the sleeve seams and set the sleeves into the armholes. Use a mattress stitch for invisible seams.
Step 18: Sew buttons on the left front band. If you made buttonholes on the right band, position buttons accordingly. For a double-breasted look, sew buttons on both sides.
Step 19: Weave in all ends with a tapestry needle. Block gently to shape, following the yarn's care instructions. Lay flat to dry.
Tips for Success
- Gauge matters: Always knit a gauge swatch before starting. Adjust needle size if needed to match the specified gauge.
- Markers are your friend: Use stitch markers liberally to keep track of the leaf panels and button bands.
- Count your stitches: After each leaf lace repeat, count your stitches to ensure you haven't accidentally dropped or added any.
- Blocking transforms: Don't skip blocking! It evens out the lace pattern and gives the cardigan a professional finish.
Your Whispering Willow Hooded Baby Cardigan is now complete! This heirloom-quality piece will keep your little one cozy and stylish, whether for a woodland stroll or a quiet afternoon nap. The delicate leaf lace pattern and soft forest green color make it a timeless treasure that can be passed down through generations.
Happy knitting, and may your needles whisper sweet stitches!


