Cream Maple Flat Fish Free Pattern: Overlay Crochet Dog Toy
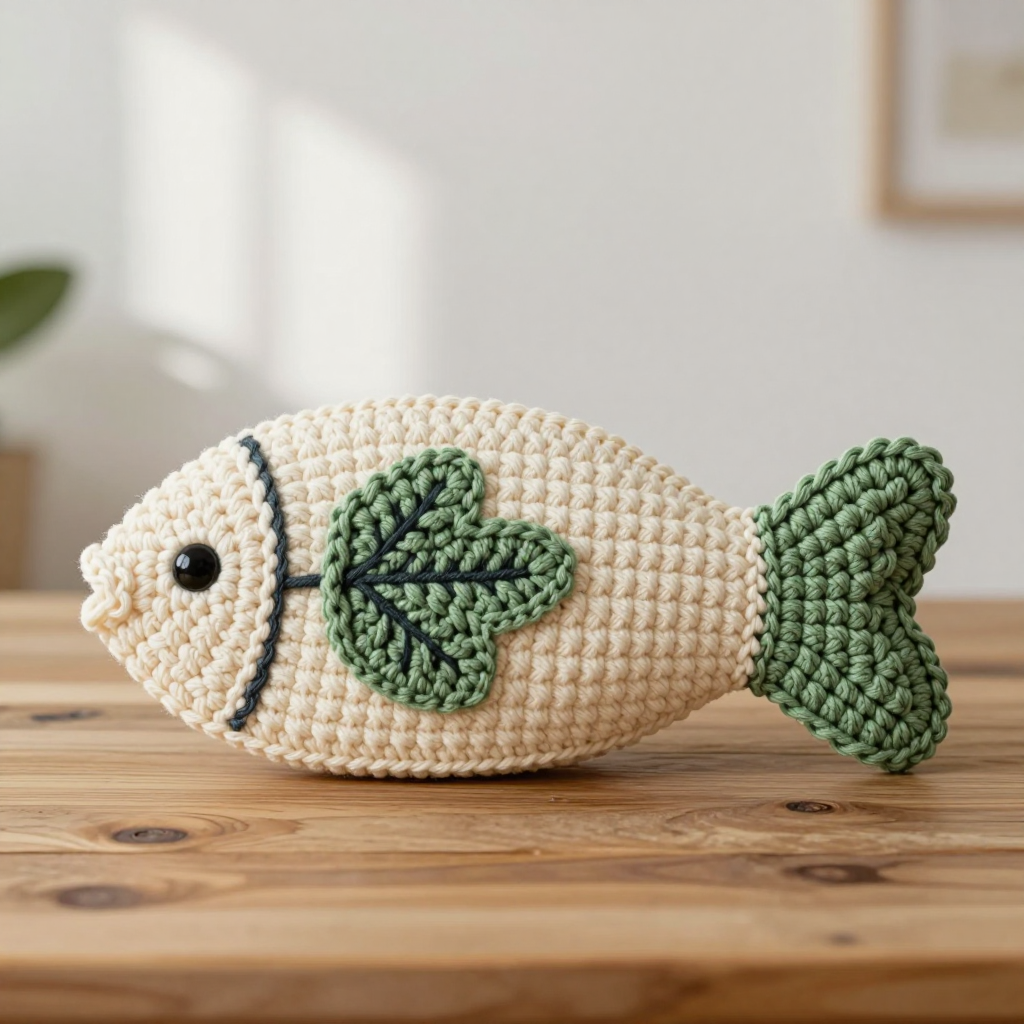
Cream Maple Flat Fish: Overlay Crochet Dog Toy (Free Beginner Pattern)
Introduction
If you have never held a crochet hook before, this Cream Maple Flat Fish is the perfect very first project to make with your own hands. It is a soft, flat oval fish worked in simple single crochet rows, lightly stuffed so it stays floppy and easy for a medium dog to carry, and finished with a cream maple-leaf overlay on one side and a sage green fan-shaped tail fin. The finished toy looks rustic and cozy, like a little autumn leaf that swam away, and it feels gentle and squishy in your palm. There are no plastic eyes, buttons, or beads anywhere on it, so it is safe for fetching and gentle chewing. Every single step is written out below, one row at a time, so you can follow along even if you have never made a stitch in your life.
Materials Needed
- Yarn: Worsted-weight (also called medium, weight category 4) cotton yarn, approximately 100 yd / 92 m total:
- 60 yd cream (MC = main color)
- 30 yd sage green (CC1 = contrast color 1)
- 10 yd dark sage or olive (CC2 = contrast color 2) for the leaf stem and veins
- Crochet hook: US G-6 / 4.0 mm
- Stitch marker (one is enough; a safety pin or a scrap of contrasting yarn works too)
- Tapestry needle (a large, blunt-tipped sewing needle with an eye big enough for yarn)
- Scissors
- Stuffing: a small handful of polyester fiberfill or cotton stuffing (you will stuff it lightly, not firmly)
- Finished size: approx. 9 in / 23 cm long x 4.5 in / 11.5 cm wide (body), with the tail fin extending to approx. 11 in / 28 cm total length
Abbreviations and Beginner Glossary
Every abbreviation used in this pattern is listed here in plain English. Read this section once before you begin and come back to it any time a term feels unfamiliar.
- ch – chain. Make a loop with the yarn, then pull a new loop through it. Each loop you pull through counts as one chain. Chains are the foundation you build on.
- sc – single crochet. Insert your hook into the stitch, wrap the yarn over the hook, pull up a loop (you now have 2 loops on the hook), wrap the yarn over again, and pull it through both loops. That is one single crochet.
- sl st – slip stitch. Insert your hook into the stitch, wrap the yarn over, and pull it through both the stitch and the loop on your hook in one motion. It makes a nearly invisible joining stitch.
- sc2tog – single crochet 2 together (a decrease). Insert your hook into the first stitch, pull up a loop, insert your hook into the next stitch, pull up a loop (3 loops on hook), wrap the yarn over, and pull through all 3 loops. Two stitches become one, which makes the piece narrower.
- 2 sc in next st – work two single crochets into the same stitch. This is an increase and makes the piece wider.
- st(s) – stitch(es).
- sk – skip. Leave that stitch unworked and move to the next one.
- sp – space. The gap between stitches.
- FO – fasten off. Cut the yarn a few inches from your work, pull the tail all the way through the last loop, and tug gently so it locks in place.
- turn – flip your work over so you can work back across the row you just made.
- MC / CC1 / CC2 – main color (cream) / contrast color 1 (sage green) / contrast color 2 (dark sage or olive).
- whipstitch – a simple sewing stitch: bring the needle up through both layers, over the edge, and back down, repeating in small even stitches.
Gauge
Gauge: 16 sc x 18 rows = 4 in / 10 cm in single crochet, worked flat and lightly stretched.
Gauge means how many stitches and rows fit into a set measurement. It matters because if your stitches are much bigger or smaller than the pattern expects, your fish will come out longer or shorter than the finished size listed above. To check your gauge, crochet a small square about 5 in / 13 cm wide in single crochet, lay it flat, and measure 4 in / 10 cm across the middle. Count how many stitches fit in that 4 inches and how many rows fit in 4 inches vertically. If you have more stitches than 16, your stitches are tight, so try a larger hook. If you have fewer, your stitches are loose, so try a smaller hook. A gauge swatch is not wasted time; it is a tiny practice piece that teaches your hands the stitch before the real project begins.
Beginner Tips Before You Start
- Count every row. Single crochet rows are easy to lose track of. Keep a scrap of paper and tick off each row number as you finish it.
- Do not pull the yarn too tight. Hold the yarn with a relaxed hand. Tight stitches make a stiff, hard toy that is difficult to stuff and unpleasant for a dog to carry.
- Use the stitch marker. Place it in the first stitch of a row so you always know where the row begins and ends. Move it up each row as you go.
- Work the turning chain correctly. The "ch 1" at the start of each row is not a stitch. Do not work into it on the way back, or your fish will grow wider on one side.
- Keep your two body halves the same size. Lay the first half flat on the table and compare the second half to it as you go. Matching halves make a neat oval.
- Stuff lightly. This is a flat, floppy fetch toy. A small handful is plenty; overstuffing makes it lumpy and heavy.
Step-by-Step Instructions
Body (make 2 identical halves, cream MC)
Each half is a flat, leaf-shaped piece worked back and forth in rows. You will make two, then join them into one oval.
Row 1: Ch 2, work 3 sc in the 2nd ch from hook. Turn. (3 sc)
Row 2: Ch 1, 2 sc in each st across. Turn. (6 sc)
Row 3: Ch 1, sc in each st across. Turn. (6 sc)
Row 4: Ch 1, 2 sc in first st, sc in each st to last st, 2 sc in last st. Turn. (8 sc)
Row 5: Ch 1, sc in each st across. Turn. (8 sc)
Row 6: Ch 1, 2 sc in first st, sc in each st to last st, 2 sc in last st. Turn. (10 sc)
Rows 7–14: Ch 1, sc in each st across. Turn. (10 sc)
Row 15: Ch 1, sc2tog, sc in each st to last 2 sts, sc2tog. Turn. (8 sc)
Row 16: Ch 1, sc in each st across. Turn. (8 sc)
Row 17: Ch 1, sc2tog, sc in each st to last 2 sts, sc2tog. Turn. (6 sc)
Row 18: Ch 1, sc in each st across. Turn. (6 sc)
Row 19: Ch 1, sc2tog, sc in each st to last 2 sts, sc2tog. Turn. (4 sc)
Row 20: Ch 1, sc in each st across. Turn. (4 sc)
Row 21: Ch 1, sc2tog twice. Turn. (2 sc)
Row 22: Ch 1, sc2tog. FO. (1 sc)
This completes one half of the oval. Make a second identical half (Rows 1–22 again). Do not fasten off the second half. Instead, hold the two halves together with the right sides facing out and join them along the center with sl st, working through both layers all the way around the edge to create one flat oval body. Before you close the last few inches, lightly stuff the body through the small opening, then finish joining. Weave in ends.
Tail Fin (sage green CC1)
Worked flat and attached to the narrow end of the body (the end that finishes with 2 sc).
Row 1: With CC1, join yarn at the narrow end of the body. Ch 1, work 6 sc evenly across the end edge. Turn. (6 sc)
Row 2: Ch 1, 2 sc in first st, sc in each st to last st, 2 sc in last st. Turn. (8 sc)
Row 3: Ch 1, sc in each st across. Turn. (8 sc)
Row 4: Ch 1, sc2tog, sc in each st to last 2 sts, sc2tog. Turn. (6 sc)
Row 5: Ch 1, sc2tog, sc in each st to last 2 sts, sc2tog. Turn. (4 sc)
Row 6: Ch 1, sc2tog twice. FO. (2 sc)
Weave in ends. The tail fin should form a small fan shape extending from the body.
Maple Leaf Overlay (cream MC with dark sage CC2 detail)
The leaf is a separate motif that you will sew onto one side of the body.
Leaf (make 1 with MC): Ch 10.
Row 1: Sc in 2nd ch from hook, sc in next 2 ch, 2 sc in next ch, sc in next 2 ch, 2 sc in next ch, sc in last 2 ch. Turn. (11 sc)
Row 2: Ch 1, sc in each st across. Turn. (11 sc)
Row 3: Ch 1, sc2tog, sc in next 3 sts, 2 sc in next st, sc in next 3 sts, sc2tog. Turn. (11 sc)
Row 4: Ch 1, sc in each st across. Turn. (11 sc)
Row 5: Ch 1, sc2tog, sc in next 2 sts, 2 sc in next st, sc in next st, 2 sc in next st, sc in next 2 sts, sc2tog. Turn. (11 sc)
Row 6: Ch 1, sc in each st across. Turn. (11 sc)
Row 7: Ch 1, sc2tog, sc in next st, 2 sc in next st, sc in next 3 sts, 2 sc in next st, sc in next st, sc2tog. Turn. (11 sc)
Row 8: Ch 1, sc in each st across. FO, leaving a long tail for sewing. (11 sc)
Leaf stem (CC2): Ch 6, sl st in 2nd ch from hook and in each ch across. FO, leaving a tail. Sew the stem to the bottom center of the leaf.
Leaf veins (CC2): Using a tapestry needle and CC2, embroider 3 short straight stitches radiating from the stem up into the leaf to suggest veins. Keep them loose so they do not pull the fabric.
Assembly and Finishing
Step 1 – Stuff and close the body. If you have not already done so, lightly stuff the body with fiberfill through the small opening, aiming for a soft, floppy toy that is not overstuffed. Close the opening with sl st or whipstitch, working through both layers so the seam disappears into the edge.
Step 2 – Position the leaf. Lay the fish flat and place the maple leaf overlay on one side of the body, centered and slightly toward the wider end. Pin it in place with a few pins or hold it steady with your fingers.
Step 3 – Sew the leaf down. Thread a tapestry needle with MC and whipstitch around the leaf edges, catching only the surface of the body so the toy stays flat. Secure the stem with a few extra stitches and weave in all ends on the wrong side.
Step 4 – Safety check. Gently tug the leaf, stem, and tail fin. Check all attachments for security and trim any loose yarn tails close to the fabric. Do not add plastic eyes, buttons, or small beads; this is a pet toy and must be safe for chewing and fetching.
Step 5 – Shape and block. Gently shape the body and tail fin with your hands so the oval lies flat and the fan spreads evenly. To block, lightly mist the toy with water, lay it flat on a towel, and smooth it into shape with your palms. Let it air dry completely before giving it to your dog. Spot clean only; air dry flat.
Pro Tips and Variations
- Change the colors. Swap the cream for a warm oatmeal or rust, and the sage for a deep mustard, to make a whole basket of autumn fish. Keep the leaf a contrasting shade so it stands out.
- Adjust the size. For a smaller toy, use a 3.5 mm hook and sport-weight cotton; for a bigger toy for a large dog, use a 5.0 mm hook and bulky cotton. The row counts stay the same, but the finished size changes, so always check your gauge first.
- Substitute the yarn. Any worsted-weight cotton works well. Avoid fuzzy or loosely spun yarns, which can shed fibers a dog might swallow. Cotton is ideal because it is durable and washes well.
- Add a squeaker or crinkle. If you want extra fun, tuck a small, securely enclosed squeaker or a piece of crinkle plastic inside the stuffing before closing the body. Make sure it is fully sealed inside so your dog cannot reach it.


