Dusk Gradient Rodeo Phone Sock Free Crochet Pattern
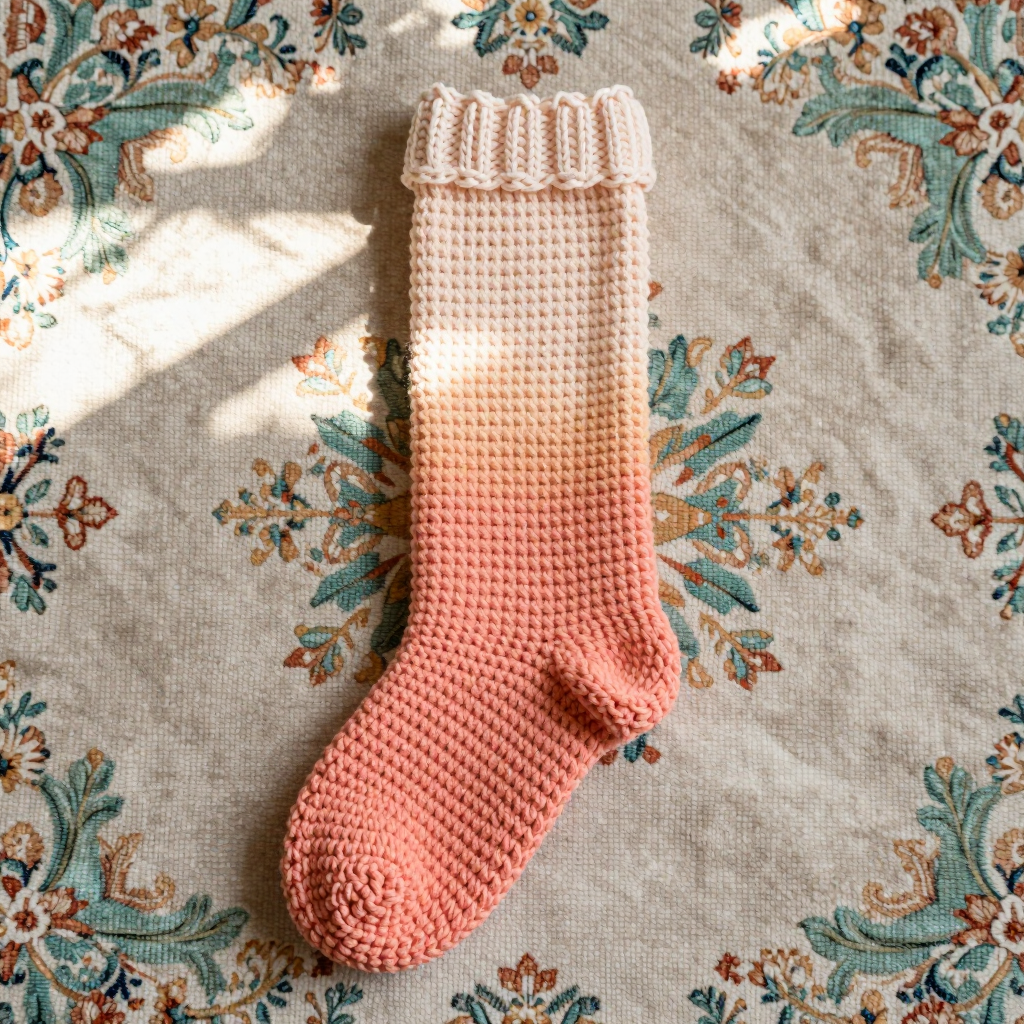
Dusk Gradient Rodeo Phone Sock — Free Beginner Crochet Pattern
Introduction
If you have never held a crochet hook before, this is the perfect first project for you. The Dusk Gradient Rodeo Phone Sock is a small, stretchy tube that hugs your phone and keeps it safe from scratches, and it is worked almost entirely in one simple stitch — single crochet — so there is very little to remember. What makes it special is the color fade: you start with a deep peach at the bottom, drift into a medium peach through the middle, and finish with a pale apricot cuff, like a sunset sliding down your phone. The finished sock is about 6 inches (15 cm) tall and 3 inches (7.5 cm) wide when flat, with a soft, slightly pebbled surface and a gently ribbed band at the top that stretches to hold your phone snug. It feels light, smooth, and a little bit squishy in your hand — and it takes only an evening to make.
Materials Needed
- Yarn: DK / light worsted weight (Category 3) cotton-blend yarn, approximately 60–70 yd (55–65 m) total, split into three shades:
- Color A (deep peach): about 25 yd (23 m)
- Color B (medium peach): about 20 yd (18 m)
- Color C (pale apricot): about 20 yd (18 m)
- Crochet hook: US G/6 (4.0 mm), or whatever size gets you the gauge below.
- Stitch marker: 1 removable marker (or a scrap of contrasting yarn) to mark the first stitch of each round.
- Tapestry needle: a blunt-tipped yarn needle for weaving in ends.
- Scissors: any small pair for cutting yarn.
- Finished size: Width about 3 in (7.5 cm) flat / 6 in (15 cm) circumference, stretching to fit phones up to 3.25 in (8 cm) wide. Height about 6 in (15 cm) from base to cuff edge.
Abbreviations and Beginner Glossary
- ch — chain. Make a slip knot on your hook, then wrap the yarn over the hook and pull it through the loop on your hook. That is one chain.
- sc — single crochet. Insert your hook into the stitch, yarn over, pull up a loop (2 loops on hook), yarn over again, pull through both loops. One single crochet made.
- dc — double crochet. Yarn over first, insert hook into the stitch, yarn over, pull up a loop (3 loops on hook), yarn over, pull through 2 loops, yarn over, pull through the last 2 loops.
- sc2tog — single crochet 2 together. A decrease: insert hook into the first stitch, pull up a loop, insert hook into the next stitch, pull up a loop (3 loops on hook), yarn over, pull through all 3 loops. Turns 2 stitches into 1. (Not used in this pattern, but listed so you recognize it.)
- sl st — slip stitch. Insert hook into the stitch, yarn over, and pull that loop straight through the loop on your hook. It joins or moves you along without adding height.
- BLO — back loop only. Every stitch has two top loops (a front one nearer you and a back one farther away). Working in BLO means you insert your hook only under the back loop.
- st(s) — stitch(es).
- rnd — round. One complete circle of stitches when working in the round.
- magic ring — an adjustable loop you make with the yarn tail, then crochet into; pulling the tail closes the hole in the center.
- [ ] — brackets mean "repeat everything inside the brackets the number of times stated after them."
Gauge
18 sc x 20 rounds = 4 in (10 cm) in single crochet worked in the round.
Gauge simply means how big your stitches turn out. If your stitches are bigger than the pattern expects, the sock will be baggy and slide off your phone; if they are smaller, it will be too tight to slide on. To check, crochet a small flat swatch of single crochet about 4 in (10 cm) square, then lay a ruler across the middle and count how many stitches fit in 4 inches and how many rounds fit in 4 inches. If you get more stitches than 18, go up one hook size; if you get fewer, go down one hook size. Because this sock is stretchy, being one stitch off is fine — but do check before you start so your finished height matches the pattern.
Beginner Tips Before You Start
- Use a stitch marker. This sock is worked in a continuous spiral, so the rounds have no visible seam. Place your marker in the very first stitch of each round and move it up every time — otherwise you will lose track of where a round begins.
- Do not pull your yarn too tight. New crocheters often tug each stitch snug, which makes the fabric stiff and hard to slide a phone into. Keep your tension relaxed and even.
- Count your stitches at the end of every round. Each round in the base has a stitch count in parentheses — check it before moving on. It is much easier to fix one round than to discover a mistake ten rounds later.
- Change colors at the end of a round. Finish the last stitch of the old color, then pull the new color through to complete it. Leave a 4 in (10 cm) tail to weave in later.
- Work the back loop only on Round 8 only. That single round creates the subtle ridge texture; every other body round is worked under both loops as normal.
Step-by-Step Instructions
Notes: Work in continuous rounds (spiral) unless told otherwise — do not join or turn, except in the cuff where joining is stated. Place a stitch marker in the first stitch of each round and move it up as you go. Color A = deep peach, Color B = medium peach, Color C = pale apricot.
Base (Rounded Closed Bottom) — Color A
Rnd 1: Make a magic ring. Work 6 sc into the ring. Pull the tail to close. (6 sc)
Rnd 2: 2 sc in each st around. (12 sc)
Rnd 3: [2 sc in next st, 1 sc in next st] around. (18 sc)
Rnd 4: [2 sc in next st, 1 sc in each of next 2 sts] around. (24 sc)
Rnd 5: [2 sc in next st, 1 sc in each of next 3 sts] around. (30 sc)
Rnd 6: [2 sc in next st, 1 sc in each of next 4 sts] around. (36 sc)
Rnd 7: [2 sc in next st, 1 sc in each of next 5 sts] around. (42 sc)
The base should now measure about 3 in (7.5 cm) across. If your phone is wider than 3 in, add one more increase round: [2 sc in next st, 1 sc in each of next 6 sts] around (48 sc). If you add this round, every body and cuff round below will have 48 sts instead of 42 — the stitch counts in parentheses assume the 42-stitch version.
Body — Color A
Rnd 8: Working in BLO, sc in each st around. (42 sc)
Rnds 9–14: Sc in each st around. (42 sc)
Fasten off Color A after Rnd 14.
Body — Color B
Join Color B with a sl st in the next st.
Rnds 15–22: Sc in each st around. (42 sc)
Fasten off Color B after Rnd 22.
Body — Color C
Join Color C with a sl st in the next st.
Rnds 23–30: Sc in each st around. (42 sc)
Do not fasten off. The piece should measure about 5 in (12.5 cm) from the base.
Ribbed Cuff — Color C
Rnd 31: Ch 1, sc in each st around, join with a sl st to the first sc. (42 sc)
Rnd 32: Ch 1, [sc in next st, dc in next st] around, join with a sl st to the first sc. (42 sts)
Rnd 33: Ch 1, [dc in next st, sc in next st] around, join with a sl st to the first sc. (42 sts)
Rnd 34: Repeat Rnd 32. (42 sts)
Rnd 35: Repeat Rnd 33. (42 sts)
Rnd 36: Ch 1, sc in each st around, join with a sl st to the first sc. (42 sc)
Fasten off Color C.
Assembly and Finishing
There is no seaming in this project — the sock is worked as one continuous piece, so "assembly" is just tidying up.
- Turn the sock right side out. The smoother side of the fabric should face outward.
- Tighten the magic ring. Pull the starting tail at the bottom firmly so the center hole closes completely, then hold it snug while you weave it in.
- Weave in all ends. Thread each tail onto the tapestry needle and run it through the inside of the fabric for about 1 in (2.5 cm), going back and forth through a few stitches so it cannot work loose. Snip the yarn close to the fabric.
- Steam-block the cuff. Hold a steam iron a few inches above the ribbed band (never press it directly onto the stitches) and let the steam relax the ribbing so it lies flat and even. Let it dry completely.
- Check the fit. Slip your phone in. The sock should stretch slightly and hold the phone securely without being difficult to remove.
Pro Tips and Variations
- Change the gradient. Use any three shades of the same yarn family — a blue fade, a dusty rose fade, or even a single solid color if you prefer. Just keep the same yardage so the height stays at 6 in (15 cm).
- Adjust the size. For a larger phone, add the extra increase round at the end of the base (48 sts) and work every following round with 48 sts. For a smaller phone, stop the base after Rnd 6 (36 sts) and work all following rounds with 36 sts.
- Make the cuff taller. Repeat Rnds 32–33 two more times before Rnd 36 for a deeper, more elastic band — this adds about 0.5 in (1.25 cm) to the height.
- Substitute yarn. A cotton or cotton-blend DK gives the best grip and stitch definition. Acrylic works too but is slightly more slippery, so keep your tension a little firmer if you use it.


