Free Pattern: Butterscotch Stripe Ribbed Knit Dress with Neon Tangerine Linen-Stitch Stripes
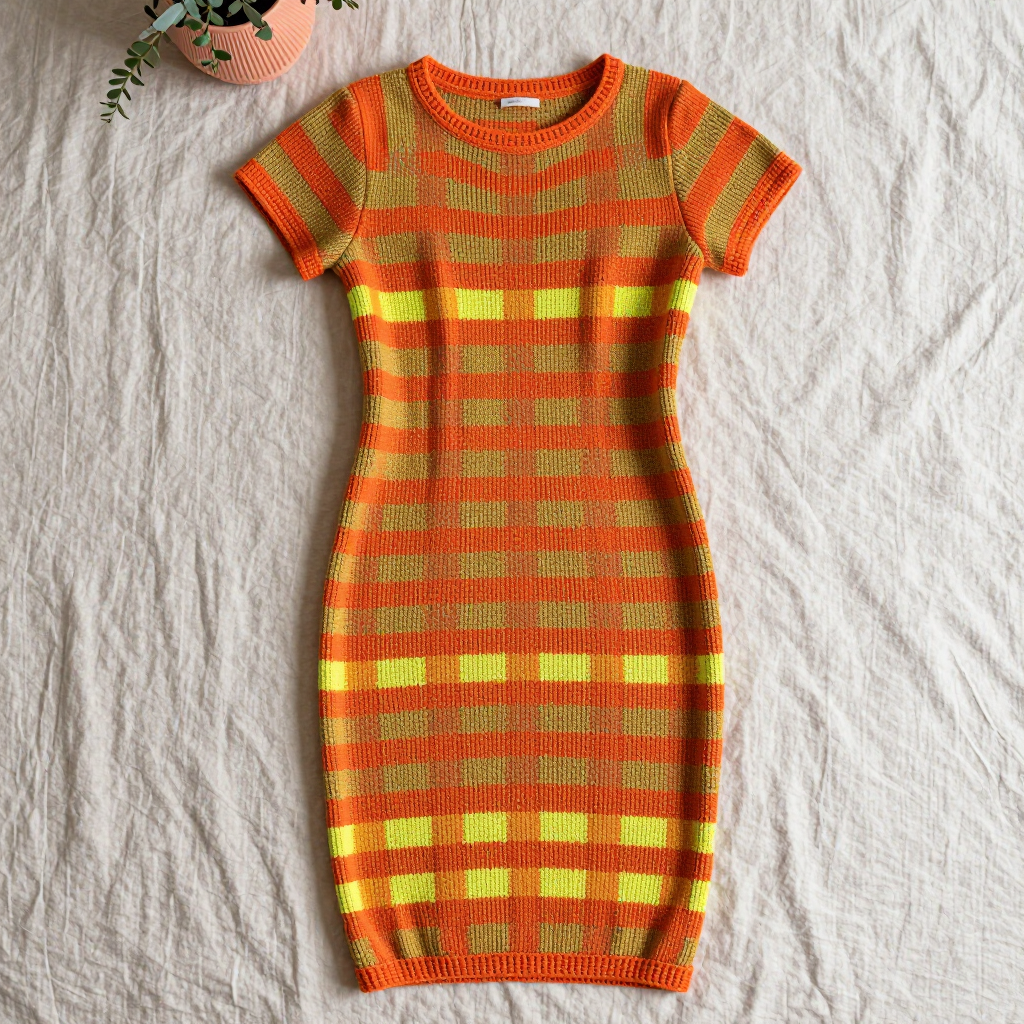
Butterscotch Stripe Ribbed Knit Dress with Neon Tangerine Linen-Stitch Stripes
Introduction
If you have ever finished a scarf or a dishcloth and thought, "I wish I could make something I could actually wear," this dress is for you. It is a snug, body-skimming tube dress knitted flat in alternating stripes of warm butterscotch gold and a bright, Y2K-inspired neon tangerine, and it is designed specifically for the advanced beginner who is ready for a real garment but not ready for sleeves, lace, or complicated shaping. The magic is all in the stitch: linen stitch, a simple two-row repeat of knit and slip stitches, creates a dense, nubby, almost woven fabric with a gentle horizontal ridge that makes the color blocks look staggered and brick-like rather than like plain flat stripes. The finished dress feels substantial and slightly crisp in the hand (that is the linen in the yarn), softens beautifully with wear, and slips on like a cozy pumpkin-season layer with a bright pop of color. There are no sleeves to set in, no motifs to embroider, and no fancy finishing — just two rectangular panels, a few decreases, and a rolled neckband that curls itself into place.
Materials Needed
- Yarn: Worsted-weight linen blend (approximately 50% linen, 50% cotton; about 180 yd / 165 m per 100 g skein).
- Color A (Butterscotch): 4 (4, 5, 5, 6) skeins
- Color B (Neon Tangerine): 3 (3, 4, 4, 5) skeins
- Sample uses approximately 620 (700, 790, 880, 980) yd / 567 (640, 722, 805, 896) m total.
- Needles: US 7 (4.5 mm) straight or circular needles (circular is easier for holding a wide panel).
- Spare needle: One extra US 7 (4.5 mm) needle (or a stitch holder) for the three-needle bind-off and for holding shoulder stitches.
- Stitch markers: A few removable markers to mark armhole and neckline points.
- Tapestry needle: A blunt-tipped needle with a large eye for seaming and weaving in ends.
- Scissors: Sharp craft scissors for cutting yarn.
- Measuring tape and a row counter (optional but helpful).
Finished sizes: XS (S, M, L, XL). Finished bust: 30 (34, 38, 42, 46) in / 76 (86, 96.5, 106.5, 117) cm. Finished length from shoulder: 33 (34, 35, 36, 37) in / 84 (86.5, 89, 91.5, 94) cm. The dress is designed with about 2 in / 5 cm of negative ease at the bust — meaning it measures slightly smaller than your body so it hugs snugly. Sample shown in size S.
Abbreviations and Beginner Glossary
- st / sts – stitch / stitches. One loop on your needle is one stitch.
- RS – right side. The "public" side of the fabric that faces out when you wear the dress.
- WS – wrong side. The inside of the fabric that faces your body.
- K – knit stitch. With the yarn behind your work, insert the right needle into the front of the stitch, wrap the yarn around, and pull it through.
- P – purl stitch. With the yarn in front of your work, insert the right needle into the front of the stitch, wrap the yarn, and pull it through.
- sl – slip. Move a stitch from the left needle to the right needle without working it.
- sl 1 wyif – slip 1 stitch purlwise with yarn in front. Hold the yarn between you and the work, insert the right needle into the stitch as if to purl, and slide it onto the right needle without knitting it.
- sl 1 wyib – slip 1 stitch purlwise with yarn in back. Hold the yarn behind the work, insert the right needle as if to purl, and slide the stitch over without knitting it.
- k2tog – knit two stitches together. Insert the needle through two stitches at once and knit them as one. This decreases by one stitch and leans to the right.
- ssk – slip, slip, knit. Slip one stitch knitwise, slip the next stitch knitwise, then insert the left needle through the front of both and knit them together. This decreases by one stitch and leans to the left.
- bind off – the way to finish an edge so stitches do not unravel. Knit two stitches, then lift the first over the second and off the needle; repeat across.
- cast on – the way to create your very first row of stitches on the needle.
- long-tail cast-on – a stretchy, tidy cast-on. Make a slip knot, hold the tail over your thumb and the working yarn over your index finger, then scoop the thumb loop over the needle and tighten.
- pick up and knit – insert your needle into an edge stitch, wrap the yarn, and pull up a new loop, creating stitches along an existing edge.
- mattress stitch – an invisible seaming technique that joins two edges side by side by weaving under the bars between stitches.
- three-needle bind-off – a way to join two sets of live stitches while binding them off at the same time, creating a neat seam.
- work even – continue in the established pattern without increasing or decreasing.
- in the round – knitting in a continuous spiral on circular needles so there is no seam.
Gauge
18 sts and 32 rows = 4 in / 10 cm in linen stitch, worked flat, after blocking.
Gauge is simply how many stitches and rows fit into a square of fabric. It matters enormously here: linen stitch pulls in and its row gauge is very dense, so if your gauge is off, your dress could come out several inches too wide or too short. To make a gauge swatch: cast on 25 stitches in Color A and work in linen stitch (see Stitch Guide below) for about 5 inches, changing colors every 6 rows so you also practice the stripe sequence. Bind off, block it gently, lay it flat, and measure 4 inches across the middle. Count the stitches in that 4 inches — you want 18. If you have more than 18, your stitches are too small; go up a needle size. If you have fewer than 18, your stitches are too big; go down a needle size. Take the time to match gauge before you begin.
Beginner Tips Before You Start
- Use stitch markers to track your stripes. Place a removable marker at the start of every 6-row color block so you never lose count of when to change colors.
- Do not pull the yarn too tight when you slip stitches. Slipped stitches should glide off the needle easily. If they feel tight, your linen stitch will pucker and the dress will lose its drape.
- Carry the unused color loosely up the side edge. Do not cut the yarn after every stripe. Let the resting color travel up the side with a little slack so the edge does not pull in.
- Always slip stitches purlwise and do not twist them. Insert the needle as if to purl, then slide the stitch over. Twisting the slipped stitch will make the fabric tight and uneven.
- Count your stitches at the end of every decrease row. The stitch counts in parentheses are your safety net — if a number does not match, rip back that row before continuing.
- Work your side seams with the right sides together. Mattress stitch is much easier to keep invisible when the public sides are facing each other.
Step-by-Step Instructions
Stitch Guide: Linen Stitch (flat, multiple of 2 sts + 1)
Row 1 (RS): K1, *sl 1 wyif, k1; repeat from * to end.
Row 2 (WS): P1, *sl 1 wyib, p1; repeat from * to end.
Repeat Rows 1–2 for the pattern. Slipped stitches are always slipped purlwise, with the yarn held on the wrong side (wyif) on RS rows and on the right side (wyib) on WS rows. Do not twist the slipped stitch.
Stripe Sequence
Work 6 rows in Color A (Butterscotch), then 6 rows in Color B (Neon Tangerine), and repeat. Carry the unused color loosely up the side edge; do not cut after every stripe. The 6-row blocks create the vertical broken stripes in linen stitch.
Back Panel
Set-up: With Color A, cast on 69 (77, 85, 93, 101) sts using the long-tail cast-on.
Set-up Row (WS): P1, *sl 1 wyib, p1; repeat from * to end. (69 [77, 85, 93, 101] sts)
Begin the Stripe Sequence and Linen Stitch. Work even in pattern, changing colors every 6 rows as established, until the piece measures 24 (24.5, 25, 25.5, 26) in / 61 (62, 63.5, 65, 66) cm from the cast-on, ending with a WS row. (69 [77, 85, 93, 101] sts)
Armhole Shaping (Back)
Next 2 rows: Bind off 4 (5, 6, 7, 8) sts at the beginning of each row. (61 [67, 73, 79, 85] sts)
Next RS row: K1, k2tog, work in pattern to the last 3 sts, ssk, k1. (59 [65, 71, 77, 83] sts)
Next WS row: Work even in pattern. (59 [65, 71, 77, 83] sts)
Repeat the last 2 rows 3 (4, 5, 6, 7) more times. (53 [57, 61, 65, 69] sts)
Work even in pattern until the armhole measures 7 (7.5, 8, 8.5, 9) in / 18 (19, 20.5, 21.5, 23) cm, ending with a WS row. (53 [57, 61, 65, 69] sts)
Back Neck and Shoulders
Next RS row: Work 16 (18, 20, 22, 24) sts in pattern, bind off the center 21 sts, work to end. (16 [18, 20, 22, 24] sts on each side)
Place the left shoulder sts on a spare needle. Work the right shoulder even for 2 rows, then place the sts on a spare needle. Rejoin yarn to the left shoulder and work even for 2 rows. Place the sts on a spare needle.
Front Panel
Work exactly as for the Back until the armhole measures 5 (5.5, 6, 6.5, 7) in / 12.5 (14, 15, 16.5, 18) cm, ending with a WS row. (53 [57, 61, 65, 69] sts)
Front Neck Shaping
Next RS row: Work 21 (23, 25, 27, 29) sts in pattern, bind off the center 11 sts, work to end. (21 [23, 25, 27, 29] sts on each side)
Place the left front sts on a spare needle. Working the right front only:
Next RS row: Work in pattern to the last 3 sts, ssk, k1. (20 [22, 24, 26, 28] sts)
Next WS row: Work even. (20 [22, 24, 26, 28] sts)
Repeat the last 2 rows 4 more times. (16 [18, 20, 22, 24] sts)
Work even until the front measures the same as the Back to the shoulder, ending with a WS row. Place the sts on a spare needle. (16 [18, 20, 22, 24] sts)
Rejoin yarn to the left front and work to match, reversing the shaping (k1, k2tog at the beginning of RS rows). (16 [18, 20, 22, 24] sts)
Join Shoulders
With RS together, use the three-needle bind-off to join the front and back shoulder stitches on each side. (16 [18, 20, 22, 24] sts joined per shoulder)
Side Seams
With RS together, seam the side edges from the cast-on edge to the underarm using mattress stitch, matching stripe colors. Then seam from the underarm to the armhole edge. Repeat for the other side. Weave in all ends.
Rolled Neckband
With RS facing and Color A, pick up and knit 1 st in each bound-off neck stitch around the entire neckline, approximately 64 (68, 72, 76, 80) sts. Join to work in the round if using circular needles, or work flat and seam the 1 in / 2.5 cm gap.
Rounds 1–4: Knit. (64 [68, 72, 76, 80] sts)
Bind off loosely knitwise. The stockinette edge will roll naturally to the RS, forming a simple rolled neckband.
Assembly and Finishing
Seaming: Thread your tapestry needle with a length of matching yarn about three times the length of the seam. With the right sides of the two panels facing each other, bring the needle under the horizontal bar between the first stitch and the edge on one panel, then under the matching bar on the other panel, and pull gently. Work up the seam in small, even stitches, matching the stripe colors as you go so the seam disappears into the pattern. Do not pull the seam tight — let it lie flat.
Weaving in ends: Thread each yarn tail onto the tapestry needle and weave it back and forth through the wrong side of the fabric for about 2 inches, following the direction of the stitches. Trim the tail close to the fabric.
Blocking: Soak the dress in cool water for about 15 minutes, then gently squeeze (never wring) out the excess water. Roll it in a towel to remove more moisture, then lay it flat on a blocking mat and pin it to the finished measurements. Press lightly through a damp cloth without stretching the linen stitch. Let it dry completely before moving it. Do not hang the dress; store it folded. The linen blend will soften with wear and washing.
Pro Tips and Variations
- Change the stripe rhythm: Try 4-row or 8-row color blocks instead of 6 for a finer or bolder broken-stripe effect. Just keep the total row count the same so the length stays true to the pattern.
- Adjust the length: Because the body is worked even before the armhole shaping, you can easily add or remove inches here. Add or subtract rows in multiples of 6 so the stripe sequence stays balanced, and remember that each 6-row block is about ¾ in / 2 cm at this gauge.
- Substitute yarn: Any worsted-weight yarn will work, but a linen or cotton blend gives the crisp, woven look shown. If you use a wool or acrylic, swatch again — the gauge and drape will change, and you may need a different needle size.
- Play with color: Swap the neon tangerine for a deep rust, olive, or cream for a more muted fall palette, or use a self-striping yarn in Color B for an unexpected surprise stripe.


