Ice Blue Triangle Puff Dress Free Crochet Pattern

Ice Blue Triangle Puff Dress — Free Beginner Crochet Pattern
Introduction
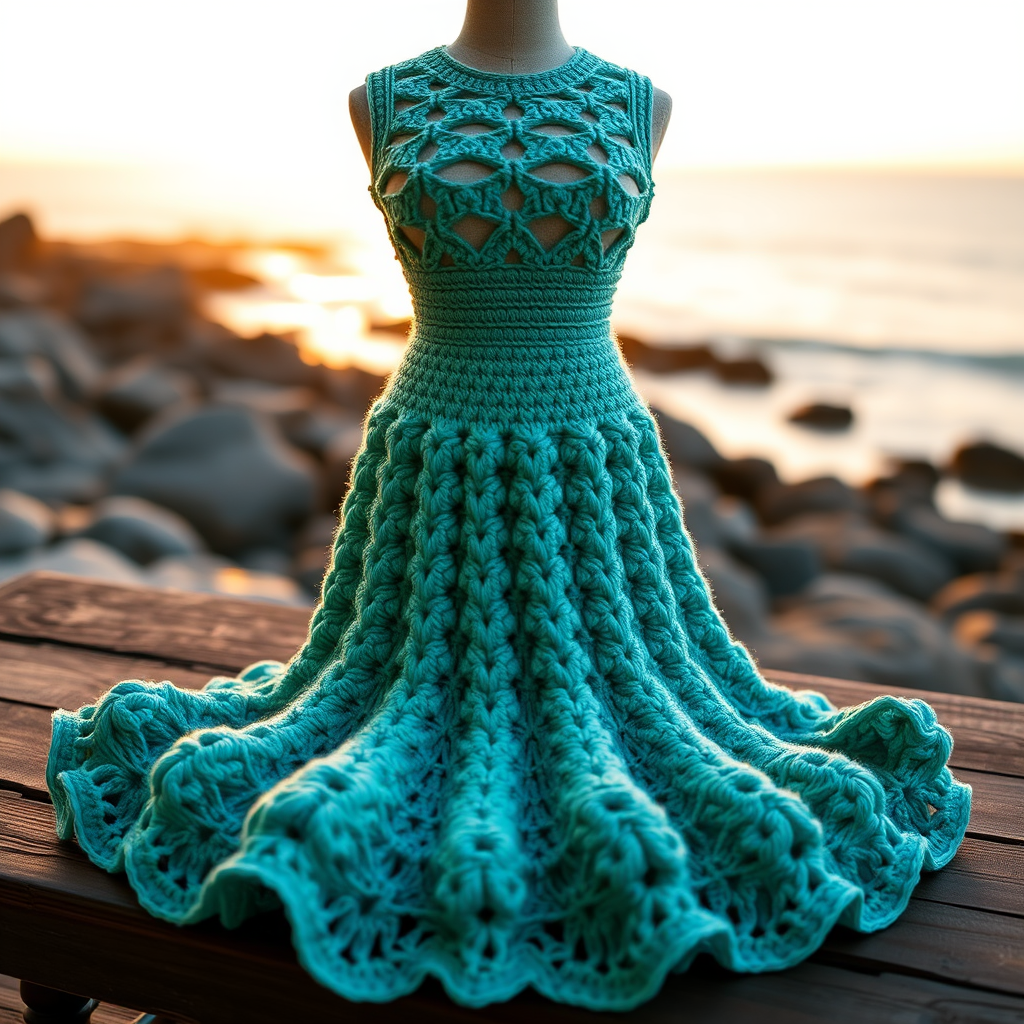
If you have ever wanted to make a dress but thought it looked too hard, this is the project for you. The Ice Blue Triangle Puff Dress is worked from the neck down as one simple triangle, so there is no seaming, no shaping math, and no complicated pattern to memorize — just one easy puff stitch repeated over and over. The finished dress is a soft, nubby, coastal-inspired A-line that falls gently from a narrow silver neckline band to a smooth single crochet hem, with two thin silver ties that knot at the back of the neck. It feels light and cool against the skin because bamboo cotton has a lovely drape and a subtle sheen. Perfect for a first garment, a summer teen wardrobe, or a handmade gift you will be proud to show off.
Materials Needed
- Yarn (main color): Bamboo cotton worsted weight (approx. 50% bamboo, 50% cotton; 200 yd / 183 m per 100 g skein) — 3 (3, 4, 4) skeins in Ice Blue.
- Yarn (contrast): Same yarn in Silver — 1 skein (used only for the yoke band and the tie straps).
- Main hook: Size G/6 (4.0 mm) crochet hook, or whatever size gives you the correct gauge.
- Small hook: Size F/5 (3.75 mm) crochet hook, used only for the tie straps.
- Stitch markers: At least 2 (or use small safety pins or scrap yarn).
- Tapestry needle: A blunt-tipped yarn needle for weaving in ends and attaching the straps.
- Scissors for cutting yarn.
- Measuring tape for checking gauge and length.
Finished sizes: Teen XS (S, M, L). Finished chest circumference: 30 (33, 36, 39) in / 76 (84, 91, 99) cm. Finished length from neck to hem: 30 (31, 32, 33) in / 76 (79, 81, 84) cm. The dress is designed to fit with 2–4 in / 5–10 cm of positive ease (meaning it measures a little bigger than the body). Sample shown in size S.
Abbreviations and Beginner Glossary
- ch — chain. Yarn over the hook and pull the yarn through the loop on your hook. This makes one chain.
- sl st — slip stitch. Insert your hook into the stitch, yarn over, and pull that loop straight through both the stitch and the loop on your hook. It makes a nearly invisible join.
- sc — single crochet. Insert hook into stitch, yarn over, pull up a loop (2 loops on hook), yarn over, pull through both loops (1 loop left).
- dc — double crochet. Yarn over, insert hook into stitch, yarn over, pull up a loop (3 loops on hook), yarn over, pull through 2 loops, yarn over, pull through last 2 loops.
- puff — puff stitch. Yarn over, insert hook into the indicated stitch or space, yarn over and pull up a loop to the height of a double crochet (3 loops on hook). [Yarn over, insert hook in the same stitch, yarn over and pull up a loop] 2 more times (7 loops on hook). Yarn over and draw through all 7 loops, then ch 1 to close the puff. The closing ch 1 does not count as a stitch.
- sp — space. The little gap made by a chain (for example, a "ch-1 sp" is the hole under a chain-one).
- st(s) — stitch(es).
- beg — beginning.
- rep — repeat. Do the same thing again.
- yo — yarn over. Wrap the yarn from back to front over your hook.
- turn — flip your work over so the back faces you, ready to work the next row/round in the opposite direction.
- fasten off — cut the yarn leaving a tail, then pull the tail all the way through the last loop to lock it.
- positive ease — extra room built into a garment so it is not skin-tight.
Gauge
Gauge: In puff stitch pattern, 4 puff stitches and 4 rounds = 4 in (10 cm). Each puff stitch measures approx. 1 in (2.5 cm) wide.
Why gauge matters: Gauge is how big your stitches turn out. If your stitches are bigger than the pattern's, the dress will come out too wide and long; if smaller, it will be too tight. Checking first saves hours of work.
How to make a gauge swatch: With your G/6 (4.0 mm) hook and Ice Blue, ch 20. Work a few rounds of the puff pattern (puff, ch 1, skip 1) until your swatch is about 4 in (10 cm) tall. Lay it flat without stretching and measure across 4 puff stitches and up 4 rounds. If you get more puffs than 4 in 4 in, your stitches are too small — try a larger hook. If you get fewer, your stitches are too big — try a smaller hook. Change hook size until the numbers match.
Beginner Tips Before You Start
- Use stitch markers at the two side points. The dress grows by adding stitches at these two points only. Marking them means you never lose your place.
- Do not pull the yarn too tight. Puff stitches need a little slack to look round and puffy. Pull each loop up to the full height of a double crochet before closing.
- Count your puffs at the end of every round. If the number is wrong, fix it right away — it is much easier than ripping back later.
- Keep your turning chain loose. A tight ch-1 or ch-3 makes the edge pull in and the dress will not lie flat.
- Work the silver yoke first, then join the blue. This keeps the neckline neat and gives you a smooth band to build on.
- Try it on as you go. Because it is worked top-down, you can slip it over your head and check the fit before you commit to the full length.
Step-by-Step Instructions
Yoke (Silver Band)
With Silver and the G/6 (4.0 mm) hook, ch 60 (66, 72, 78). Being careful not to twist the chain, join with a sl st to the first ch to form a ring.
Round 1: Ch 1, sc in each ch around, join with sl st to first sc. (60 [66, 72, 78] sc)
Round 2: Ch 1, sc in each sc around, join with sl st to first sc. (60 [66, 72, 78] sc) Fasten off Silver. Do not turn.
Body (Ice Blue)
Join Ice Blue with a sl st in the first sc of Round 2.
Round 1 (set-up): Ch 3 (counts as first dc), dc in next 28 (31, 34, 37) sc, place a marker in the last dc made (right side point), dc in next 30 (33, 36, 39) sc, place a marker in the last dc made (left side point), join with sl st to top of beg ch-3. (60 [66, 72, 78] dc) Turn.
Round 2: Ch 1, puff in first dc, [ch 1, skip 1 dc, puff in next dc] rep around, join with sl st to first puff. Turn. (30 [33, 36, 39] puff stitches)
Round 3 (increase): Ch 1, puff in first puff, ch 1, puff in next puff and in each puff to the marked stitch, puff in marked stitch, ch 2, puff in same marked stitch (increase made), ch 1, puff in each puff to next marked stitch, puff in marked stitch, ch 2, puff in same marked stitch (increase made), ch 1, join with sl st to first puff. Turn. (32 [35, 38, 41] puff stitches) Each increase round adds 2 puff stitches.
Rounds 4–5: Ch 1, puff in each puff and ch 1 between puffs around, working [puff, ch 2, puff] in each ch-2 increase sp from the previous increase round. Join with sl st to first puff. Turn. (32 [35, 38, 41] puff stitches)
Round 6 (increase): Rep Round 3, working the increase as [puff, ch 2, puff] in each marked increase stitch. (34 [37, 40, 43] puff stitches)
Repeat Rounds 4–6 for the pattern, working an increase round every 3rd round, until you have completed 27 (28, 29, 30) rounds total in Ice Blue and have 48 (51, 54, 57) puff stitches. Piece measures approx. 27 (28, 29, 30) in / 69 (71, 74, 76) cm from the neck.
Hem Edging
Round 1: Ch 1, sc in each puff and in each ch-1 sp around, join with sl st to first sc. (96 [102, 108, 114] sc)
Round 2: Ch 1, sc in each sc around, join with sl st to first sc. (96 [102, 108, 114] sc) Fasten off and weave in ends.
Tie Straps (Make 2)
With Silver and the smaller F/5 (3.75 mm) hook, ch 70 (75, 80, 85).
Row 1: Sl st in 2nd ch from hook and in each ch across. (69 [74, 79, 84] sl sts) Fasten off, leaving a 6 in / 15 cm tail.
Attach one strap to each side of the yoke at the top edge, approx. 4 in / 10 cm apart from the center front, using the tails and a yarn needle. Tie in a small bow at the back of the neck.
Assembly and Finishing
Seaming: There is no seaming in this dress — it is worked in one piece from the neck down. The only "assembly" is attaching the two tie straps. Thread a tail onto your tapestry needle, push the needle through the yoke edge and back through the end of the strap two or three times to anchor it firmly, then weave the tail into the wrong side.
Weaving in ends: Thread each loose tail onto the tapestry needle and run it in and out through the back of several stitches (about 2 in / 5 cm), then trim close. Never knot your ends — knots work loose in the wash.
Blocking: Lay the dress flat on a towel or blocking mat, pin the hem flat to your measurements, and mist lightly with water. Let it dry completely. Do not press the puff stitches flat — steam gently from the wrong side only, holding the iron just above the fabric, never touching it.
Pro Tips and Variations
- Change colors: Work the yoke band in any contrast color you love — white, blush pink, or a deeper teal all look lovely against ice blue. You can also add a stripe of contrast color every 6th round for a beachy look.
- Adjust the length: Because the dress grows by one puff at each side point every 3rd round, simply add or remove repeat rounds to make it longer or shorter. Each extra set of 3 rounds adds about 3 in / 7.5 cm of length.
- Adjust the width: For a fuller A-line, work an increase round every 2nd round instead of every 3rd. For a straighter fit, work an increase every 4th round.
- Substitute yarn: Any worsted weight cotton, cotton blend, or bamboo blend will work — just check your gauge swatch again, since different fibers behave differently. Avoid fluffy or fuzzy yarns, which hide the puff texture.