Free Pattern: Star Stitch Pumpkin Patch Crochet Wall Hanging
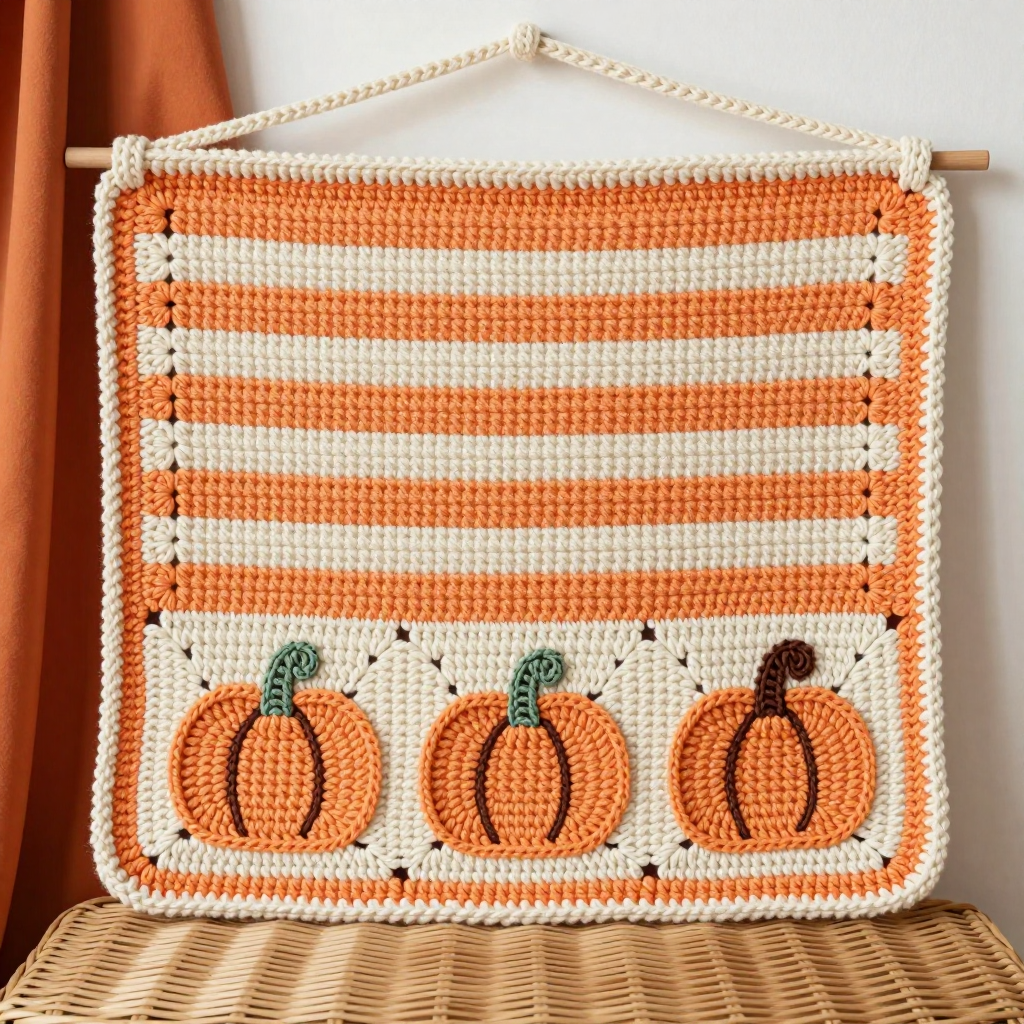
Star Stitch Pumpkin Patch Crochet Wall Hanging
Introduction
If you have ever wanted to make something that looks like it came straight out of a cozy cottage, this Star Stitch Pumpkin Patch Wall Hanging is the perfect first project for you. It is a soft, textured rectangle of alternating pastel orange and cream stripes, worked in a bumpy, raised stitch that looks far more complicated than it actually is. Along the bottom edge sit three plump little pumpkins, each with a tiny sage green stem and a curly brown tendril, so the whole piece feels warm, handmade, and ready for autumn. This project is ideal for complete beginners because it uses only a handful of basic stitches, bulky yarn that is easy to see and hold, and a simple rectangular shape that does not require any shaping or fitting. When it is finished, you will have a 12 by 14 inch hanging that feels thick and squishy in your hands and adds instant charm to any wall.
Materials Needed
- Yarn: Bulky (weight 5) wool yarn. You will need about 180 yards of pastel orange (Color A), 120 yards of cream (Color B), 30 yards of sage green (Color C) for the stems, and a small amount of dark brown for the tendrils.
- Crochet hook: 6.0 mm (US size J-10).
- Stitch markers: At least 4, to mark the corners and the first stitch of each row.
- Tapestry needle: A large-eyed yarn needle for sewing the pumpkins and weaving in ends.
- Scissors: Sharp craft scissors for cutting yarn.
- Finished size: 12 inches (30.5 cm) wide by 14 inches (35.5 cm) tall, not counting the small hanging loop at the top.
Abbreviations and Beginner Glossary
Every abbreviation used in this pattern is listed below with a plain-English explanation. Read through this list once before you begin, and come back to it any time a symbol confuses you.
- ch – chain. Make a loop with the yarn, then pull a new loop through it. Each loop you pull through is one chain.
- sc – single crochet. Insert your hook into the stitch, yarn over, pull up a loop (2 loops on hook), yarn over again, and pull through both loops. One single crochet made.
- hdc – half double crochet. Yarn over first, insert hook into the stitch, yarn over, pull up a loop (3 loops on hook), yarn over, and pull through all 3 loops at once.
- dc – double crochet. Yarn over, insert hook, yarn over, pull up a loop (3 loops), yarn over and pull through 2 loops, yarn over and pull through the last 2 loops.
- sl st – slip stitch. Insert hook into the stitch, yarn over, and pull the loop straight through the loop on your hook. It makes a tiny, flat joining stitch.
- st(s) – stitch or stitches. One completed loop or unit in your fabric.
- yo – yarn over. Wrap the working yarn over your hook from back to front.
- star st – star stitch. A textured stitch made by pulling up several loops onto your hook and pulling through them all at once. The full instructions are in the pattern below.
- beg – beginning. The start of a row or round.
- rep – repeat. Do the same instruction again.
- RS – right side. The front, prettier face of your work.
- sp – space. The small gap between stitches, usually under a chain.
- magic ring – an adjustable loop of yarn that you crochet into, then pull tight so there is no hole in the center.
Gauge
Gauge: 12 stitches x 12 rows = 4 inches (10 cm) in star stitch pattern.
Gauge simply means how big your stitches turn out. If your stitches are looser or tighter than the pattern expects, your finished hanging will be bigger or smaller than 12 by 14 inches. To check your gauge, crochet a small practice square about 5 inches wide using the star stitch instructions below, then lay a ruler across the middle and count how many stitches fit in 4 inches and how many rows fit in 4 inches. If you have more stitches than 12, your work is too tight, so try a larger hook. If you have fewer, your work is too loose, so try a smaller hook. Always make a swatch before starting the real panel, because it saves you from redoing the whole project.
Beginner Tips Before You Start
- Use stitch markers on every row. Place one in the very first stitch of each row so you never lose your place, and place one in each corner of the border round.
- Do not pull your yarn too tight. Star stitch needs a little slack to pull up those five loops. Keep your tension relaxed and even.
- Count your stars out loud. Each star stitch row should have exactly 17 stars. Counting as you go catches mistakes immediately.
- Keep your color changes tidy. Fasten off one color completely and join the next color with a slip stitch in the first stitch of the new row.
- Practice the star stitch first. Make a small 10-stitch practice swatch before starting the panel so your hands learn the motion.
- Work in good light. Bulky yarn in two light colors is easy to see, but good lighting makes the star points much clearer.
Step-by-Step Instructions
Special Stitch: Star Stitch (worked over an odd number of stitches)
Row 1 (foundation): Ch 2. Insert hook in the 2nd ch from hook, yo, pull up a loop (2 loops on hook). Insert hook in next ch, yo, pull up a loop (3 loops). Insert hook in next ch, yo, pull up a loop (4 loops). Insert hook in next ch, yo, pull up a loop (5 loops). Yo and pull through all 5 loops, then ch 1 to close the star. *Insert hook in the ch-1 just made, yo, pull up a loop. Insert hook in the same ch as the last loop of the previous star, yo, pull up a loop. Insert hook in next ch, yo, pull up a loop. Insert hook in next ch, yo, pull up a loop. Insert hook in next ch, yo, pull up a loop (5 loops). Yo, pull through all 5 loops, ch 1. Rep from * across. End with 1 hdc in the last ch. Turn.
Row 2: Ch 1, sc in first st, sc in each ch-1 sp and each star point across, end with sc in last st. Turn.
Row 3: Ch 2, work star st across as Row 1, beginning the first star in the first sc. Turn.
Repeat Rows 2–3 for the pattern.
Panel
With Color A, ch 37.
Row 1 (RS): Work star stitch foundation across. You will have 17 stars and 1 hdc at the end. (35 sts)
Row 2: With Color A, ch 1, sc in each st across. (35 sc) Fasten off A.
Row 3: Join Color B, ch 2, work star st across. (17 stars)
Row 4: With B, ch 1, sc in each st across. (35 sc) Fasten off B.
Rows 5–6: With A, rep Rows 3–4. (35 sts)
Rows 7–8: With B, rep Rows 3–4. (35 sts)
Rows 9–10: With A, rep Rows 3–4. (35 sts)
Rows 11–12: With B, rep Rows 3–4. (35 sts)
Rows 13–14: With A, rep Rows 3–4. (35 sts)
Rows 15–16: With B, rep Rows 3–4. (35 sts)
Rows 17–18: With A, rep Rows 3–4. (35 sts)
Rows 19–20: With B, rep Rows 3–4. (35 sts)
Rows 21–22: With A, rep Rows 3–4. (35 sts)
Rows 23–24: With B, rep Rows 3–4. (35 sts)
Rows 25–26: With A, rep Rows 3–4. (35 sts)
Rows 27–28: With B, rep Rows 3–4. (35 sts)
Rows 29–30: With A, rep Rows 3–4. (35 sts)
Rows 31–32: With B, rep Rows 3–4. (35 sts)
Rows 33–34: With A, rep Rows 3–4. (35 sts)
Rows 35–36: With B, rep Rows 3–4. (35 sts)
Rows 37–38: With A, rep Rows 3–4. (35 sts)
Rows 39–40: With B, rep Rows 3–4. (35 sts)
Rows 41–42: With A, rep Rows 3–4. (35 sts) Do not fasten off.
Border
Round 1: With A, ch 1, sc evenly around the entire panel: approximately 35 sc across the top, 35 sc across the bottom, 42 sc along each side, and 3 sc in each corner. Join with a sl st to the first sc. Fasten off and weave in ends. (approx 160 sc)
Pumpkin Appliqués (make 3)
With Color A, make a magic ring.
Round 1: Ch 2, work 10 hdc into the ring, join with sl st to first hdc. (10 hdc)
Round 2: Ch 2, 2 hdc in each st around, join with sl st. (20 hdc)
Round 3: Ch 2, *2 hdc in next st, hdc in next st; rep from * around, join with sl st. (30 hdc)
Round 4: Ch 1, sc in each st around, join with sl st. Fasten off, leaving a 12-inch tail for sewing. (30 sc)
Using the tail and a yarn needle, run a gathering stitch around the outer edge and pull gently to slightly cup the pumpkin, then flatten it. With Color C, embroider a small vertical stem at the top center using 4–5 straight stitches. With dark brown, make 1–2 small curly tendrils with a couching stitch beside the stem.
Assembly and Finishing
Block the panel: Pin the panel to a towel or blocking mat, mist it lightly with water, and gently stretch it to exactly 12 by 14 inches. Let it dry completely. This makes the star points pop and keeps the rectangle square.
Place the pumpkins: Arrange the three pumpkins along the lower edge, spacing them evenly with centers about 3 inches apart and about 1.5 inches up from the bottom border. Pin them in place.
Sew them down: Using a tapestry needle and the yarn tail, whipstitch each pumpkin to the panel through the back loops only. Whipstitch means bringing the needle up through one loop of the pumpkin and one stitch of the panel, then over and around again, creating small even stitches all the way around.
Make the hanging loop: With Color B, ch 12, then sl st in each ch across. Fold the strip in half and sew it securely to the top center of the panel with several firm stitches.
Weave in ends: Thread each loose yarn end onto the tapestry needle and weave it back and forth through the back of the fabric for about 2 inches, then trim close to the fabric.
Final steam: Lightly steam block the appliqués and the loop so everything lies flat. Your wall hanging is finished.
Pro Tips and Variations
- Change the colors: Swap pastel orange for deep rust and cream for oatmeal for a richer autumn look, or use sage and ivory for a softer cottage palette.
- Adjust the size: To make a wider hanging, begin with a longer starting chain in an odd number (add 6 chains for each extra star). To make it taller, simply repeat the two-row stripe sequence more times.
- Substitute yarn: Any bulky weight 5 yarn will work. Just check your gauge again, because different fibers and brands can change your stitch size.
- Add more pumpkins: Make five smaller pumpkins instead of three by stopping after Round 3 on each one, then space them evenly along the bottom for a fuller patch.