Petal Ribbon Puff Capelet Free Pattern: A Whimsical Crochet Collar Cape
Introduction
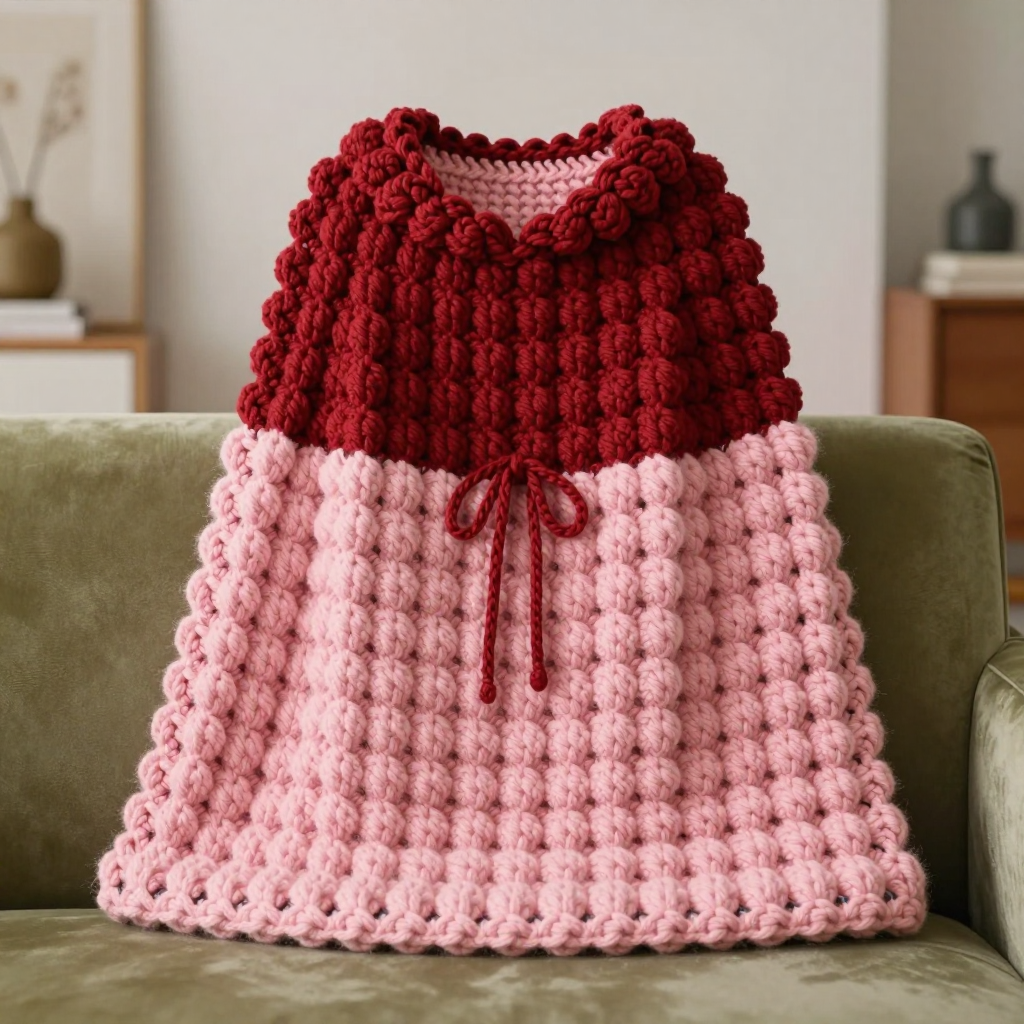
Welcome to the Petal Ribbon Puff Capelet — a soft, cloud-like collar cape that looks far more complicated than it actually is. This project is absolutely perfect for complete beginners: it is worked flat in simple back-and-forth rows, there is no shaping, no increasing, and no decreasing, and it uses only two stitches (single crochet and the puff stitch). The finished piece is a straight tube about 96 cm (38 in) around and 32 cm (12.5 in) deep, with a wide cherry-red puff stitch collar at the top and a soft pink puff stitch body below. Made from a mohair silk blend held double, it feels feather-light, fluffy, and gently warm — like wearing a hug around your shoulders. A thin red crocheted cord threads through the top edge and ties in a simple bow at the front, giving it that whimsical, ribbon-like finish.
Materials Needed
- Yarn: Mohair silk blend, lace weight, held double (two strands worked together as if they were one). You need approximately 200 m in Cherry Red (about 2 skeins of 50 g / 420 m) and approximately 300 m in Soft Pink (about 3 skeins of 50 g / 420 m).
- Crochet hook: 5.0 mm (US H-8).
- Stitch markers: 2–4 (or use small safety pins or scrap yarn loops).
- Tapestry needle: a large blunt needle with an eye big enough for your yarn, used for seaming and weaving in ends.
- Scissors for cutting yarn.
- Measuring tape for checking gauge and finished size.
- Steamer or iron with steam setting (used gently, never pressed flat) for the final finishing step.
- Finished size: One size fits most adults. Circumference 96 cm (38 in), depth 32 cm (12.5 in) — made up of a 10 cm (4 in) red collar band plus a 22 cm (8.5 in) pink body.
Abbreviations and Beginner Glossary
- ch — chain. Make a loop with the yarn, pass the hook through it, wrap yarn over the hook, and pull it through the loop. That is one chain. A row of chains is your starting foundation.
- st(s) — stitch(es). One completed unit of crochet work.
- sc — single crochet. Insert the hook into the stitch, wrap yarn over the hook, pull up a loop (2 loops on hook), wrap yarn over again, pull through both loops. One single crochet made.
- puff — puff stitch. (Yarn over, insert hook into the stitch, yarn over, pull up a loop) three times — you will have 7 loops on your hook. Then yarn over and pull through all 7 loops at once, and chain 1 to close it. The closing chain 1 does not count as a stitch.
- RS — right side. The "public" side of the fabric that faces outward when worn.
- rep — repeat. Do the instruction again.
- tog / seam — joining two edges together with a needle and yarn.
- whipstitch — a simple seaming stitch: pass the needle over both edges and back through, over and over, like a spiral of small diagonal stitches.
- fasten off — cut the yarn leaving a tail, pull the tail all the way through the last loop, and pull tight to lock it.
- weave in ends — thread a yarn tail onto a tapestry needle and run it back and forth through the fabric so it disappears and cannot unravel.
- gauge — how many stitches and rows fit in 10 cm (4 in). It tells you whether your fabric will come out the right size.
Gauge
8 puff stitches and 8 rows = 10 cm (4 in) in puff stitch pattern, measured after light steaming.
Gauge matters because it is the only way to know your capelet will come out the size written. If your stitches are bigger than the pattern's, the capelet will be too large; if smaller, it will be too tight. To check: with your yarn held double and your 5.0 mm hook, chain 20, then work about 10 rows of the puff pattern (alternating a puff row and a plain single crochet row). Lay the swatch flat, steam it lightly, let it dry, then measure 10 cm (4 in) across the middle and count how many puff stitches fit. If you have more than 8, go up one hook size; if fewer, go down one hook size. Always swatch before you begin — it takes 20 minutes and saves hours.
Beginner Tips Before You Start
- Hold two strands together as one. Pull one strand from the outside of the skein and one from the inside so they do not tangle, and always work with both strands on the hook at the same time.
- Do not pull the yarn too tight. Puff stitches need a little room to puff. Keep your loops relaxed and even; if your puffs look squashed, loosen your grip.
- Use stitch markers. Place a marker in the first stitch of every row so you never lose your place, and place one at each end of Row 1 to mark your edges.
- Count every row. Puff rows and plain rows alternate, so it is easy to lose track. Say the row number out loud as you finish it.
- The chain 1 that closes each puff is not a stitch. When you work the next row, skip over it and work only into the puff itself and the single crochets.
- Work loosely on the foundation chain. A tight chain makes Row 1 difficult; if needed, use a hook one size larger just for the chain, then switch back.
Step-by-Step Instructions
Red Collar Band (approx. 10 cm / 4 in deep)
With Cherry Red (held double), ch 78.
Row 1 (RS): Sc in the 2nd ch from the hook and in each ch across. (77 sc) Turn.
Row 2: Ch 1, sc in the first sc, *puff in the next sc, sc in the next sc; rep from * across. (38 puffs, 39 sc) Turn.
Row 3: Ch 1, sc in each st across, working 1 sc into each puff and each sc. (77 sc) Turn.
Rows 4–9: Rep Rows 2–3 three more times, ending with a Row 3. (77 sc) Do not fasten off. The collar now measures approx. 10 cm (4 in).
Pink Body (approx. 22 cm / 8.5 in deep)
Change to Soft Pink (held double).
Row 10: Ch 1, sc in each sc across. (77 sc) Turn.
Row 11: Ch 1, sc in the first sc, *puff in the next sc, sc in the next sc; rep from * across. (38 puffs, 39 sc) Turn.
Row 12: Ch 1, sc in each st across. (77 sc) Turn.
Rows 13–26: Rep Rows 11–12 seven more times, ending with a Row 12. (77 sc) The body now measures approx. 22 cm (8.5 in). Fasten off, leaving a 40 cm (16 in) tail.
Cord
With Cherry Red (held double), leave a 15 cm (6 in) tail and ch 90. Fasten off, leaving a 15 cm (6 in) tail. Tie a small knot in each end so it does not unravel.
Assembly and Finishing
Seam the tube: Fold the piece in half widthwise with right sides together, aligning the first row (the top of the red collar) with the last row (the bottom of the pink body). Thread the 40 cm tail onto your tapestry needle and whipstitch the two short edges together: bring the needle from the back to the front over both edges, then repeat, making small diagonal stitches about 5 mm apart all the way down. Pull each stitch snug but not tight so the seam stays soft. Fasten off and weave in the end.
Thread the cord: Using your crochet hook or fingers, thread the cord through the top edge of the red collar, going in and out every few stitches, starting and ending at the front centre so the two ends hang evenly. Tie in a simple bow.
Weave in all ends: Thread each tail onto the tapestry needle and run it back and forth through the fabric for about 5 cm, then trim close to the fabric.
Block: Lay the capelet flat on a towel. Hold a steamer (or iron on steam setting) about 15 cm above the fabric and let the steam relax the mohair silk and open up the puff stitches. Never press the iron directly onto the fabric — mohair silk will flatten and lose its halo. Let it dry completely before wearing.
Pro Tips and Variations
- Change the colours: Swap the cherry red and soft pink for any two colours you love — a cream collar with a sage body, or a deep plum collar with a dusty lilac body, both look beautiful in this texture.
- Adjust the size: To make the capelet wider or narrower, add or remove chains in multiples of 2 at the start (each 2 chains adds one puff and one sc). Every 2 chains changes the circumference by roughly 2.5 cm (1 in).
- Substitute the yarn: Any lace weight yarn held double will work, or use a single strand of fingering/sport weight yarn — just swatch again, because the gauge will change.
- Add a decorative edge: Work one final row of sc all the way around the bottom edge of the pink body for a neat, finished hem, or add a small picot (ch 3, slip stitch into the same stitch) every 5 stitches for a scalloped look.


