Gold Grid C2C Crochet Placemat Set Free Pattern
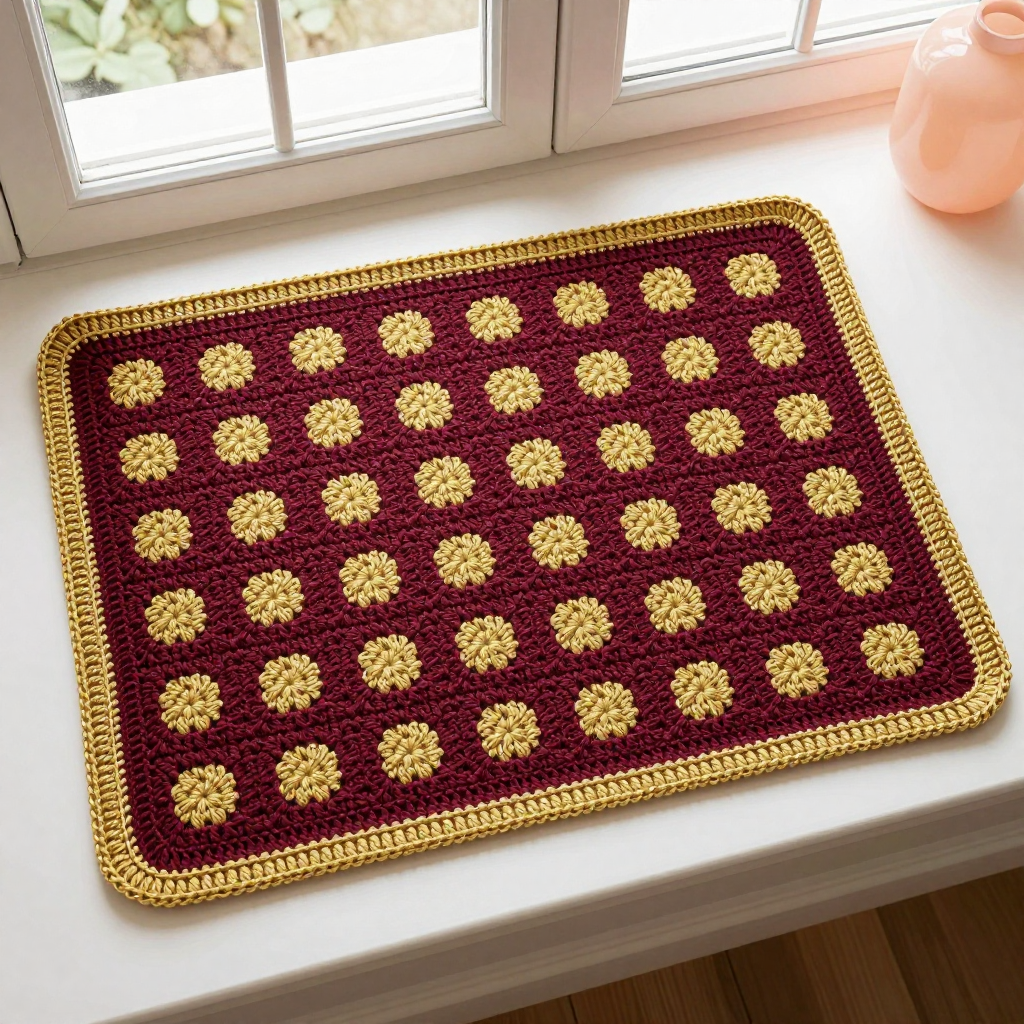
Gold Grid C2C Crochet Placemat Set — Free Beginner Pattern
Introduction
If you have never held a crochet hook before, this is the perfect first "real" project for you. These placemats are worked in corner-to-corner (C2C) crochet, a technique that builds a fabric out of little square blocks — so instead of following a complicated stitch chart, you simply work one small square at a time and watch a rectangle grow. The finished placemat is a flat, firm rectangle about 14 x 20 inches, with a rich burgundy ground and a clean gold grid of single squares, all framed by a slightly raised two-round gold double crochet border. It feels smooth and matte under a plate, holds its shape beautifully, and looks far more impressive than the skills it requires. Make one for yourself and one for a friend — the set of two takes only a weekend of relaxed evening crocheting.
Materials Needed
- Yarn: Medium (worsted/aran, weight 4) acrylic or cotton-blend yarn. Approximately 220 yd burgundy and 110 yd gold per placemat — about 440 yd burgundy and 220 yd gold for the set of two.
- Hook: Size H/8 (5.0 mm) crochet hook, or whatever size you need to match the gauge below.
- Stitch markers: At least 4 (helpful for marking corners and color changes).
- Tapestry needle: A blunt-tipped needle with a large eye for weaving in ends.
- Scissors: Any sharp pair for cutting yarn.
- Measuring tape or ruler: For checking gauge and finished size.
- Blocking supplies: Pins and a spray bottle of water, or a steam iron (optional but recommended).
- Finished size: Approximately 14 x 20 inches per placemat after the border. The set makes 2 placemats.
Abbreviations and Beginner Glossary
- ch — chain. Make a loop of yarn over the hook and pull it through the loop already on your hook. Each one looks like a little "V."
- dc — double crochet. Yarn over (wrap yarn around hook), insert hook into the stitch, pull up a loop (3 loops on hook), yarn over and pull through 2 loops, yarn over and pull through the last 2 loops. One dc made.
- sl st — slip stitch. Insert hook into the stitch, yarn over, and pull that loop straight through the loop on your hook. It creates almost no height — it is used to join.
- C2C block — corner-to-corner block. A small square made of ch 3 + 3 dc worked into the ch-3 space of the block below. One block measures about 1 inch square.
- ch-3 space — the little hole created by a chain of 3. You work your next block into this hole.
- turning chain — the ch 3 you make at the start of a row to bring your yarn up to the height of a double crochet.
- increase — adding one more block to the row, making the placemat wider.
- decrease — removing one block from the row, making the placemat narrower.
- work even — keep the same number of blocks per row (no increasing or decreasing).
- fasten off — cut the yarn a few inches from your work and pull the tail all the way through the last loop to lock it.
- weave in ends — thread a yarn tail onto a tapestry needle and sew it back and forth through the fabric so it disappears.
- B — burgundy (the main ground color).
- G — gold (the grid and border color).
Gauge
1 C2C block (ch 3 + 3 dc) = approximately 1 inch square. 13 blocks x 19 blocks = approximately 13 x 19 inches before the border.
Why gauge matters: Gauge is simply how big your stitches turn out. If your blocks are bigger than 1 inch, your placemat will be too large; if smaller, it will be too small. Because this pattern is built from a fixed number of blocks, matching the block size is what guarantees a 14 x 20 inch placemat.
How to make a gauge swatch: With your hook and yarn, work Rows 1–5 of the pattern exactly as written below (this gives you a small triangle of 5 blocks). Lay it flat and measure one single block from corner to corner. If it is about 1 inch, you are ready. If your block is larger than 1 inch, switch to a smaller hook (such as G/6, 4.0 mm). If it is smaller, switch to a larger hook (such as I/9, 5.5 mm).
Beginner Tips Before You Start
- Count your blocks out loud at the end of every row. C2C is easy to lose track of — the block count in parentheses is your safety net.
- Do not pull your yarn too tight. Tight tension makes the blocks shrink and the placemat curl. Keep your loops relaxed and even.
- Change color in the last double crochet of a block, before the slip stitch join. This hides the color change neatly and keeps the grid crisp.
- Carry the unused color loosely along the edge. Catch it under every few stitches so it does not pull, but never stretch it tight across the row.
- Use a stitch marker in the first block of each row so you always know where the row began.
- Turn your work the same way every time (in the same direction) so your edges stay straight and even.
Step-by-Step Instructions
Grid Design Overview
The placemat is worked in C2C from one corner to the opposite corner. The grid is formed by gold blocks on a burgundy ground: gold blocks run along the outer edge rows and every 4th block inward, creating a simple open grid of single gold squares. Read the grid from the bottom-right corner to the top-left corner as you work.
Grid chart (each letter = one C2C block; read each row from right to left as worked):
- Row 1: B
- Row 2: B B
- Row 3: B G B
- Row 4: B B B B
- Row 5: B G B G B
- Row 6: B B B B B B
- Row 7: B G B G B G B
- Row 8: B B B B B B B B
- Row 9: B G B G B G B G B
- Row 10: B B B B B B B B B B
- Row 11: B G B G B G B G B G B
- Row 12: B B B B B B B B B B B B
- Row 13: B G B G B G B G B G B G B
- Row 14: B B B B B B B B B B B B B
- Row 15: B G B G B G B G B G B G B
- Row 16: B B B B B B B B B B B B B
- Row 17: B G B G B G B G B G B G B
- Row 18: B B B B B B B B B B B B B
- Row 19: B G B G B G B G B G B G B
Note: Work the increase section first (Rows 1–13), then work even across 13 blocks for Rows 14–19, then decrease back down to the final corner.
Increase Section (Rows 1–13)
Row 1 (B): Ch 4, dc in 4th ch from hook and in each of next 2 ch (first block made). Turn. (1 block)
Row 2 (B): Ch 3, 3 dc in ch-3 space of previous block, sl st in top of turning ch of previous row. Turn. (2 blocks)
Row 3 (B, G, B): Ch 3, 3 dc in first ch-3 space, sl st to next block; change to G, ch 3, 3 dc in next ch-3 space, sl st; change to B, ch 3, 3 dc in last ch-3 space. Turn. (3 blocks)
Row 4 (B): Work 4 blocks in B, increasing 1 block at the beginning of the row as established. Turn. (4 blocks)
Row 5 (B, G, B, G, B): Work 5 blocks following the color sequence, changing color at the last dc of each block before the sl st join. Turn. (5 blocks)
Rows 6–13: Continue increasing 1 block per row, following the grid chart color sequence for each row. Each row begins with a ch 3 and ends with a sl st join to the previous row's turning chain. Change colors by working the final dc of a block with the new color, then carrying the unused color loosely along the edge. (Row 13 = 13 blocks)
Even Section (Rows 14–19)
Rows 14–19: Work even at 13 blocks per row, following the grid chart color sequence. To work even, begin each row with a sl st across the first block, then ch 3 and work 3 dc in each ch-3 space across, ending with a sl st join. Do not increase or decrease. (13 blocks each row; 6 rows even)
Decrease Section (Rows 20–31)
Row 20: Sl st across first block, ch 3, work 3 dc in each remaining ch-3 space across, following chart colors. Turn. (12 blocks)
Rows 21–31: Continue decreasing 1 block at the beginning of each row, following the grid chart color sequence in reverse (mirror the increase rows). Final row = 1 block. Fasten off and weave in ends. (Row 31 = 1 block)
Gold Double Crochet Border
Round 1: With G, join with sl st to any corner of the placemat. Ch 3 (counts as first dc), work 2 dc in same corner space, then work dc evenly along the side edge (approximately 1 dc per row end), working 3 dc in each corner. Work dc evenly around all four sides, join with sl st to top of beginning ch 3.
Round 2: Ch 3, dc in each dc around, working 3 dc in each corner. Join with sl st. Fasten off and weave in ends.
Assembly and Finishing
Weaving in ends: Thread each yarn tail onto your tapestry needle. Turn the placemat to the wrong side and sew the tail back and forth through the backs of several stitches, changing direction once, then trim close to the fabric. Never knot your ends — weaving hides them permanently.
Blocking: Lay the placemat flat on a towel or blocking mat. Pin each corner so the rectangle is perfectly square at 14 x 20 inches. Lightly mist with water (or hold a steam iron a few inches above the surface — do not press the iron directly onto the stitches). Let it dry completely. This opens up the C2C blocks and squares the corners.
Make the second placemat: Repeat the entire pattern exactly as written to create an identical pair.
Pro Tips and Variations
- Change the colors: Swap burgundy for deep teal, navy, or charcoal, and gold for cream or copper. Keep one dark ground and one light grid color so the pattern still reads clearly.
- Adjust the size: To make a longer runner, simply add more even rows in the middle section (Rows 14–19) — each extra row adds about 1 inch of length. To make a square coaster, stop increasing at 7 blocks and decrease immediately.
- Substitute yarn: Cotton yarn gives a crisper, more washable placemat; acrylic is softer and more affordable. Always re-check your gauge block after switching yarns.
- Add a wider border: Work a third border round of single crochet (sc — insert hook, pull up a loop, yarn over and pull through both loops) for a tighter, more defined edge.


