Heirloom Rose Garden Bookmark Free Pattern – A Romantic Crochet Keepsake
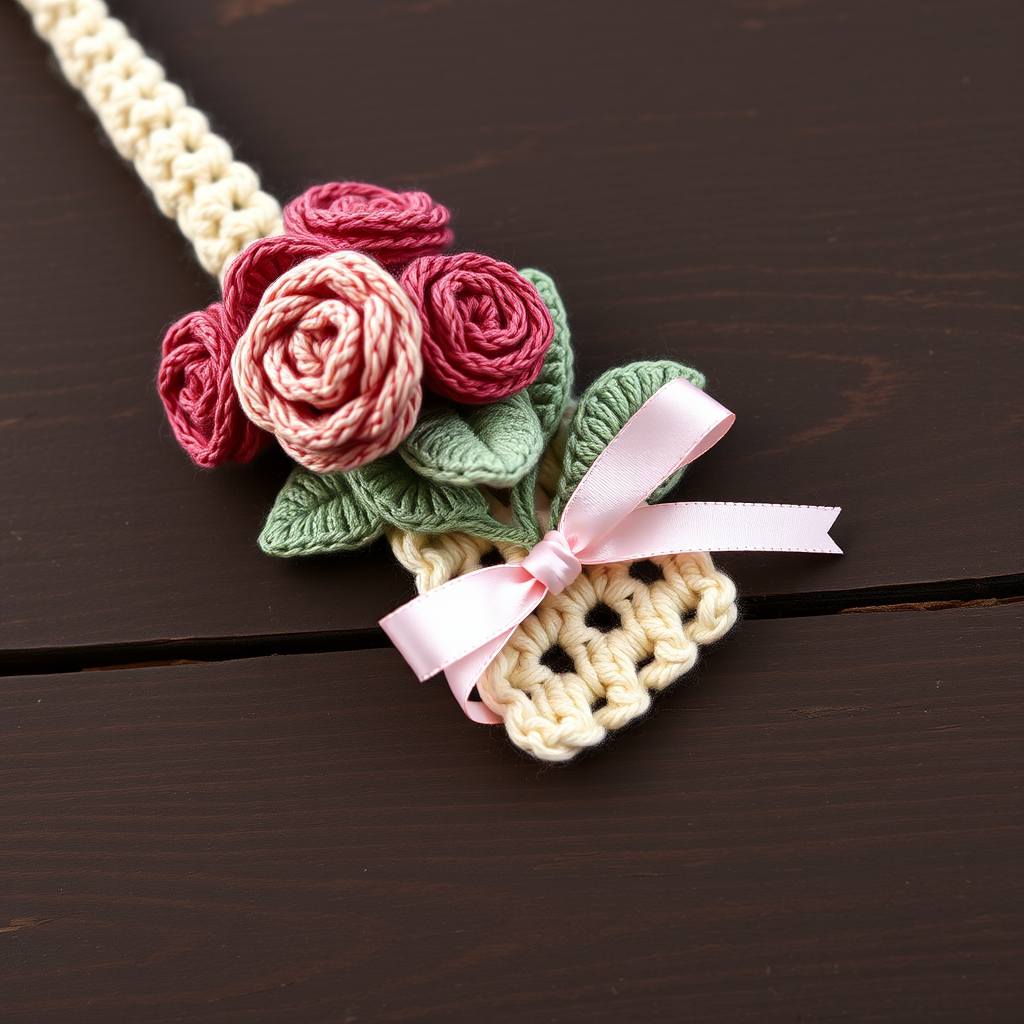
Heirloom Rose Garden Bookmark Free Pattern – A Romantic Crochet Keepsake
There is something undeniably magical about a handcrafted bookmark. It transforms the simple act of reading into a ritual, a moment of quiet beauty. Today, I am thrilled to share a pattern that truly captures this sentiment: the Heirloom Rose Garden Bookmark. This romantic design features a cascade of dimensional roses and leafy vines, creating a delicate keepsake that is perfect for marking the pages of your favorite novels or gifting to a cherished book lover.
This project is a wonderful way to use up small amounts of worsted weight cotton yarn and practice a few classic crochet techniques. The combination of a neat single crochet stem with three-dimensional floral motifs results in a piece that is both elegant and tactile. Whether you are an experienced crocheter looking for a quick, satisfying project or a confident beginner ready for a new challenge, this pattern is designed to guide you through every step with clarity and ease.
Materials Needed
Before we begin, let's gather our supplies. This project is wonderfully portable and requires very little yarn, making it an ideal stash-buster.
- Yarn: Worsted weight cotton yarn in four colors:
- Deep Rose (for the large roses)
- Blush Pink (for the small rose)
- Sage Green (for the leaves)
- Cream (for the bookmark stem)
- Hook: 3.5mm (E) crochet hook
- Gauge: Not critical for this project; aim for a firm, neat stitch to ensure the bookmark is sturdy and holds its shape.
- Extras: Yarn needle for weaving in ends and sewing pieces together, scissors, and optionally, a thin satin ribbon (approximately ¼ inch wide) for threading through the loops.
Note on Yarn: Cotton yarn is highly recommended for this project. It provides excellent stitch definition, which is essential for showcasing the intricate rose petals and leaf textures. It is also durable and will withstand the wear and tear of being tucked into books.
Step-by-Step Instructions
This pattern is broken down into four main components: the bookmark stem, the large roses, the small rose, and the leaves. We will then assemble them into the final, beautiful keepsake. Let's get started!
Part 1: Bookmark Stem (Make 1)
The stem forms the foundation of our bookmark. It is worked in rows of single crochet, with a decorative row of loops near the bottom for threading the ribbon.
Row 1: Ch 41. Sc in 2nd ch from hook and in each ch across. (40 sc)
Row 2: Ch 1, turn. Sc in each st across. (40 sc)
Row 3: Ch 1, turn. Sc in first 3 sts, *ch 5, skip 2 sts, sc in next 3 sts* repeat from * to * across, ending with sc in last 3 sts. (This creates the loops for threading the ribbon or tassel)
Row 4: Ch 1, turn. Sc in each st and in each ch across. (40 sc)
Fasten off and weave in ends.
Pro Tip: When working Row 3, be careful not to twist your chain loops. Keep them facing the same direction as you work across. This will ensure they lie flat and look neat when the ribbon is threaded through.
Part 2: Large Rose (Make 2)
These are the stars of the show! Worked in the round, these roses build up from a flat circle into a beautifully layered, dimensional flower.
Round 1: With deep rose, make a magic ring, ch 2 (counts as dc), work 11 dc into ring, join with sl st to top of ch-2. (12 dc)
Round 2: Ch 2, dc in same st, 2 dc in each st around, join. (24 dc)
Round 3: Ch 3 (counts as dc), dc in same st, *ch 2, skip 1 st, 2 dc in next st* repeat from * to * around, ending with ch 2, join to top of ch-3. (12 clusters of 2 dc, 12 ch-2 spaces)
Round 4: Sl st into first ch-2 space. Ch 3, 3 dc, ch 3, sl st in same space (first petal). *Sl st in next ch-2 space, ch 3, 3 dc, ch 3, sl st in same space* repeat from * to * around. Fasten off, leaving a long tail for sewing.
Understanding the Construction: In Round 3, we are creating the "skeleton" for the petals. The ch-2 spaces are the gaps where our petals will bloom in Round 4. When you work the petals in Round 4, you are essentially creating a scalloped edge that curls inward, giving the rose its dimensional, layered look.
Part 3: Small Rose (Make 1)
This smaller rose adds a lovely contrast in size and color. It follows the same initial construction as the large rose but has a simpler, tighter petal arrangement.
Round 1: With blush pink, make a magic ring, ch 2 (counts as dc), work 11 dc into ring, join with sl st to top of ch-2. (12 dc)
Round 2: Ch 2, dc in same st, 2 dc in each st around, join. (24 dc)
Round 3: Ch 3, 2 dc in same st, *ch 1, skip 1 st, 3 dc in next st* repeat from * to * around, ending with ch 1, join. Fasten off, leaving a tail.
Note: The small rose does not have a separate petal round. The clusters of 3 dc worked in Round 3 form the petals directly, creating a more compact and tightly curled flower.
Part 4: Leaf (Make 4)
These simple leaves provide the perfect verdant backdrop for our roses. They are worked in rows along both sides of a starting chain, creating a classic leaf shape.
With sage green, ch 7. Sc in 2nd ch from hook, hdc in next, dc in next 2, hdc in next, sc in last ch. Ch 1, turn, working along the other side of the chain: sc in first st, hdc in next, dc in next 2, hdc in next, sc in last. Fasten off, leaving a tail.
Pro Tip: When working the second side of the leaf, you will be working into the "bumps" on the back of the chain. This creates a neat, symmetrical leaf shape. Ensure you work into the same stitches you used on the first side to avoid gaps.
Part 5: Assembly
Now for the most rewarding part – bringing all the pieces together to create your heirloom bookmark!
- Position the Roses: Lay your bookmark stem flat. Position the two large roses and one small rose along the top half of the stem, slightly overlapping them. A pleasing arrangement is to place one large rose in the center, with the second large rose and the small rose flanking it at slight angles. Play around with the placement until you are happy with the composition.
- Sew the Roses: Using the long tails left on the roses, thread them onto your yarn needle. Sew each rose securely to the stem, making sure to catch the back of the rose and the stem fabric. Use small, firm stitches to ensure they are well-attached. Weave in the ends.
- Arrange the Leaves: Tuck the four leaves around the roses, positioning them underneath the petals so they peek out naturally. Sew them in place using their tails, again with small, secure stitches.
- Add the Ribbon (Optional): Thread a thin satin ribbon through the loops at the bottom of the bookmark. Tie a small, neat bow. This adds a final touch of elegance and romance.
- Final Weave-In: Carefully weave in any remaining ends from the leaves and roses to ensure the back of your bookmark is as neat as the front.
And there you have it – your very own Heirloom Rose Garden Bookmark! This beautiful, romantic keepsake is ready to grace the pages of your current read or to be gifted to someone special. The dimensional roses and delicate leaves are a testament to the beauty of handcrafted items, and this bookmark is sure to be treasured for years to come.
I hope you have enjoyed this pattern. Happy crocheting, and may your reading adventures be filled with beauty and inspiration!


