Orange Hedgehog Bookmark Free Crochet Pattern
Orange Hedgehog Bookmark: A Free Beginner Crochet Pattern
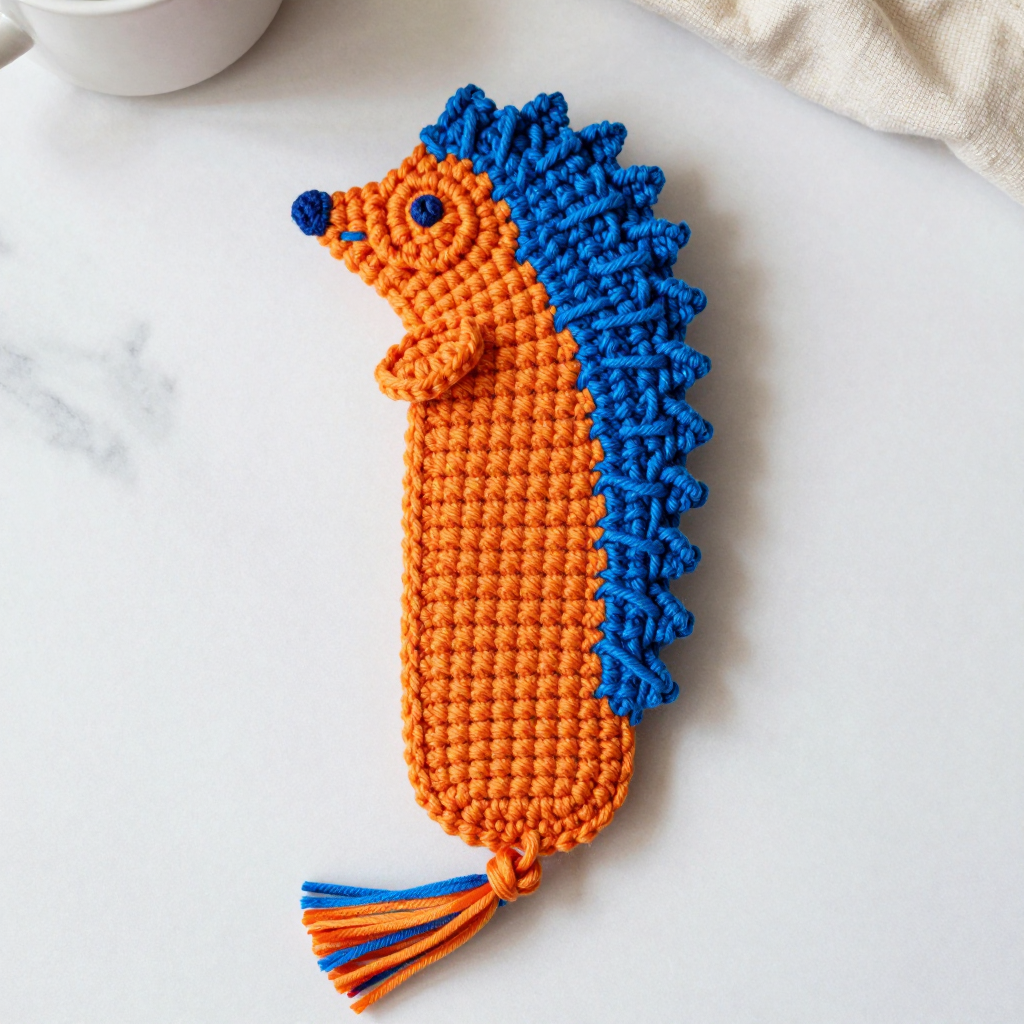
This little orange hedgehog bookmark is the perfect first project for anyone who has never held a crochet hook before. It is small, quick, and forgiving — you will practice the single crochet stitch, learn to work in rows and in the round, and finish with simple embroidery, all in one cozy afternoon. The finished bookmark is about 2 inches (5 cm) wide and 7 inches (18 cm) long, with a soft, rounded hedgehog head at the top, tiny cobalt blue eyes and nose, and little blue quill stitches across its back. It feels soft and matte in worsted-weight yarn, and it makes a charming cottagecore page keeper for your favorite book or a sweet handmade gift.
Materials Needed
- Yarn: Worsted weight (category 4) acrylic or cotton yarn, approximately 40 yards total — 30 yards orange and 10 yards cobalt blue.
- Crochet hook: G/6 (4 mm) hook.
- Stitch marker (optional, but helpful for marking the first stitch of each round).
- Tapestry needle (a large-eyed, blunt-tipped needle for embroidery and weaving in ends).
- Scissors.
- Small amount of stuffing (polyester fiberfill or orange yarn scraps) for the head.
- Finished size: About 2 inches (5 cm) wide by 7 inches (18 cm) long, excluding the tassel. The tassel adds about 2 inches (5 cm).
Abbreviations and Beginner Glossary
- ch – chain. Make a loop with the yarn, pull a new loop through it. Each chain looks like a tiny "V".
- sc – single crochet. Insert your hook into the stitch, pull up a loop (2 loops on hook), yarn over, pull through both loops. One loop remains.
- sl st – slip stitch. Insert hook into the stitch, yarn over, and pull the yarn straight through both the stitch and the loop on your hook. It joins without adding height.
- sc2tog – single crochet 2 together (a decrease). Insert hook into the first stitch, pull up a loop; insert hook into the next stitch, pull up a loop (3 loops on hook); yarn over and pull through all 3 loops. Two stitches become one.
- st(s) – stitch(es).
- BLO – back loop only. Each stitch top has two loops (a front loop and a back loop). Working in the back loop only means you insert your hook under just the loop farthest from you.
- turn – flip your work over so you can work back across the row you just made.
- fasten off – cut the yarn, pull the tail all the way through the last loop, and tighten.
- join with sl st – after working a round, slip stitch into the first stitch of that round to close the circle.
Gauge
Gauge: 4 single crochet stitches and 5 rows = 1 inch (2.5 cm) in single crochet.
Gauge means how many stitches and rows fit into a measured square. It matters because it controls the finished size: if your stitches are looser than this, your bookmark will come out wider and longer than 2 by 7 inches. To check, crochet a small square about 3 inches wide and 3 inches tall in single crochet, lay it flat, and measure 1 inch across the middle. Count the stitches in that inch. If you have more than 4, try a larger hook; if you have fewer than 4, try a smaller hook. A bookmark is forgiving, so don't worry if you are off by a little — but a quick swatch saves surprises.
Beginner Tips Before You Start
- Count every row. The body is 30 identical rows, so keep a tally on paper or with a stitch marker every 10 rows. Losing your place is the most common beginner mistake.
- Do not pull the yarn too tight. Keep your tension relaxed and even. Tight stitches make the hook hard to insert and make the bookmark stiff and narrow.
- Use a stitch marker. Place it in the first stitch of each round on the head so you always know where the round begins and ends.
- Work the first row loosely. The starting chain is the hardest part. If it feels tight, use a hook one size larger just for the chain, then switch back to your 4 mm hook.
- Stuff the head lightly. A little filling gives the head a soft dome shape. Too much and the stitches will stretch and gap.
- Keep your embroidery simple. Short, slightly angled quill stitches look natural. Perfection is not the goal — charm is.
Step-by-Step Instructions
Body (worked flat in rows, orange)
Row 1: Ch 9. Sc in the 2nd ch from hook and in each ch across. (8 sc)
Row 2: Ch 1, turn. Sc in each st across. (8 sc)
Rows 3–30: Repeat Row 2. (8 sc per row)
Do not fasten off. The body should measure about 2 inches wide and 6 inches long.
Hedgehog Head (worked in the round from the top of the body, orange)
Round 1: Ch 1, work 8 sc evenly along the top edge of the body (one sc in each row-end along the short edge). Join with sl st to the first sc. (8 sc)
Round 2: Ch 1, 2 sc in each st around. Join with sl st. (16 sc)
Round 3: Ch 1, [sc in next st, 2 sc in next st] around. Join with sl st. (24 sc)
Round 4: Ch 1, sc in each st around. Join with sl st. (24 sc)
Round 5: Ch 1, [sc in next 2 sts, 2 sc in next st] around. Join with sl st. (32 sc)
Round 6: Ch 1, sc in each st around. Join with sl st. (32 sc)
Round 7: Ch 1, [sc in next 2 sts, sc2tog] around. Join with sl st. (24 sc)
Round 8: Ch 1, [sc in next st, sc2tog] around. Join with sl st. (16 sc)
Round 9: Ch 1, sc2tog around. Join with sl st. (8 sc)
Stuff the head lightly with a small amount of orange yarn scraps or polyester fiberfill.
Round 10: Ch 1, sc2tog around. Join with sl st. (4 sc)
Fasten off, leaving a 6-inch tail. Thread the tail onto your tapestry needle and draw it through the remaining 4 sts. Pull tight to close the hole. Weave in the end.
Face Details (cobalt blue)
Nose: With cobalt blue yarn and your tapestry needle, embroider a small satin-stitch triangle at the tip of the head (the closed end), about 1/4 inch wide. To make a satin stitch, bring the needle up on one side of the shape and down on the other, filling the shape with straight, side-by-side stitches.
Eyes: Embroider two small French knots or straight stitches in cobalt blue, spaced about 1/2 inch apart and 1/2 inch back from the nose. For a French knot, wrap the yarn around the needle twice, then push the needle back down close to where it came up and pull gently.
Quills (cobalt blue embroidery)
Using cobalt blue yarn and your tapestry needle, embroider short straight stitches over the head and the upper body to suggest hedgehog quills. Work approximately 20–25 quill stitches, each about 1/4 to 1/2 inch long, radiating outward from the center of the head and extending down the first 2 inches of the body. Keep the stitches evenly spaced and slightly angled for a natural look.
Tassel (orange and cobalt blue)
Cut 6 strands of orange yarn and 4 strands of cobalt blue yarn, each 6 inches long. Fold the bundle in half. Using your crochet hook, pull the folded loop through the bottom edge of the body (the starting chain edge), then pull the yarn ends through the loop and tighten to secure. Trim the ends evenly to about 2 inches.
Assembly and Finishing
Weaving in ends: Thread each loose tail onto your tapestry needle and run it back and forth through the inside of the stitches for about 1 inch, then trim close to the work. Never knot your ends — weaving hides them neatly.
Shaping the head: Gently roll the stuffed head between your fingers to even out the filling so the dome looks round and smooth.
Blocking: Lightly mist the bookmark with water and pin it flat to a towel or blocking mat, shaping it to 2 by 7 inches. Let it dry completely. Blocking relaxes the stitches and makes the edges lie flat and even.
Final check: Trim any stray tassel strands, and make sure the nose and eyes are secure. Your bookmark is ready to use.
Pro Tips and Variations
- Change the colors: Try a gray hedgehog with cream quills, or a rust-orange body with deep green quills for an autumn look. Any worsted-weight color combination works.
- Adjust the length: For a taller book, add extra rows to the body in pairs (Rows 31–32, and so on). Each extra row adds about 1/5 inch. Keep the head rounds exactly as written.
- Substitute yarn: Cotton yarn gives crisp stitch definition and a sturdy bookmark; acrylic is softer and slightly stretchier. Just check your gauge again, since different fibers behave differently.
- Make a matching set: Work the same pattern in different colors to create a family of little hedgehogs — they make lovely gifts tucked inside a book.