Prairie Horseshoe Filet Crochet Bralette Free Pattern
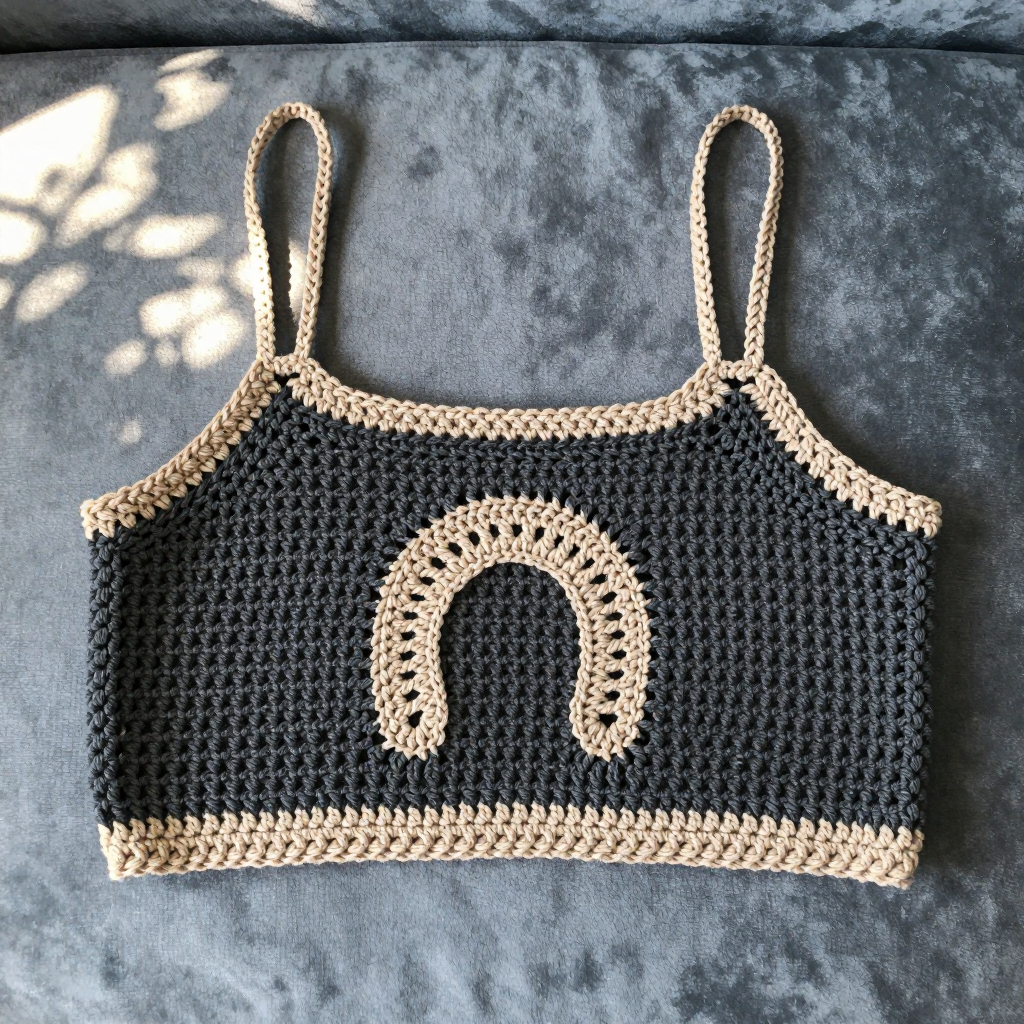
Prairie Horseshoe Filet Crochet Bralette: A Beginner-Friendly Western-Inspired Project
This bralette is perfect for anyone who has just learned a few basic crochet stitches and wants to make something they will actually wear. It is a straight, rectangular band worked flat in filet crochet, which means the whole pattern is built from simple filled and open squares—no shaping, no increasing, no decreasing. The finished piece is a firm, breathable charcoal band about 30 inches around and 5 inches tall, with one crisp oatmeal horseshoe motif floating in the center and soft oatmeal borders top and bottom. It looks structured and a little bit Western, feels cool against the skin thanks to the linen blend, and comes together in a weekend of happy crocheting.
Materials Needed
- Yarn: DK weight linen blend (approx. 50% linen / 50% cotton), approx. 220 yd [200 m] per 100 g skein.
- Main Color (MC), charcoal: approx. 130 yd [120 m]
- Contrast Color (CC), oatmeal: approx. 20 yd [18 m]
- Hook: Size 4.0 mm (US G-6) crochet hook, or the size you need to match gauge
- Stitch markers: at least 4 (to mark the motif squares and the seam)
- Tapestry needle: a blunt-tipped needle with a large eye for weaving in ends
- Scissors
- Measuring tape and a blocking mat with pins (or a towel and rust-proof pins)
Finished size: Teen, fits approx. 30–32 in [76–81 cm] underbust. Finished band circumference approx. 30 in [76 cm]; band height approx. 5 in [12.7 cm]. Changes for a larger size are given in parentheses.
Abbreviations and Beginner Glossary
- ch – chain: yarn over the hook, pull the hook through the loop on your hook. This makes one chain.
- sc – single crochet: insert hook into the stitch, yarn over, pull up a loop (2 loops on hook), yarn over, pull through both loops. One loop remains.
- dc – double crochet: yarn over, insert hook into the stitch, yarn over, pull up a loop (3 loops on hook), yarn over, pull through 2 loops, yarn over, pull through the last 2 loops.
- sl st – slip stitch: insert hook into the stitch, yarn over, pull the loop straight through the loop on your hook. No height is added.
- st(s) – stitch(es): one completed loop or "V" in your fabric.
- MC – main color (charcoal).
- CC – contrast color (oatmeal).
- RS – right side: the front, public face of your work.
- WS – wrong side: the back, hidden face of your work.
- Filet solid square – 3 dc worked side by side. This is a "filled" square.
- Filet open square – ch 2, skip 2 stitches. This is an "empty" square and creates a little window.
- Turn – flip your work over so you can crochet back along the row you just made.
- Fasten off – cut the yarn a few inches from the work, pull the tail all the way through the last loop, and tug gently to lock it.
Gauge
16 dc x 8 rows = 4 in [10 cm] in filet crochet (solid dc ground), blocked.
Gauge is simply how big your stitches come out. If your stitches are bigger than the pattern expects, the bralette will be too loose; if they are smaller, it will be too tight. To check, crochet a small square about 6 in [15 cm] wide in solid dc, block it lightly, then lay a ruler across the middle and count how many double crochet stitches fit in 4 inches and how many rows fit in 4 inches. If you have more stitches than 16, try a larger hook; if you have fewer, try a smaller hook. Please do this swatch—it takes 15 minutes and saves hours of disappointment.
Beginner Tips Before You Start
- Count your squares, not your stitches. Every square is 3 stitches wide, so 40 squares = 120 stitches. If you lose your place, count squares in groups of five.
- Use stitch markers. Place one marker in the first stitch of the motif (square 17) and one in the last (square 23) on Row 3. They will keep the horseshoe centered.
- Do not pull your yarn too tight. The open squares need a little breathing room; if your ch-2 spaces are tight, the horseshoe will look pinched instead of open.
- Keep your turning chain consistent. The ch 3 at the start of every row counts as your first dc. Work your first real dc into the next stitch, not into the base of the chain.
- Work the motif rows slowly. Rows 3–9 are the only rows that differ; the rest is plain double crochet, so relax and enjoy the easy rows.
- Check your width after Row 1. Lay the strip flat and measure: it should be about 30 in [76 cm] wide. If it is far off, now is the time to change hooks.
Step-by-Step Instructions
Set-Up Chain and Solid Ground
With MC, ch 122 (134).
Row 1 (RS): Dc in the 4th ch from hook and in each ch across. Turn. (120 [132] dc — this equals 40 [44] filet squares across.)
Row 2 (WS): Ch 3 (counts as first dc), dc in each st across. Turn. (120 [132] sts — 40 [44] solid squares.)
Horseshoe Motif
The motif is 7 squares wide and sits in squares 17–23, centered. Each row below begins and ends with solid squares; only the middle changes. "Work 1 open square" means ch 2, skip 2 sts. "Work 1 solid square" means dc in each of the next 3 sts.
Row 3 (RS): Ch 3, dc in next 48 sts (16 solid squares). Work 7 open squares. Dc in each remaining st across (17 solid squares). Turn. (120 [132] sts — 16 solid + 7 open + 17 solid = 40 squares.)
Row 4 (WS): Ch 3, dc in next 48 sts. Work 1 open square, 5 solid squares, 1 open square. Dc in each remaining st across. Turn. (120 [132] sts.)
Row 5 (RS): Ch 3, dc in next 48 sts. Work 1 open square, 1 solid square, 3 open squares, 1 solid square, 1 open square. Dc in each remaining st across. Turn. (120 [132] sts.)
Row 6 (WS): Repeat Row 5. (120 [132] sts.)
Row 7 (RS): Repeat Row 5. (120 [132] sts.)
Row 8 (WS): Ch 3, dc in next 48 sts. Work 1 open square, 5 solid squares, 1 open square. Dc in each remaining st across. Turn. (120 [132] sts.)
Row 9 (RS): Ch 3, dc in next 48 sts. Work 7 open squares. Dc in each remaining st across. Turn. (120 [132] sts.)
Top Solid Ground
Row 10 (WS): Ch 3, dc in each st across. Turn. (120 [132] sts — 40 [44] solid squares.) Do not fasten off yet if you plan to work the top edging right away; otherwise fasten off.
Note on color: All ten rows are worked in MC charcoal. The horseshoe appears because of the open squares (negative space) in the solid ground. The oatmeal CC is used only for the edging and ties, which is what gives the motif its light, oatmeal-toned openwork look against the dark band.
Edging (CC Oatmeal)
Bottom edge: With RS facing, join CC at the bottom right corner. Ch 1, then work 1 sc evenly along the bottom edge, about 120 [132] sc, spacing them so the edge lies flat. Fasten off.
Top edge: With RS facing, join CC at the top right corner. Ch 1, work 1 sc evenly along the top edge, about 120 [132] sc. Fasten off. (These two oatmeal rows frame the charcoal band.)
Tie Cord (CC Oatmeal) — Make 2
Cord: Ch 60, then sl st in each ch across. Fasten off, leaving a 6 in [15 cm] tail. (Each cord is about 20 in [50 cm] long.) Make a second cord the same way.
Assembly and Finishing
Block the band first. Pin the rectangle out to 30 x 5 in [76 x 12.7 cm] on a blocking mat, mist it lightly with water, and let it dry completely. This opens the filet squares and makes the horseshoe crisp.
Seam the tube. With RS together, fold the band in half so the two short side edges meet. Thread your tapestry needle and whipstitch (or sl st) the short edges together, working through both layers, from the bottom edge to the top edge. Try it on before you weave in the seam tail—if it is snug, you can undo the seam and add a few more stitches to the band.
Attach the ties. Sew one cord securely to each top corner of the band with your tapestry needle, using the 6 in [15 cm] tails. These can tie halter-style at the back of the neck, or cross behind and tie at the back for a different look.
Weave in all ends. Thread each tail onto the tapestry needle and run it back and forth through the back of the fabric for about 2 inches, then trim close. Never knot your ends—they work loose in the wash.
Final steam. Hold a steam iron an inch above the fabric (never press it down) to set the filet grid and smooth the edging. Let it dry fully before wearing.
Pro Tips and Variations
- Change the colors. Try a cream band with a rust horseshoe, or a dusty rose band with a natural oatmeal motif. Any two colors with good contrast will make the filet shape pop.
- Adjust the size. To go up a size, add 12 stitches (4 squares) to the set-up chain, which adds about 3 in [7.6 cm] of circumference. Keep the motif centered by adding 2 solid squares to the left and 2 to the right of the horseshoe.
- Substitute the yarn. A cotton DK or a cotton-bamboo blend works beautifully and gives a slightly softer drape. Avoid fuzzy yarns like mohair—they hide the crisp filet grid.
- Make it a top, not a bralette. Work 6 extra solid rows before the motif and 6 after, and you will have a cropped tank band instead of a bralette—perfect for layering.


