Sunburst Meadow Granny Square Blanket Free Pattern – A Radiant Floral Mosaic Throw

Sunburst Meadow Granny Square Blanket Free Pattern – A Radiant Floral Mosaic Throw
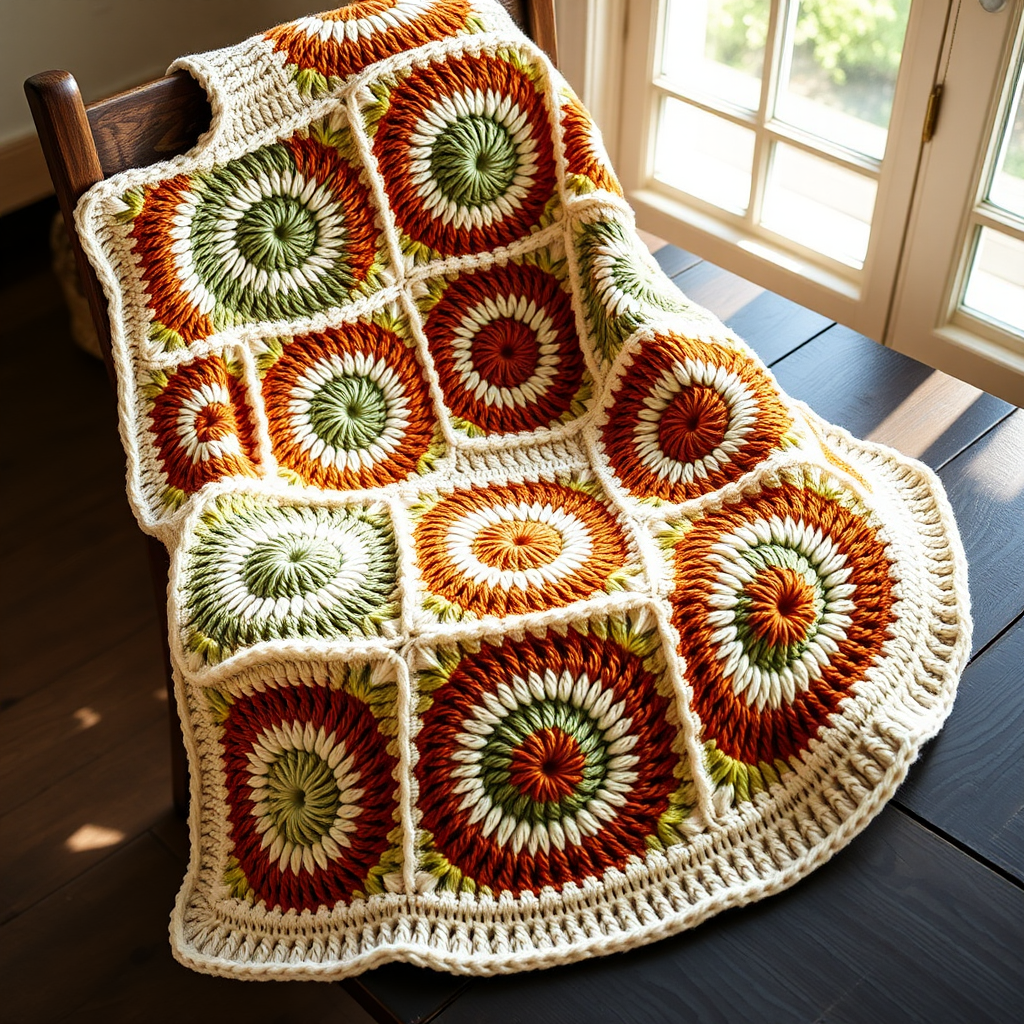
Wrap yourself in a garden of handcrafted blooms with this vibrant granny square blanket, where each square bursts with a unique flower motif. This pattern is a joyful journey through color and texture, perfect for adding a handcrafted heirloom touch to any cozy corner. Whether you're a seasoned crocheter or a confident beginner looking for a rewarding project, this Sunburst Meadow Blanket is designed to delight your senses and warm your home.
With 42 individual granny squares arranged in a 6x7 grid, this throw is a celebration of color—sunflower yellow cores, coral pink petals, sky blue accents, and sage green framing, all tied together with a mustard yellow join and a scalloped cream-and-coral edge. The result is a rich, dimensional textile that evokes a wildflower meadow in full bloom. Let's dive into this free pattern and create something truly special.
Materials Needed
Before you begin, gather the following supplies. This project is perfect for using up scrap yarn or creating a coordinated palette from your favorite worsted weight yarns.
Yarn
Worsted weight cotton or acrylic blend (e.g., Lion Brand Cotton-Ease) in 8 colors. You will need approximately the following amounts for a 6x7 grid throw (adjust based on your gauge and tension):
- Sunflower Yellow – 1 skein (for flower centers)
- Coral Pink – 2 skeins (for petals and border)
- Sky Blue – 1 skein (for petals)
- Sage Green – 1 skein (for leaf accents)
- Cream – 2 skeins (for background and border)
- Terracotta – 1 skein (for square corners)
- Lavender – 1 skein (for outer square border)
- Mustard – 2 skeins (for joining and border)
Hook and Notions
- 5.5 mm (I-9) crochet hook
- Yarn needle for weaving in ends and whip stitching
- Scissors
- Stitch markers (optional, for counting)
- Blocking mats and pins (for finishing)
Gauge
One granny square measures 6 inches x 6 inches (15 cm x 15 cm) after blocking. This gauge is essential for ensuring your squares align perfectly in the grid. Always make a test square first to check your tension.
Step-by-Step Instructions
This blanket is constructed from 42 individual granny squares, each featuring a central flower motif surrounded by a classic granny shell border. After completing all squares, they are joined in a 6x7 grid and finished with a scalloped edge. Follow these detailed instructions carefully, and you'll have a stunning heirloom piece in no time.
Square Pattern (Make 42)
Each square is worked in the round, changing colors as you go. Do not cut the yarn until instructed; instead, carry the yarn loosely up the side or fasten off and weave in ends at the end. For a cleaner look, we recommend fastening off after each round and weaving in ends as you go, but carrying is acceptable for a quicker project.
Round 1: The Sunny Center
With Sunflower Yellow, make a magic ring. Chain 3 (this counts as your first double crochet). Work 11 double crochets (dc) into the ring. Slip stitch (sl st) to the top of the starting chain-3 to join. You should have 12 dc stitches total. Pull the magic ring tight to close the center.
Round 2: First Petal Layer
Switch to Coral Pink. Slip stitch into the next stitch to position your yarn. Chain 3 (counts as first dc), then work 1 dc in the same stitch (this is an increase). Work 2 dc in each stitch around. Slip stitch to join. You will now have 24 dc stitches. This creates a ruffled, dense petal effect.
Round 3: Second Petal Layer
Switch to Sky Blue. Slip stitch into the next stitch. Chain 3 (counts as first dc), then work 2 dc in the same stitch (this forms a cluster). *Skip 2 stitches, work 3 dc in the next stitch.* Repeat from * around. Slip stitch to join. You will have 8 groups of 3 dc. This creates a scalloped petal look.
Round 4: Adding Airy Spaces
Switch to Cream. Slip stitch into the next stitch. Chain 3 (counts as first dc), work 2 dc in the same stitch. *Chain 1, skip 3 stitches, work 3 dc in the next stitch.* Repeat from * around, ending with a chain 1. Slip stitch to join. You will have 8 groups of 3 dc and 8 chain-1 spaces. This round begins to square off the shape slightly.
Round 5: Expanding the Frame
Switch to Sage Green. Slip stitch into the next stitch. Chain 3 (counts as first dc), work 2 dc in the same stitch. *Chain 1, work 3 dc in the next chain-1 space. Chain 1, work 3 dc in the next stitch.* Repeat from * around, ending with a chain 1. Slip stitch to join. You will now have 16 groups of 3 dc. The square shape is becoming more defined.
Round 6: Creating the Corners
Switch to Terracotta. Slip stitch into the next stitch. Chain 3 (counts as first dc), work 2 dc in the same stitch. *Chain 1, work 3 dc in the next chain-1 space. Chain 1, work 3 dc in the next stitch. Chain 1, work 3 dc in the next chain-1 space. Chain 1, work (3 dc, chain 2, 3 dc) in the next stitch (this is your corner made).* Repeat from * around, working the last corner as (3 dc, chain 2, 2 dc) in the final stitch. Slip stitch to join. This round creates the distinct square shape with 4 clear corners.
Round 7: Final Border
Switch to Lavender. Slip stitch into the next stitch. Chain 3 (counts as first dc), work 2 dc in the same stitch. *Work 3 dc in each chain-1 space across the side. In the corner chain-2 space, work (3 dc, chain 2, 3 dc).* Repeat from * around. Slip stitch to join. Fasten off and weave in all ends securely. Your square is complete! Repeat this process to make a total of 42 squares.
Joining the Squares
Now comes the fun part—assembling your meadow. The joining method creates a beautiful, sturdy seam that adds to the overall design.
Arranging Your Grid
Arrange your 42 squares in a 6x7 grid (6 squares across, 7 squares down). Alternate the color placement of the center flowers to create a balanced, scattered meadow effect. Play with the layout until you're happy with the color distribution. Take a photo for reference before you start joining.
Whip Stitch Joining
Using Mustard yarn and a yarn needle, join the squares together using a whip stitch through the back loops only, working from the wrong side of the fabric. This creates a subtle, flat seam on the front. Join all squares in rows first (joining squares side-by-side within each row), then join the rows together to form the full blanket. Weave in ends as you go to keep the back tidy.
Border
Once all squares are joined, it's time to frame your masterpiece with a beautiful, scalloped border.
Round 1: Mustard Foundation
With Mustard, attach yarn to any corner of the blanket. Chain 3 (counts as first dc), work 2 dc in the same corner space. *Work 3 dc in each space along the edge, work (3 dc, chain 2, 3 dc) in each corner.* Repeat from * around the entire blanket. Slip stitch to join. This evens out the edges and creates a solid base.
Round 2: Cream Scallop Base
Switch to Cream. Slip stitch into the next stitch. Chain 1, work 1 single crochet (sc) in each dc around, working (1 sc, chain 2, 1 sc) in each corner chain-2 space. Slip stitch to join. This round creates a clean, even edge for the scallops.
Round 3: Coral Pink Scalloped Edge
Switch to Coral Pink. Slip stitch into the next stitch. Chain 1, work 1 sc in each sc around, working (1 sc, chain 2, 1 sc) in each corner chain-2 space. Slip stitch to join. Fasten off and weave in all ends. The scalloped effect is created by the natural curve of the stitches combined with the corner increases.
Finishing Touches
Blocking is essential for this project. It evens out the squares, sharpens the corners, and enhances the stitch definition, making your blanket look professionally made.
Soak the blanket in lukewarm water with a mild wool wash or gentle detergent. Gently squeeze out excess water (do not wring). Lay the blanket flat on blocking mats, pinning it to the correct dimensions (approximately 36 inches x 42 inches, or your desired size). Allow it to dry completely before unpinning. This step will transform your work into a polished, heirloom-quality throw.
Your Sunburst Meadow Granny Square Blanket is now complete! Drape it over a cozy armchair, snuggle under it on a chilly evening, or gift it to someone special. The vibrant colors and textured stitches are sure to bring warmth and joy to any space. Happy crocheting!