Sunflower Hexagon Hex Cardigan Front Panels Free Pattern
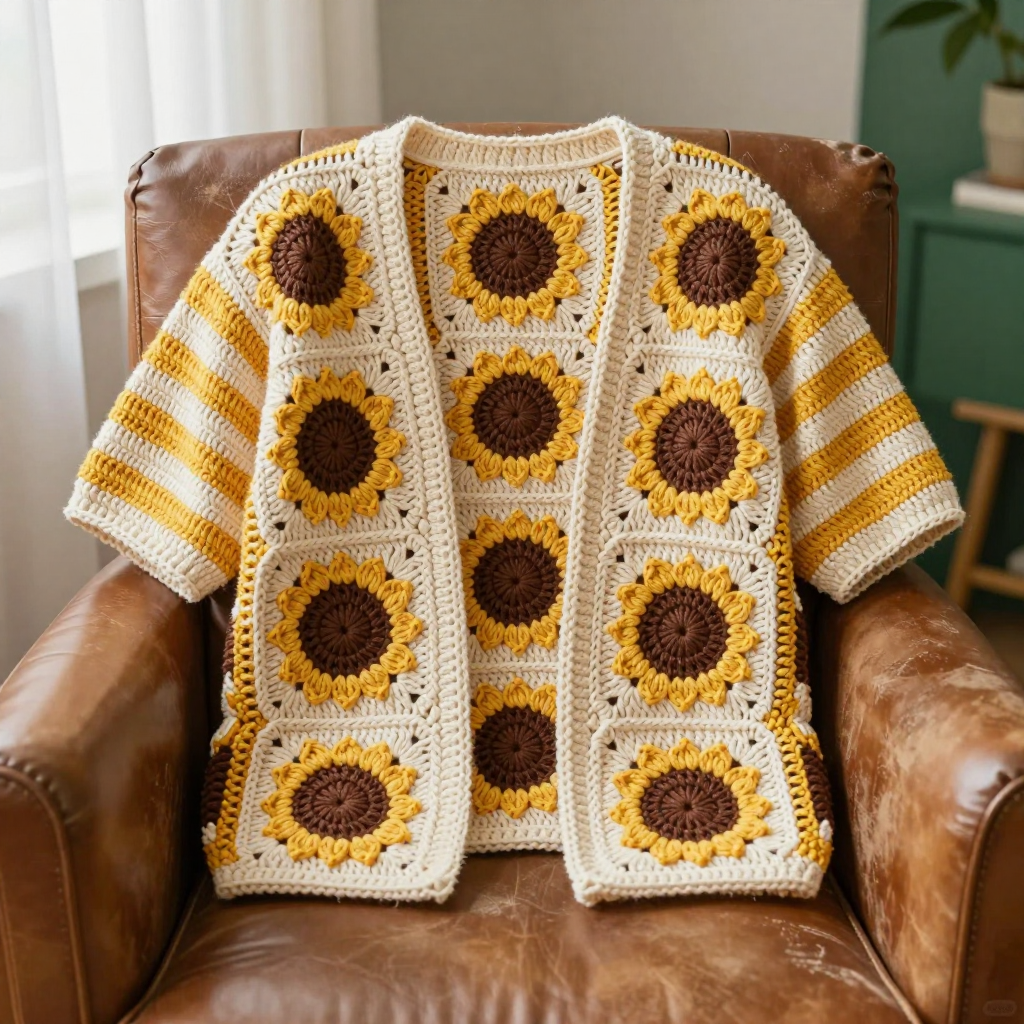
Sunflower Hexagon Hex Cardigan Front Panels – Free Crochet Pattern
Introduction
This retro-inspired sunflower hexagon cardigan is the perfect first "big" project for a complete beginner who wants something that looks impressive but is built from small, friendly pieces. You will crochet simple hexagon motifs with a chocolate-brown center, golden-yellow petals, and a cream border, then join them into two front panels. The finished cardigan is a boxy, open-front 90s-style layering piece with short striped sleeves — soft, cozy, and full of texture. Because each motif is only about 5 inches across, you get lots of little wins along the way, and any small mistakes disappear into the pattern. By the end you will have a wearable, handmade cardigan you will be proud to show off.
Materials Needed
- Yarn: Worsted weight (Category 4) acrylic or cotton blend, approximately 900–1100 yards total. Colors: Golden Yellow (A) ~400 yds, Chocolate Brown (B) ~200 yds, Cream (C) ~250 yds, Olive Green (D) ~100 yds (optional accent).
- Crochet hook: I/9 (5.5 mm), or the size needed to match gauge.
- Stitch markers: At least 8, to mark corners and round beginnings.
- Tapestry needle: A blunt, large-eye needle for weaving in ends and seaming.
- Scissors: Sharp craft scissors for cutting yarn.
- Measuring tape: To check your 5-inch motif and 4-inch gauge swatch.
- Finished size: Each front panel measures approximately 5 inches wide x 10 inches tall (two hexagons joined vertically). Each hexagon measures approximately 5 inches point-to-point. Sleeves measure approximately 5 inches from armhole to cuff. The back panel (for reference) is a 3-wide x 2-tall grid of six motifs, about 15 inches wide x 10 inches tall.
Abbreviations and Beginner Glossary
- ch – chain: yarn over the hook, pull the loop through the loop on your hook. Creates a small "V."
- sl st – slip stitch: insert hook into the stitch, yarn over, pull the loop through both the stitch and the loop on your hook at once. Used to join rounds.
- sc – single crochet: insert hook into stitch, yarn over, pull up a loop (2 loops on hook), yarn over, pull through both loops. One loop remains.
- hdc – half double crochet: yarn over, insert hook into stitch, yarn over, pull up a loop (3 loops on hook), yarn over, pull through all 3 loops.
- dc – double crochet: yarn over, insert hook into stitch, yarn over, pull up a loop (3 loops on hook), yarn over, pull through 2 loops, yarn over, pull through remaining 2 loops.
- st / sts – stitch / stitches: the individual loops you work into.
- sp / sps – space / spaces: the gap created by a chain (for example, a "ch-3 space").
- rep – repeat: do the instruction again.
- rnd / rnds – round / rounds: one complete circle of stitches worked in the round.
- magic ring – an adjustable loop you pull tight to close the center hole of a circle.
- fasten off – cut the yarn a few inches from the work and pull the tail through the last loop to secure it.
- join with sl st – connect the last stitch of a round to the first stitch with a slip stitch so the round closes into a circle.
- right sides facing – place two pieces with their "good" (front) sides touching each other.
- sc join – a seam made by working single crochet through both layers of fabric at once.
Gauge
Gauge: One finished hexagon motif measures 5 inches (12.7 cm) point-to-point across the widest span. In double crochet, 4 dc = 1 inch and 2 dc rows = 1 inch.
Why gauge matters: Gauge is how big your stitches come out. If your stitches are bigger than the pattern expects, your cardigan will be too large; if smaller, it will be too small. The motif size is the easiest check for this pattern.
How to make a gauge swatch: Crochet one complete hexagon motif following Rounds 1–6 below. Lay it flat and measure from one point straight across to the opposite point. If it measures 5 inches, you are on track. If it is larger, try a smaller hook (H/8, 5.0 mm). If it is smaller, try a larger hook (J/10, 6.0 mm).
Beginner Tips Before You Start
- Use stitch markers. Place one in the first stitch of every round and one in each ch-2 corner. This stops you from losing your place.
- Do not pull your yarn too tight. Keep an even, relaxed tension. Tight stitches make the motif curl and shrink below 5 inches.
- Count after every round. Check the stitch count in parentheses before moving on. Fixing one round is easy; fixing five is not.
- Make all your motifs first. Crochet all four front-panel hexagons before joining. It keeps your tension consistent and lets you arrange colors.
- Weave in ends as you go. Use your tapestry needle to tuck each tail into the back of the work so they do not tangle later.
- Block each hexagon lightly before joining so the points lie flat and the panels line up neatly.
Step-by-Step Instructions
Sunflower Hexagon Motif (make 4 total for the two front panels)
Each motif is a hexagon worked in joined rounds. The brown center is a solid circle, the yellow petals form the hexagon shape, and the cream border squares off the edges for joining.
Round 1 (Center, Color B – Chocolate Brown): Make a magic ring. Ch 3 (counts as first dc). Work 11 dc into the ring. Join with sl st to top of ch-3. (12 dc)
Round 2 (Center, Color B): Ch 3. Dc in same st. 2 dc in each st around. Join with sl st to top of ch-3. (24 dc) Fasten off B.
Round 3 (Petals, Color A – Golden Yellow): Join A with sl st in any st. Ch 1. *Sc in next st, ch 3, skip next st; rep from * around. Join with sl st to first sc. (12 ch-3 spaces)
Round 4 (Petals, Color A): Sl st into first ch-3 space. Ch 1. In each ch-3 space work: sc, hdc, dc, hdc, sc. Join with sl st to first sc. (12 petals) Fasten off A.
Round 5 (Hexagon shaping, Color C – Cream): Join C with sl st in any sc between petals. Ch 1. *Sc in next 2 sts, ch 2, sc in next 2 sts, ch 2; rep from * around, working 6 ch-2 corners evenly spaced to create a hexagon shape. Join with sl st to first sc. (6 corners, 6 sides)
Round 6 (Hexagon border, Color C): Ch 1. Sc in each st around, working (sc, ch 2, sc) in each ch-2 corner space. Join with sl st to first sc. Fasten off C. (Hexagon now measures approximately 5 inches point-to-point.)
Left Front Panel
Join 2 hexagons vertically: place the motifs side by side with right sides facing. Using Color C and sc, join along one edge with sc through both layers. Fasten off. Panel measures approximately 5 inches wide x 10 inches tall.
Right Front Panel
Work the same as the Left Front Panel with 2 hexagons joined vertically. (5 inches wide x 10 inches tall)
Back Panel (for reference)
The back is worked as a 3-wide x 2-tall grid of the same hexagon motifs (6 motifs), joined the same way, measuring approximately 15 inches wide x 10 inches tall.
Joining Front Panels to Back
Place the back panel flat. Place the left and right front panels on either side, aligning the top and bottom edges. Using Color C, sc join along the shoulder seams (top edge of each front panel to top edge of back panel) and along the side seams (outer edge of each front panel to side edge of back panel), leaving the center front open. Fasten off.
Short Striped Sleeves (make 2)
Sleeves are worked in the round from the armhole downward in alternating stripes.
Round 1: Join Color A at armhole edge. Ch 3. Work 36 dc evenly around armhole opening. Join with sl st to top of ch-3. (36 dc)
Rounds 2–3: Ch 3. Dc in each st around. Join. Fasten off A. (36 dc)
Rounds 4–5: Join Color C. Ch 3. Dc in each st around. Join. Fasten off C. (36 dc)
Rounds 6–7: Join Color A. Ch 3. Dc in each st around. Join. Fasten off A. (36 dc)
Rounds 8–9: Join Color C. Ch 3. Dc in each st around. Join. Fasten off C. (36 dc)
Round 10: Join Color A. Ch 1. Sc in each st around. Join. Fasten off A. (36 sc)
Sleeve measures approximately 5 inches from armhole to cuff. Repeat for the second sleeve.
Front Edging and Neckline
With Color C, join at the bottom right front corner. Ch 1. Work sc evenly up the right front edge, around the neckline, and down the left front edge. Ch 1, turn. Work 1 more row of sc. Fasten off. Weave in all ends.
Assembly and Finishing
Seaming: Lay all pieces flat with right sides up. Use your tapestry needle or a crochet hook and Color C to sc join the shoulder seams first, then the side seams. Work through both layers at once, keeping your stitches even so the seams lie flat. Leave the center front open — no buttons or closures.
Weaving in ends: Thread each yarn tail onto your tapestry needle. Turn the work to the wrong side and weave the tail in and out through several stitches, then back the other way to lock it. Trim close to the fabric.
Blocking: Lightly mist the finished cardigan with water (or gently wet it and roll it in a towel). Pin it flat to the measurements above on a towel or blocking mat. Let it dry completely. This opens up the hexagon shapes and evens out the stitches.
Pro Tips and Variations
- Change the colors: Swap the golden yellow for lavender or rust, or make the center a deep burgundy for a different flower. Keep the cream border so the hexagon shape stays crisp.
- Adjust the size: Add one more hexagon to each front panel for a longer cardigan, or use a larger hook (J/10, 6.0 mm) to make every motif bigger for a roomier fit.
- Substitute yarn: A cotton blend gives crisp stitch definition; a soft acrylic gives a cozier drape. Always check your motif gauge after switching yarn.
- Add a sleeve stripe: Work the final sleeve round in Color D (Olive Green) for a subtle retro accent that ties the whole cardigan together.


