Basketweave Pixie Cone Hat Free Crochet Pattern for Baby
Basketweave Pixie Cone Hat: A Beginner-Friendly Rainbow Baby Hat
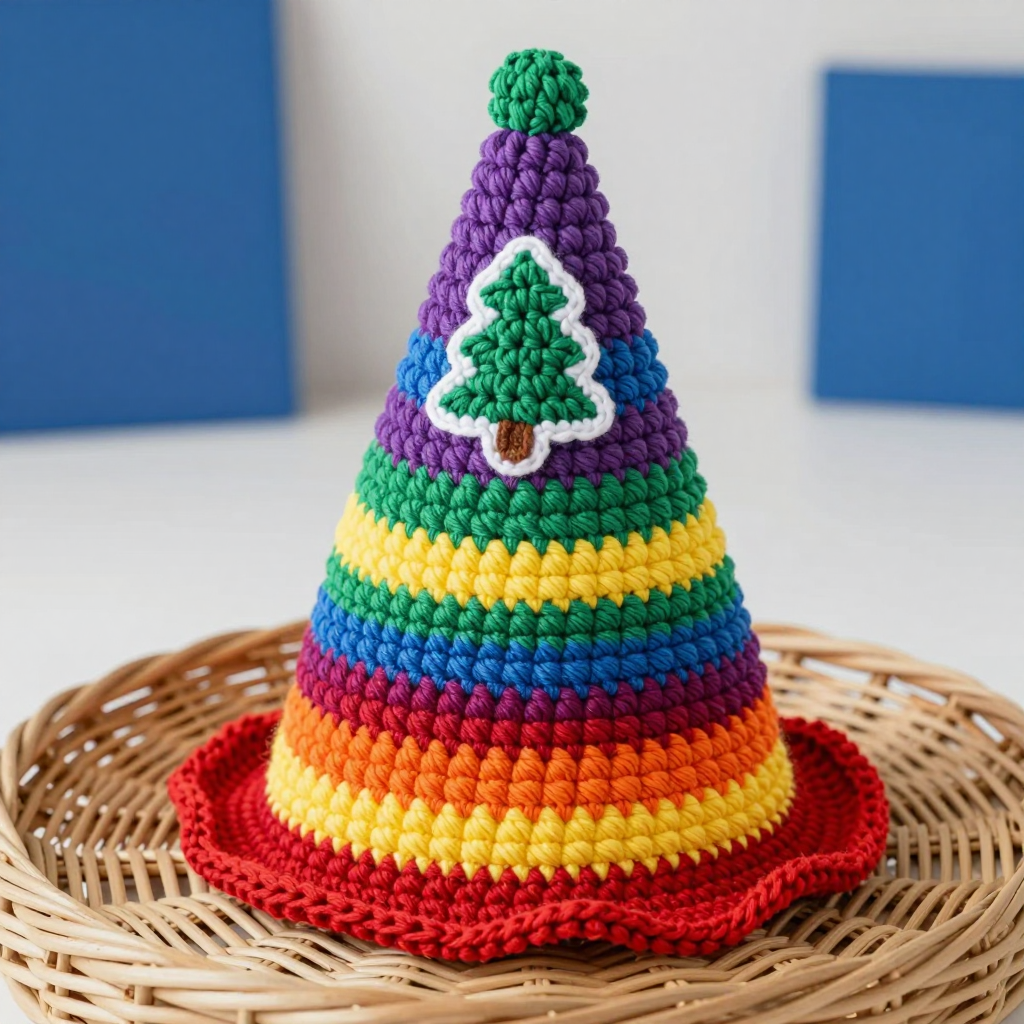
If you have never held a crochet hook before, this is the perfect first project to fall in love with. This tiny pixie cone hat is worked in soft, squishy chenille yarn in bright rainbow bands, with a woven basketweave texture that looks far more complicated than it really is. The finished hat is a tall, narrow cone about 12 inches high that tapers to a point, with a firm little brim that hugs a newborn's head and a sweet crocheted Christmas tree patch stitched near the tip. It feels like a cloud and looks like something from a Parisian boutique. Best of all, it is made almost entirely from one simple stitch repeated in groups, so you can absolutely do this.
Materials Needed
- Yarn: Chenille plush yarn, super bulky (weight 6). You need approximately 90–110 yards total, in small amounts of bright rainbow colors: red, orange, yellow, green, blue, and purple, plus a small amount of white for the tree patch edging.
- Crochet hook: Size 6.5 mm (US K-10.5), or whatever size you need to match the gauge below.
- Stitch marker: 1 (to mark the first stitch of each round).
- Tapestry needle: A large-eyed, blunt needle for weaving in ends and sewing on the patch.
- Scissors.
- Finished size: 0–6 months. Circumference approx. 14 in (35.5 cm) at the brim, height approx. 12 in (30 cm) from brim to tip.
Abbreviations and Beginner Glossary
- ch – chain: yarn over the hook and pull it through the loop on your hook. This makes a small link.
- sc – single crochet: insert hook into stitch, yarn over, pull up a loop (2 loops on hook), yarn over, pull through both loops. One loop remains.
- dc – double crochet: yarn over, insert hook into stitch, yarn over, pull up a loop (3 loops on hook), yarn over, pull through 2 loops, yarn over, pull through last 2 loops.
- dc2tog – double crochet 2 together (a decrease): start a double crochet in one stitch but stop when 2 loops remain, then start another double crochet in the next stitch and pull through all remaining loops. This turns 2 stitches into 1.
- sc2tog – single crochet 2 together (a decrease): insert hook into first stitch, pull up a loop, insert hook into next stitch, pull up a loop (3 loops on hook), yarn over, pull through all 3 loops. This turns 2 stitches into 1.
- FPdc – front post double crochet: instead of working into the top of the stitch, you work a double crochet around the post (the vertical body) of the stitch, inserting your hook from the front to the back. This pushes the stitch forward and creates a raised bump.
- BPdc – back post double crochet: same idea, but you insert your hook from the back to the front around the post, which pushes the stitch backward and creates a recessed bump.
- magic ring – an adjustable loop you make with your yarn, then crochet into, and pull tight to close the center hole.
- st(s) – stitch(es).
- back loop only – each stitch top has two loops (front and back). Working in the back loop only means you insert your hook under just the loop farthest from you.
Gauge
8 stitches and 8 rounds = 4 in (10 cm) in the basketweave pattern (alternating front-post and back-post double crochet groups) with chenille yarn.
Why gauge matters: Gauge is how big your stitches turn out. If your stitches are bigger than the pattern expects, the hat will be too large; if smaller, it will be too tight. Because this hat must fit a baby's head, matching gauge keeps the size correct.
How to make a gauge swatch: With your 6.5 mm hook and chenille yarn, chain 12, then work a few rows of double crochet with alternating groups of 3 FPdc and 3 BPdc. Measure a 4-inch square in the middle. If you have more than 8 stitches in 4 inches, go up a hook size; if fewer, go down a hook size. Try again until it matches.
Beginner Tips Before You Start
- Use a stitch marker. Because this hat is worked in continuous rounds (a spiral with no joining), place a marker in the first stitch of each round so you always know where a round begins and ends.
- Do not pull your yarn too tight. Chenille yarn is fluffy and easy to over-tighten. Keep your tension relaxed so the basketweave bumps stay soft and puffy.
- Count every round. The stitch count in parentheses at the end of each round is your safety net. If it does not match, fix it before moving on.
- Change colors at the end of a round. Finish the last stitch of the round with the new color by pulling the new yarn through the final loop, then continue.
- Keep the right side facing out. In continuous rounds the work naturally curls; push the fabric so the smooth, raised basketweave side faces you.
- Work loosely around the posts. When making FPdc and BPdc, the hook goes around the vertical post, not into the top. Go slowly the first time.
Step-by-Step Instructions
Brim (Red)
Round 1: Make a magic ring, ch 1, work 8 sc into the ring, pull tight. Place marker in first st. (8 sc)
Round 2: 2 sc in each st around. (16 sc)
Round 3: [2 sc in next st, sc in next st] around. (24 sc)
Round 4: [2 sc in next st, sc in next 2 sts] around. (32 sc)
Round 5: Sc in each st around, working in the back loop only for a firm brim edge. (32 sc)
Round 6: Sc in each st around. Do not join; continue in continuous rounds. (32 sc)
Body — Basketweave Bands
Work 3 rounds per color, changing color at the end of every 3rd round. The basketweave texture comes from alternating groups of 3 FPdc and 3 BPdc, swapping which group is in front every 3 rounds.
Round 7 (red): Ch 2 (does not count as a st), dc in each st around. (32 dc)
Round 8 (red): Ch 2, [3 FPdc, 3 BPdc] around, ending with 3 BPdc. (32 sts)
Round 9 (red): Ch 2, [3 FPdc, 3 BPdc] around, matching the blocks of Round 8. (32 sts) Change to orange.
Round 10 (orange): Ch 2, [3 BPdc, 3 FPdc] around (blocks swap). (32 sts)
Rounds 11–12 (orange): Repeat Round 10. (32 sts) Change to yellow.
Round 13 (yellow): Ch 2, [3 FPdc, 3 BPdc] around. (32 sts)
Rounds 14–15 (yellow): Repeat Round 13. (32 sts) Change to green.
Round 16 (green): Ch 2, [3 BPdc, 3 FPdc] around. (32 sts)
Rounds 17–18 (green): Repeat Round 16. (32 sts) Change to blue.
Round 19 (blue): Ch 2, [3 FPdc, 3 BPdc] around. (32 sts)
Rounds 20–21 (blue): Repeat Round 19. (32 sts) Change to purple.
Round 22 (purple): Ch 2, [3 BPdc, 3 FPdc] around. (32 sts)
Rounds 23–24 (purple): Repeat Round 22. (32 sts)
Shaping the Cone
Round 25 (purple): Ch 2, [dc in next 2 sts, dc2tog] around. (24 sts)
Round 26 (purple): Ch 2, [dc in next st, dc2tog] around. (16 sts) Change to green.
Round 27 (green): Ch 2, [dc2tog] around. (8 sts)
Round 28 (green): Ch 2, [dc2tog] around. (4 sts)
Round 29 (green): Ch 1, sc2tog twice. (2 sts) Fasten off, leaving a long tail. Thread tail through remaining 2 sts, pull tight, and weave in.
Christmas Tree Patch (Green and White)
Worked flat in rows with green yarn, then edged in white.
Row 1: Ch 4, sc in 2nd ch from hook and in each ch across. (3 sc)
Row 2: Ch 1, turn, 2 sc in first st, sc in next st, 2 sc in last st. (5 sc)
Row 3: Ch 1, turn, sc in each st across. (5 sc)
Row 4: Ch 1, turn, 2 sc in first st, sc in next 3 sts, 2 sc in last st. (7 sc)
Row 5: Ch 1, turn, sc in each st across. (7 sc)
Row 6: Ch 1, turn, sc2tog, sc in next 3 sts, sc2tog. (5 sc)
Row 7: Ch 1, turn, sc2tog, sc in next st, sc2tog. (3 sc)
Row 8: Ch 1, turn, sc2tog, sc in last st. (2 sc) Fasten off.
Edging: Join white yarn at the bottom corner, sc evenly around the tree shape, working 2 sc in each corner. Fasten off and weave in ends.
Assembly and Finishing
1. Weave in all yarn ends. Thread each tail onto the tapestry needle and run it back and forth through the inside of the fabric for about an inch, then trim close. This hides the ends securely.
2. Attach the tree patch. Place the tree patch near the tip of the hat, about 2 in (5 cm) below the point. Thread white yarn on the tapestry needle and stitch it in place with small invisible stitches all around the edge, catching only the surface of the hat so the stitches do not show on the inside.
3. Steam lightly. Hold a steam iron a few inches above the basketweave bands to relax the chenille. Do not press the iron onto the fabric, or you will flatten the texture.
4. Shape the brim. Fold the brim up slightly if you would like a snugger fit. Your hat is ready to wear.
Pro Tips and Variations
- Change the color story. Swap the rainbow bands for pastel shades, or use a single color for a minimalist look. Just keep each color band 3 rounds long so the basketweave blocks line up.
- Adjust the size. For a slightly larger hat, add one more increase round in the brim (for example, [2 sc in next st, sc in next 3 sts] around to reach 40 sts) and add extra basketweave rounds before shaping the cone.
- Substitute the yarn. Any super bulky (weight 6) yarn works, but chenille gives the softest, plushest finish. Always swatch first, since different yarns change the gauge.
- Personalize the patch. Replace the tree with a tiny star, heart, or snowflake for a year-round hat, or leave the patch off entirely for a simple pixie cone.