Retro Wheel Hot Pad Crochet Free Pattern: Mid-Century Sage & Cream Trivet
Retro Wheel Hot Pad Crochet Pattern: A Mid-Century Sage & Cream Trivet
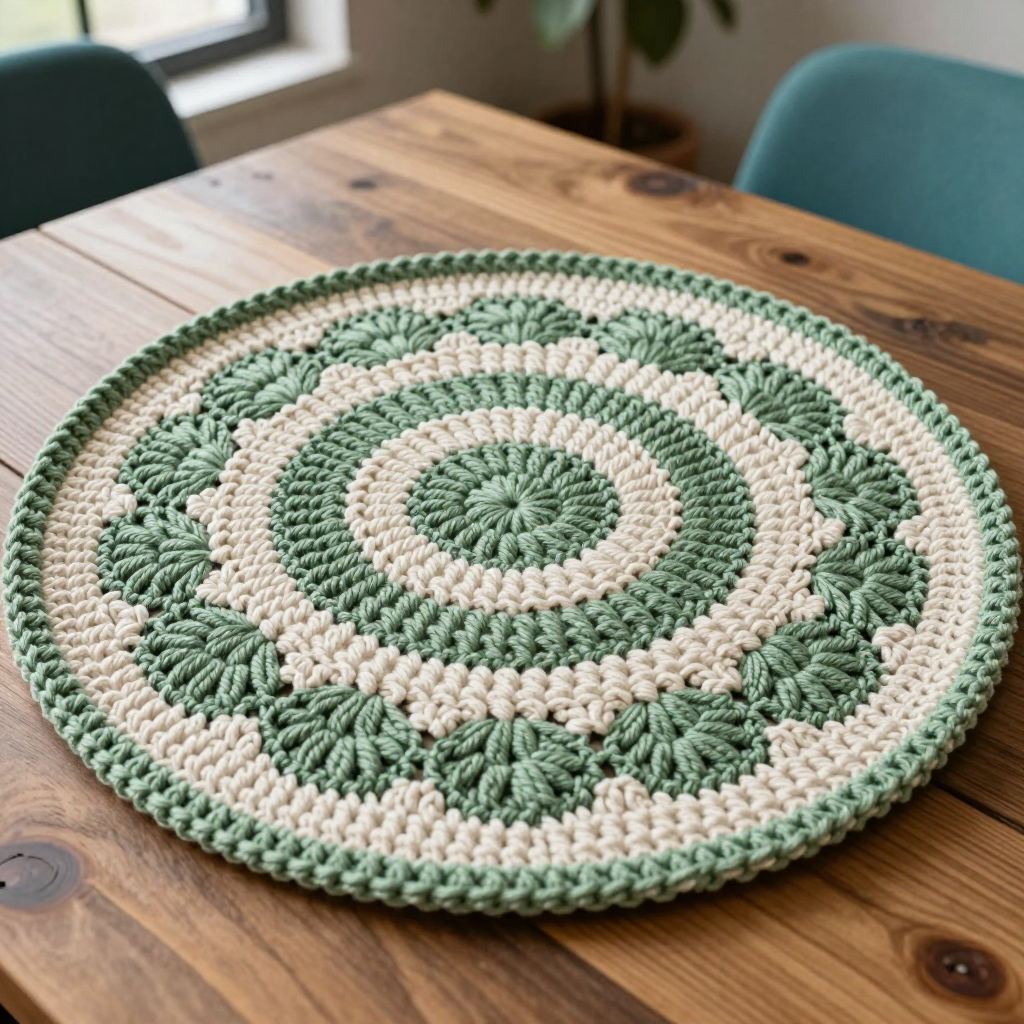
If you have ever wanted to make something that looks like it came straight out of a 1960s kitchen magazine, this is the project for you. This flat, circular hot pad is worked in alternating rounds of sage green and cream, and the Catherine wheel stitch creates raised fan shapes that look like tiny wheel spokes spinning out from the center. It is perfect for a complete beginner who has learned a few basic stitches and wants a small, satisfying project that finishes in an afternoon. The finished trivet is about 8 inches (20 cm) across, dense and nubby, with a firm sage edge that keeps it perfectly flat on your table. It feels sturdy and heat-resistant in the hand, and it looks like a little piece of retro art sitting under your teapot.
Materials Needed
- Yarn: Worsted weight (CYC 4) cotton yarn, approximately 120 yards total: 60 yards sage green (Color A) and 60 yards cream (Color B). Cotton is strongly recommended because it resists heat and will not melt like acrylic can.
- Hook: 5.0 mm (US H-8) crochet hook, or the size you need to match the gauge below.
- Stitch marker: One removable stitch marker (or a scrap of contrasting yarn) to mark the first stitch of each round.
- Tapestry needle: A blunt-tipped yarn needle for weaving in ends.
- Scissors: Any small, sharp pair.
- Finished size: Approximately 8 inches (20 cm) in diameter and about 1/4 inch thick.
Abbreviations and Beginner Glossary
Every abbreviation used in this pattern is listed here. Read this section once before you begin, and come back to it whenever a term feels unfamiliar.
- ch – chain. Wrap the yarn over your hook and pull it through the loop already on your hook. This makes one chain stitch.
- sc – single crochet. Insert your hook into the stitch, wrap yarn over the hook, pull up a loop (you now have 2 loops on the hook), wrap yarn over again, and pull through both loops. One single crochet made.
- dc – double crochet. Wrap yarn over the hook first, insert the hook into the stitch, wrap yarn over and pull up a loop (3 loops on hook), wrap yarn over and pull through 2 loops (2 loops left), wrap yarn over and pull through the last 2 loops. One double crochet made.
- sl st – slip stitch. Insert your hook into the stitch, wrap yarn over, and pull that loop straight through both the stitch and the loop on your hook in one motion. It creates almost no height and is used to join rounds.
- sc2tog – single crochet 2 together (a decrease). Insert your hook into the first stitch, pull up a loop, insert your hook into the next stitch, pull up a loop (3 loops on hook), wrap yarn over and pull through all 3 loops. This turns two stitches into one.
- CW cluster – Catherine wheel cluster. Worked all in the same stitch: [dc, ch 1, dc, ch 1, dc, ch 1, dc]. That is 4 double crochet stitches with a chain-1 space between each one, all sitting in one stitch. Then you skip 2 stitches. This creates one fan of "wheel spokes."
- Magic ring – an adjustable loop you make with your yarn, then crochet into, so the center of your circle can be pulled tight with no hole.
- Join with sl st – after working all the way around, put your hook into the first stitch of the round and make a slip stitch to close the circle.
- St(s) – stitch or stitches.
- Color A / Color B – A is sage green, B is cream.
Gauge
Gauge: One wheel repeat (one fan plus its anchoring single crochet) measures approximately 1 inch (2.5 cm) wide, and 4 rounds measure approximately 1 inch (2.5 cm) tall. Finished diameter: approximately 8 inches (20 cm).
Why gauge matters: Gauge is simply how big your stitches turn out. If your stitches are bigger than the pattern expects, your hot pad will be too large and floppy; if they are smaller, it will be too small and stiff. Because this piece is worked in the round, gauge also controls whether the circle stays flat.
How to make a gauge swatch: Chain 20, then work 4 rounds of the Catherine wheel pattern exactly as written below. Lay the swatch flat and measure one fan from side to side with a ruler. If it measures about 1 inch, you are on track. If it is bigger, switch to a smaller hook; if it is smaller, switch to a larger hook. Do not skip this step — it takes ten minutes and saves the whole project.
Beginner Tips Before You Start
- Use a stitch marker. Place it in the first stitch of every round. When you reach the marker again, you know the round is complete. This single habit prevents almost every beginner mistake.
- Do not pull your yarn too tight. Tension should feel relaxed. If your hook squeaks or your stitches are hard to insert into, you are pulling too hard.
- Count your fans out loud. Each round has a specific number of fans (5, then 10, then 15, then 20). Say the number as you finish each fan so you never lose your place.
- Keep the circle flat. After every two rounds, lay the piece on the table. If it ruffles like a potato chip, your stitches are too tight; if it cups upward like a bowl, they are too loose.
- Fasten off each color at the end of its round. This pattern suggests fastening off and rejoining the next color rather than carrying yarn across the back. It is slower but much neater for a beginner.
- Cotton has no stretch. Unlike wool or acrylic, cotton does not bounce back. Work a little more loosely than you think you need to.
Step-by-Step Instructions
The hot pad is worked in the round from the center outward. Colors alternate every round: Round 1 sage, Round 2 cream, Round 3 sage, Round 4 cream, and so on. Fasten off each color at the end of its round and rejoin the next color in the starting stitch.
Center and First Wheels (Rounds 1–4)
Round 1 (Color A, sage): Make a magic ring. Ch 1 (this does not count as a stitch). Work 8 sc into the ring. Join with sl st to the first sc. Fasten off. (8 sc)
Round 2 (Color B, cream): Join B with sl st in any sc. Ch 1. Work 2 sc in each sc around. Join with sl st to the first sc. Fasten off. (16 sc)
Round 3 (Color A, sage): Join A with sl st in any sc. Ch 1. *Work 1 CW cluster in the next sc, skip 2 sc, sc in the next sc; repeat from * around, ending with sc in the last sc. Join with sl st to the first sc. Fasten off. (5 wheel fans, 5 sc) If the count does not divide evenly, work the final sc into the joining stitch; the circle should lie flat.
Round 4 (Color B, cream): Join B with sl st in the center ch-1 space of any fan. Ch 1. *Sc in the center ch-1 space of the fan, ch 1, work 1 CW cluster in the next sc, ch 1; repeat from * around. Join with sl st to the first sc. Fasten off. (5 fans, 5 sc, with ch-1 spaces between)
Growing the Circle (Rounds 5–8)
Round 5 (Color A, sage): Join A with sl st in any sc. Ch 1. *Work 1 CW cluster in the next sc, skip 2 sts, sc in the next sc; repeat from * around. Join with sl st to the first sc. Fasten off. (10 wheel fans, 10 sc)
Round 6 (Color B, cream): Join B with sl st in the center ch-1 space of any fan. Ch 1. *Sc in the center ch-1 space of the fan, ch 1, work 1 CW cluster in the next sc, ch 1; repeat from * around. Join with sl st to the first sc. Fasten off. (10 fans, 10 sc)
Round 7 (Color A, sage): Join A with sl st in any sc. Ch 1. *Work 1 CW cluster in the next sc, skip 2 sts, sc in the next sc; repeat from * around. Join with sl st to the first sc. Fasten off. (15 wheel fans, 15 sc)
Round 8 (Color B, cream): Join B with sl st in the center ch-1 space of any fan. Ch 1. *Sc in the center ch-1 space of the fan, ch 1, work 1 CW cluster in the next sc, ch 1; repeat from * around. Join with sl st to the first sc. Fasten off. (15 fans, 15 sc)
Final Wheel Round and Edging (Rounds 9–11)
Round 9 (Color A, sage) — final wheel round: Join A with sl st in any sc. Ch 1. *Work 1 CW cluster in the next sc, skip 2 sts, sc in the next sc; repeat from * around. Join with sl st to the first sc. Do not fasten off. (20 wheel fans, 20 sc) At this point the piece should measure approximately 7.5 inches (19 cm) in diameter. If it is smaller, add one more round of sc evenly around before continuing.
Round 10 (Color A, sage) — tight edging: Ch 1. Work 1 sc in each sc and in each ch-1 space around, working sc2tog twice evenly spaced to draw the edge in slightly and keep the circle flat. Join with sl st to the first sc. (approximately 100 sc)
Round 11 (Color A, sage) — final edge: Ch 1. Work 1 sc in each sc around. Join with sl st to the first sc. Fasten off. (approximately 100 sc)
Assembly and Finishing
There is no seaming in this project — it is worked as one continuous circle. Finishing is all about hiding your ends and setting the shape.
Weaving in ends: Thread each yarn tail onto your tapestry needle. Turn the hot pad to the wrong side (the side with the most visible carried yarn). Slide the needle under the backs of several stitches, going in one direction, then reverse direction and go under a few more stitches. This locks the tail in place so it will not work loose in the wash. Trim the yarn close to the fabric. Do this for every color change.
Blocking: Lightly mist the hot pad with cool water until it is damp but not soaking. Pin it flat to a towel or blocking mat, stretching it gently into a circle approximately 8 inches (20 cm) across. Use several pins around the edge so the rim is even. Allow it to dry completely — usually several hours or overnight. Do not iron. If you want a crisper finish, hold a steam iron an inch above the fabric and let the steam settle on it; never press the iron directly onto the stitches.
Final check: Lay the dry hot pad on your table. It should sit perfectly flat with no ruffled edge and no cupping. If it ruffles, work one more round of sc2tog evenly around the edge; if it cups, your tension was too loose and a light re-blocking will help.
Pro Tips and Variations
- Change the colors: The sage and cream pairing is what gives this its mid-century feel, but you can swap in mustard and off-white, terracotta and oatmeal, or navy and pale gray. Keep one color light and one darker so the wheel texture stands out.
- Make it bigger or smaller: To make a larger trivet, simply continue the pattern — Round 10 would add 25 fans, Round 11 would add 30, and so on, always alternating colors and adding 5 fans per wheel round. To make a smaller coaster, stop after Round 6 and work the two edging rounds.
- Substitute yarn: Cotton is best for heat resistance, but a cotton-blend or a smooth worsted acrylic will also work for a decorative trivet that will not touch hot pans. Avoid fuzzy or hairy yarns, which hide the wheel motif.
- Add a hanging loop: After Round 11, ch 12, then sl st back into the same stitch to form a loop, and fasten off. This lets you hang the hot pad on a hook beside the stove.