Celestial Cascade Crescent Shawl Free Pattern – Knit a Starry Night Wrap
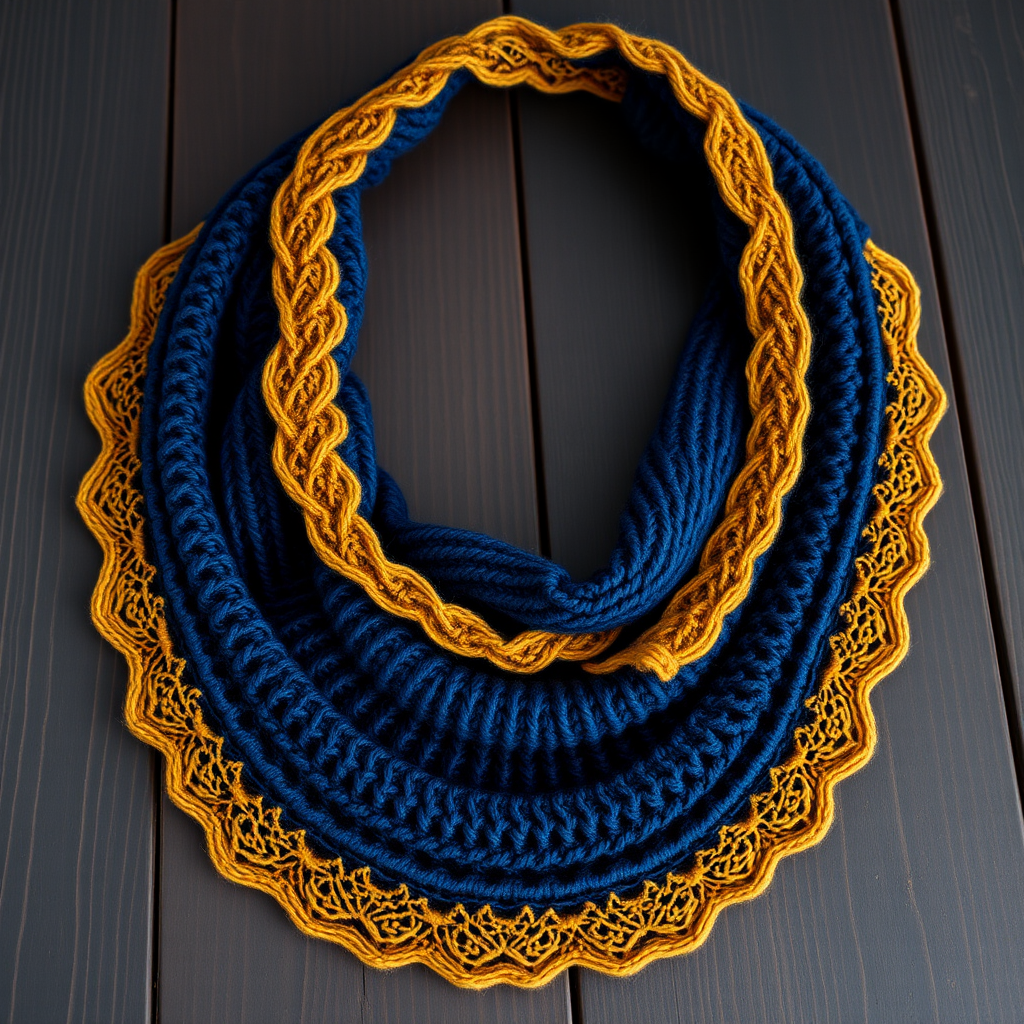
Celestial Cascade Crescent Shawl Free Pattern – Knit a Starry Night Wrap
Wrap yourself in a hand-knit crescent shawl that captures the deep blues and shimmering golds of a star-filled sky. This textured knit features a unique combination of garter ridges and delicate lace, creating a luxurious accessory for any season. Whether you're a seasoned knitter looking for a meditative project or a beginner ready to tackle your first shawl, this pattern offers a rewarding journey with stunning results. The finished piece drapes elegantly over the shoulders, with a gentle curve that hugs the neck—perfect for cool evenings or as a statement layering piece.
Materials Needed
Before you begin, gather the following supplies to ensure a smooth knitting experience:
- Yarn: Worsted weight yarn in deep navy (Color A) and gold/copper (Color B), approximately 500 yards total (350 yards A, 150 yards B). Choose a soft, cozy yarn with good stitch definition—a wool blend works beautifully.
- Needle: US 8 (5.0 mm) circular knitting needle, 32-inch or longer. The long cord is essential to accommodate the increasing stitch count as the shawl grows.
- Notions: Stitch markers (at least 2), tapestry needle for weaving in ends, scissors, and blocking mats with pins for the final shaping.
- Gauge: 18 stitches and 24 rows = 4 inches in stockinette stitch (blocked). Gauge is important for achieving the correct size and drape, so take a moment to swatch before starting.
Step-by-Step Instructions
This shawl is knit from the top center down, increasing on both sides to form a crescent shape. Use a long circular needle to accommodate the increasing stitch count. Follow along carefully, and you'll have a beautiful starry-night wrap in no time.
Abbreviations
- K = knit
- P = purl
- K2tog = knit two together (right-leaning decrease)
- SSK = slip, slip, knit (left-leaning decrease)
- YO = yarn over (creates an eyelet hole)
- PM = place marker
- SM = slip marker
Setup
With Color A, cast on 3 stitches using your preferred method (long-tail cast-on works well).
Row 1 (RS): K1, YO, K1, YO, K1 (5 stitches). This row creates the initial increases that will form the top edge of the shawl.
Row 2 (WS): K2, P1, K2. The knit stitches at the edges form the garter border, while the purl stitch in the center maintains the fabric structure.
Row 3 (RS): K2, YO, K1, YO, K2 (7 stitches). Notice how the increases are placed inside the 2-stitch borders.
Row 4 (WS): K2, P3, K2. Continue to keep the first and last 2 stitches in garter (knit) for the border.
Body – Garter Section
Now you'll work the main body of the shawl in garter stitch (knit every row) while increasing at each edge. This creates the smooth, ridged texture that forms the base of your crescent shape.
Continue working in garter stitch for the next 10 rows, increasing 1 stitch at each edge every row by knitting into the front and back of the first and last stitch (KFB). This increase method is simple and creates a neat edge.
Detailed instruction for each row: KFB (knit into front and back of first stitch), knit across to the last stitch, KFB (knit into front and back of last stitch).
After completing these 10 rows, you will have 27 stitches. Your work should measure approximately 3 inches from the cast-on edge. The increases are gradual, allowing the shawl to flare gently outward.
Lace Section
Now the magic begins! You'll work the lace pattern that evokes the starry night sky. Maintain a 2-stitch garter border on each side throughout this section—these stitches are always knit, regardless of the pattern.
Row 1 (RS): K2, *YO, K2tog, K1, SSK, YO, K1; repeat from * to last 2 stitches, K2. The yarn overs create eyelets, while the decreases keep the stitch count balanced.
Row 2 (WS): K2, Purl across to last 2 stitches, K2. The purl row creates the contrast between the lace openings and the solid fabric.
Row 3 (RS): K2, *K1, YO, K2tog, SSK, YO, K2; repeat from * to last 2 stitches, K2. Notice how the pattern shifts slightly, creating a diagonal line of eyelets.
Row 4 (WS): K2, Purl across to last 2 stitches, K2.
Repeat these 4 rows until the shawl measures approximately 20 inches from the cast-on edge, ending with a WS row (Row 2 or 4). The lace will open up beautifully once blocked, so don't worry if it looks a bit scrunched now.
Color Transition
Switch to Color B (gold/copper). Cut Color A, leaving a 6-inch tail for weaving in later. Work 6 rows in garter stitch (knit every row), increasing 1 stitch at each edge every row (by knitting into the front and back of the first and last stitch). This creates a smooth transition between the navy body and the golden border, adding a subtle ridge that separates the two sections.
Detailed instruction for each row: KFB (knit into front and back of first stitch), knit across to the last stitch, KFB (knit into front and back of last stitch).
After these 6 rows, you'll have added 12 stitches total (6 on each side), giving your shawl a gentle flare that will become the scalloped edge.
Final Lace Border
Continue with Color B, work the lace pattern as above (Rows 1-4) for 8 more rows (2 full repeats of the 4-row pattern). This creates a delicate, lacy edge that mirrors the starry theme. Then work 4 rows of garter stitch (knit every row) without increases. This solid border will frame the lace and provide a clean finish.
Bind Off
Bind off loosely in knit on the RS. To ensure a stretchy edge that won't pull the shawl, use a loose bind-off method: knit the first stitch, knit the second, then pass the first over the second. Continue across, keeping the tension relaxed. Alternatively, you can use a larger needle for the bind-off row.
Weave in all ends using a tapestry needle, being careful to secure them within the fabric so they don't show on the right side. Trim any excess yarn.
Blocking
Blocking is essential for this shawl to open up the lace and create the smooth crescent curve. Soak the shawl in lukewarm water with a mild wool wash for 15-20 minutes. Gently squeeze out excess water (never wring), then lay it flat on a blocking mat. Pin the top edge straight, then gently stretch the bottom edge downward and outward to create the crescent shape. Focus on opening up the lace eyelets—you can use your fingers to shape each one. Allow to dry completely, which may take 24-48 hours depending on humidity.
Once dry, unpin and enjoy your Celestial Cascade Crescent Shawl! The deep navy and shimmering gold will catch the light beautifully, and the soft, cozy texture will make it a favorite accessory for years to come.



