Coastal Cottage Half-Circle Clutch Free Pattern
Coastal Cottage Half-Circle Clutch: A Free Beginner Crochet Pattern
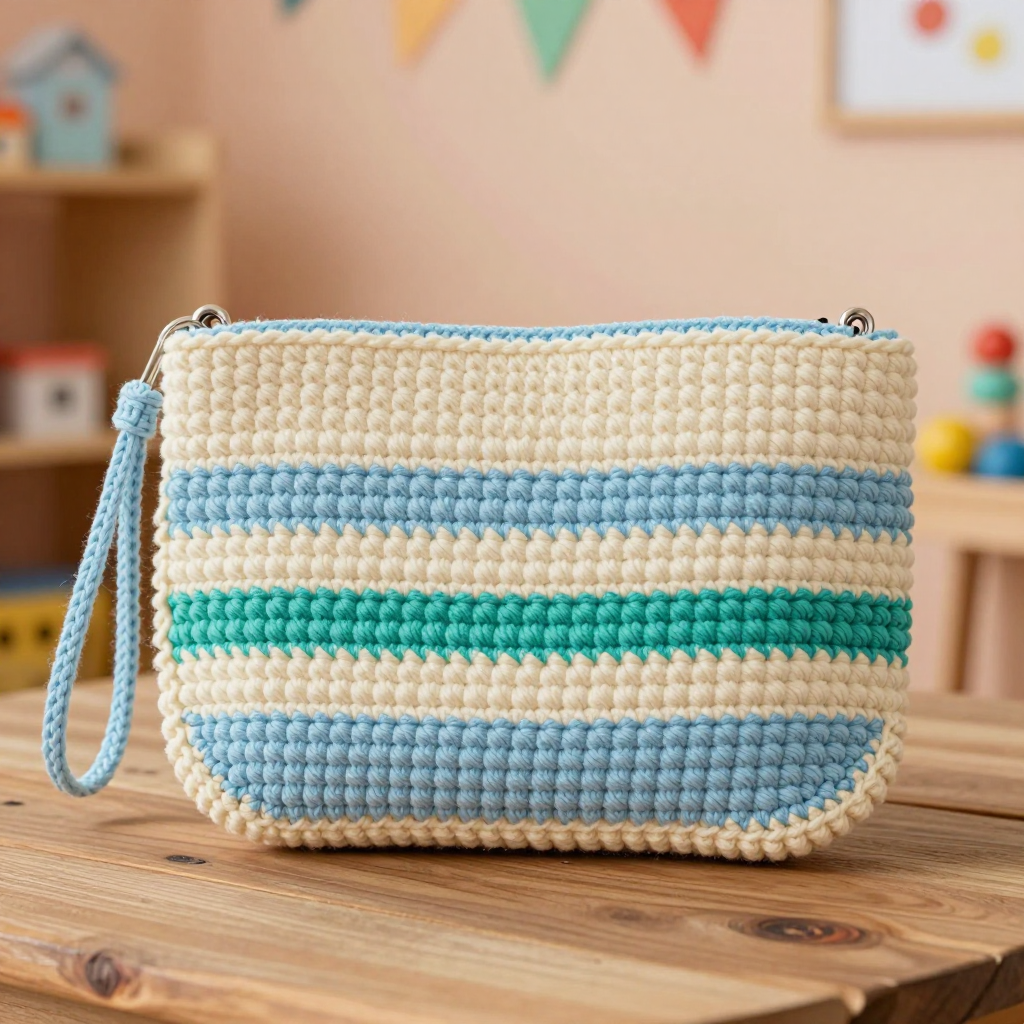
If you have never held a crochet hook before, this is the perfect first project to fall in love with. The Coastal Cottage Half-Circle Clutch is a flat, half-moon shaped bag worked in soft, concentric bands of ivory, pale blue, and seafoam — like a seashell you can carry in your hand. It uses only one simple stitch (single crochet) and one simple decrease, so you can learn the basics while making something you will actually use and show off. The finished clutch feels dense and slightly ridged, with a clean, coastal-grandmother charm that looks lovely tucked under your arm on a summer evening. Best of all, it works up in just a few hours, so you get that wonderful "I made this!" feeling fast.
Materials Needed
- Yarn: Bulky (weight 5) acrylic or cotton-blend yarn, approximately 180 yards total: 80 yards ivory (Color A), 55 yards pale blue (Color B), 45 yards seafoam (Color C).
- Crochet hook: 8 mm (US size L/11).
- Stitch marker (one is enough, but a few are handy).
- Tapestry needle (a large, blunt needle with a big eye for sewing in yarn ends).
- Scissors.
- Optional: one 1/2-inch button if you would like a closure.
- Finished size: 12 inches wide across the flat top edge x 6 inches deep at the center. The wrist strap is 7 inches long.
Abbreviations and Beginner Glossary
Do not worry if these look like a secret code — here is every single one explained in plain English.
- ch – chain. Make a loop of yarn on your hook, then pull the yarn through the loop. Each one you make is a "chain." Chains are the foundation you build on.
- sc – single crochet. Insert your hook into the next stitch, wrap the yarn over the hook and pull up a loop (you now have 2 loops on the hook), wrap the yarn over again and pull it through both loops. That is one single crochet.
- sl st – slip stitch. Insert your hook into the stitch, wrap the yarn over, and pull it through both the stitch and the loop on your hook in one motion. It makes a tiny, flat joining stitch.
- sc2tog – single crochet 2 together. This is a decrease: it turns 2 stitches into 1. Insert your hook into the first stitch, pull up a loop (2 loops on hook), insert your hook into the next stitch, pull up a loop (3 loops on hook), wrap the yarn over and pull through all 3 loops. Now you have 1 stitch where there were 2.
- st(s) – stitch(es). One completed loop in your fabric.
- RS – right side. The "front" or prettier side of your work that will face outward.
- turn – flip your work over so you can crochet back the other way. This is how flat rows are made.
Gauge
Gauge: 12 single crochet stitches and 12 rows = 4 inches.
Gauge simply means how big your stitches come out. If your stitches are too big, your clutch will be larger than 12 inches; if too small, it will be smaller. To check, crochet a small square about 5 inches wide in single crochet, lay a ruler across the middle, and count how many stitches fit in 4 inches. If you have more than 12, try a larger hook; if fewer, try a smaller hook. It is worth the five minutes — it is the difference between a clutch that fits your hand nicely and one that surprises you!
Beginner Tips Before You Start
- Count every row. Because the stitch count changes on decrease rows, place your stitch marker in the first stitch of each row so you always know where a row begins and ends.
- Do not pull your yarn too tight. Keep a relaxed, even tension. Tight stitches make it hard to insert your hook and make the fabric stiff and small.
- Change colors at the very beginning of a row. Finish the last stitch of the old color, then loop the new color onto your hook to start the next row. Leave a 6-inch tail to weave in later.
- Carry your unused colors loosely. Let the other yarns rest along the side edge and catch them behind your work every few stitches so they do not pull the fabric out of shape.
- Always make the turning chain. The "ch 1" at the start of each row gives your edge height — it is not a stitch, so do not crochet into it.
- Trust the process. The first few rows look like a rectangle, not a half-circle. The shape appears as the decreases build up — keep going!
Step-by-Step Instructions
Note: The clutch is worked flat in turned rows from the flat top edge downward. You shape the half-circle with paired decreases (sc2tog) at both ends of every other row. Color bands are changed at the beginning of a row.
Half-Circle Body
With Color A (ivory), ch 37.
Row 1 (RS): Sc in 2nd ch from hook and in each ch across, turn. (36 sc)
Row 2: Ch 1, sc in each st across, turn. (36 sc)
Row 3: Ch 1, sc2tog over first 2 sts, sc in each st to last 2 sts, sc2tog over last 2 sts, turn. (34 sc)
Row 4: Ch 1, sc in each st across, turn. (34 sc)
Rows 5–32: Repeat Rows 3–4 fourteen more times. You will decrease by 2 stitches on each odd row and work even on each even row, ending on Row 32 with (6 sc). (Stitch counts along the way: 32 after Row 5, 30 after Row 7, 28 after Row 9, 26 after Row 11, 24 after Row 13, 22 after Row 15, 20 after Row 17, 18 after Row 19, 16 after Row 21, 14 after Row 23, 12 after Row 25, 10 after Row 27, 8 after Row 29, 6 after Row 31.)
Row 33: Ch 1, sc2tog over first 2 sts, sc in next 2 sts, sc2tog over last 2 sts, turn. (4 sc)
Row 34: Ch 1, sc in each st across, turn. (4 sc)
Row 35: Ch 1, sc2tog over first 2 sts, sc2tog over last 2 sts, turn. (2 sc)
Row 36: Ch 1, sc2tog over the 2 sts. Fasten off. (1 sc)
Total: 36 rows. At 12 rows = 4 inches, 36 rows gives you about 12 inches of depth — matching the 6-inch finished depth once the piece is folded in half along the flat top edge.
Color Bands
Work the body in color bands as follows, changing color at the beginning of the stated row:
- Rows 1–8: Ivory (A)
- Rows 9–16: Pale blue (B)
- Rows 17–24: Seafoam (C)
- Rows 25–32: Ivory (A)
- Rows 33–36: Pale blue (B)
Carry the colors along the side edge, catching them behind the work every few stitches so they do not pull.
Border
With the right side facing and using seafoam (C), work one round of sc evenly around the entire outer edge of the half-circle: work 1 sc in each row-end along the curved side, 1 sc in each stitch along the flat top edge, and 1 sc in each row-end along the other curved side, joining with a sl st to the first sc. Do not work into the bottom point more than once per row-end. Fasten off and weave in ends.
Wrist Strap
With pale blue (B), ch 3.
Row 1: Sc in 2nd ch from hook and in next ch, turn. (2 sc)
Row 2: Ch 1, sc in each st across, turn. (2 sc)
Repeat Row 2 until the strap measures 7 inches. Fasten off, leaving a 6-inch tail.
Assembly and Finishing
- Check the shape. Fold the clutch in half along the flat top edge to check the shape; block lightly if needed.
- Attach the wrist strap. Thread a tapestry needle with matching yarn. Attach one end of the strap to the inside of the curved edge near the top corner, using a few secure stitches. Repeat for the other end on the opposite side.
- Add a closure (optional). If a closure is desired, sew a 1/2-inch button to the center front of the flat top edge and work a small chain loop on the back edge to fit.
- Weave in all ends. Thread each yarn tail onto the tapestry needle and weave it back and forth through the back of several stitches, then trim close to the fabric.
- Block and steam. Lay the clutch flat, mist or steam gently, and let it dry completely to settle the stitches and even out the edges.
Pro Tips and Variations
- Change the palette. Swap the coastal colors for any three shades you love — try blush, cream, and dusty rose, or charcoal, mustard, and rust for a bolder look. Just keep the same yardage per color.
- Adjust the size. For a wider clutch, add chains in multiples of 2 to the starting chain (each extra 2 chains adds about 1/2 inch of width). For a deeper clutch, add extra repeat rows of Rows 3–4 before the final shaping rows.
- Substitute yarn. A worsted (weight 4) yarn held double, or a chunky (weight 6) yarn, can work too — but always crochet a gauge swatch first and adjust your hook size to hit 12 sc and 12 rows per 4 inches.
- Make it a crossbody. Instead of the 7-inch wrist strap, work the strap until it measures 40–45 inches for a hands-free crossbody bag.