Coral Cove Crab Applique Free Pattern – Crochet a Coastal Charm
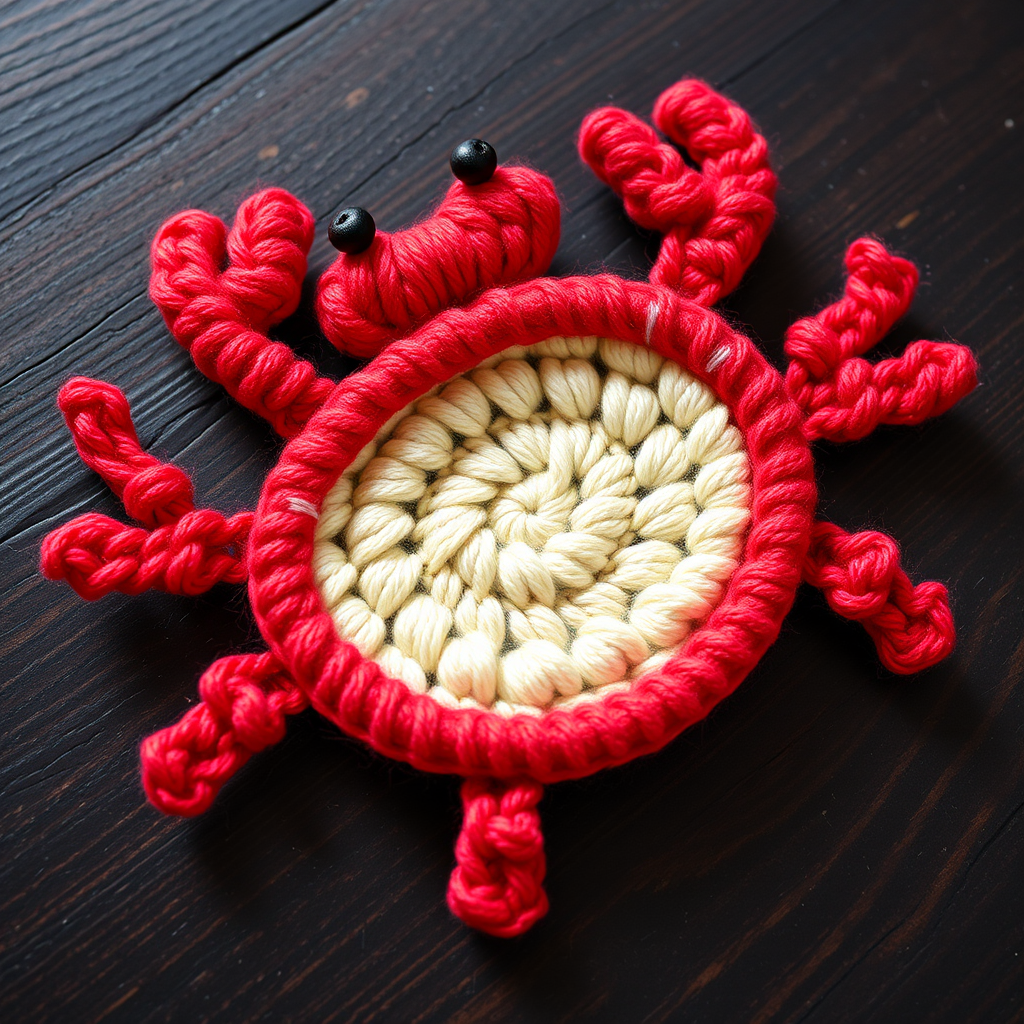
Dive into Coastal Crafting: The Coral Cove Crab Applique
Are you ready to add a splash of ocean whimsy to your next handmade project? Meet the Coral Cove Crab Applique—a charming, beginner-friendly crochet pattern that brings the shore right to your fingertips. Whether you're embellishing a beach bag, sprucing up a child's blanket, or adding a nautical touch to a cardigan, this little crustacean is the perfect quick craft. With its textured shell, cheerful claws, and adorable button eyes, this crab is guaranteed to become your new favorite go-to applique. Best of all, it works up in under an hour, making it an ideal project for last-minute gifts or a relaxing afternoon of stitching.
This pattern is designed with beginners in mind. Using basic stitches like single crochet, increases, and decreases, you'll create a flat, tactile piece that's ready to sew onto almost anything. The gauge isn't critical here—just aim for a tight tension so your stuffing (if you choose to add a little) doesn't peek through. Let's gather our materials and get started on this coastal adventure!
Materials Needed for Your Crochet Crab
Before we dive into the stitches, let's make sure you have everything on hand. This project uses small amounts of yarn, so it's perfect for using up scraps from your stash.
Yarn & Hook
- Worsted weight cotton yarn in three colors:
- Coral Red (main body, claws, and legs)
- Cream (belly)
- Black (eyes)
- 3.5mm (E) crochet hook – This size works beautifully with worsted weight yarn to create a firm, defined fabric.
Notions & Tools
- Yarn needle for sewing pieces together and weaving in ends.
- Scissors for cutting yarn.
- Stitch marker (optional, but helpful for keeping track of rounds).
- Fiberfill (optional, for lightly stuffing the body to give it a bit of dimension).
Abbreviations (US Terms)
Familiarize yourself with these standard crochet abbreviations before you begin:
- ch = chain
- sc = single crochet
- hdc = half double crochet
- dc = double crochet
- sl st = slip stitch
- inc = increase (2 sc in same stitch)
- dec = decrease (sc 2 together)
- Rnd = round
- R = row
Step-by-Step Instructions: Crafting Your Crab
Follow these detailed instructions carefully, and you'll have a delightful crab applique in no time. Remember to keep your tension consistent—tight enough to hide any stuffing, but not so tight that it's difficult to work into your stitches.
Body (Make 1, in Coral Red)
The body is worked in continuous rounds, starting with a magic ring. This creates a seamless, dome-like shape for the shell.
- Rnd 1: Start with a magic ring. Work 6 sc into the ring. Pull the tail to close the ring tightly. (6 stitches)
- Rnd 2: Work 2 sc into each stitch around (increase in every stitch). (12 stitches)
- Rnd 3: *Sc in the next stitch, inc in the next stitch.* Repeat from * to * around. (18 stitches)
- Rnd 4: *Sc in the next 2 stitches, inc in the next stitch.* Repeat from * to * around. (24 stitches)
- Rnd 5-7: Sc in each stitch around for three rounds. (24 stitches) – This builds the height of the shell.
- Rnd 8: *Sc in the next 2 stitches, dec (sc 2 together).* Repeat from * to * around. (18 stitches)
- Rnd 9: *Sc in the next stitch, dec.* Repeat from * to * around. (12 stitches)
- Stuff lightly: At this point, add a small amount of fiberfill to give the body a gentle, rounded shape. Don't overstuff—you want it to remain relatively flat for an applique.
- Rnd 10: Dec around. (6 stitches)
- Fasten off, leaving a long tail (about 15-20 cm). Thread the tail through a yarn needle, weave it through the front loops of the remaining 6 stitches, and pull tight to close the hole. Secure with a knot and set the body aside.
Belly (Make 1, in Cream)
The belly is a simple flat oval worked in rows. It will be sewn onto the underside of the body.
- R1: Chain 6. Sc in the 2nd chain from the hook and in each chain across. (5 stitches)
- R2-3: Chain 1, turn. Sc in each stitch across. (5 stitches)
- Fasten off, leaving a tail for sewing. This small oval will sit nicely on the crab's underside.
Claws (Make 2, in Coral Red)
These little pincers are worked in the round and then flattened to create the classic crab claw shape.
- Rnd 1: Start with a magic ring. Work 6 sc into the ring. (6 stitches)
- Rnd 2: *Sc in the next stitch, inc in the next stitch.* Repeat from * to * around. (9 stitches)
- Rnd 3-4: Sc in each stitch around for two rounds. (9 stitches)
- Rnd 5: *Sc in the next stitch, dec.* Repeat from * to * around. (6 stitches)
- Fasten off, leaving a long tail. Flatten the piece so the opening is at the bottom, and sew the opening closed with a few whip stitches. This creates a rounded, pincer-like shape.
Legs (Make 6, in Coral Red)
These are simple chains that will be attached to the sides of the body. They give the crab its characteristic spindly legs.
- Leg: Chain 8. Sc in the 2nd chain from the hook and in each chain across. (7 stitches)
- Fasten off, leaving a tail for sewing. Repeat to make a total of 6 legs.
Eyes (Make 2, in Black)
These tiny circles will give your crab its cute, expressive face.
- Eye: Start with a magic ring. Work 6 sc into the ring. (6 stitches)
- Fasten off, leaving a tail. Pull the ring closed tightly. Repeat to make 2 eyes.
Assembly: Bringing Your Crab to Life
Now that all your pieces are ready, it's time to assemble your crab. Take your time with the sewing to ensure everything is securely attached and evenly spaced.
- Sew the Belly: Position the cream oval on the underside of the body, slightly lower than the center so the top of the red shell remains visible. Using the yarn needle and the tail from the belly, whip stitch it securely in place. Weave in the end.
- Attach the Legs: On each side of the body, sew three legs evenly spaced. Angle them slightly downward for a natural crab look. Use the tails from the legs to sew them firmly to the sides of the body, just below the belly line. Weave in all ends.
- Attach the Claws: Sew one claw to each side of the front of the body, just above the topmost leg. Position them so they curve slightly outward. Use the long tails from the claws to sew them securely. Weave in the ends.
- Sew the Eyes: Place the two black circles on the top of the body, close together and slightly above the belly line. Sew them in place using their tails. Weave in the ends.
- Embroider a Smile (Optional): Using a small piece of black yarn and your yarn needle, embroider a tiny smile just below the eyes. A simple backstitch or a few straight stitches will do the trick.
- Final Weave-In: Double-check all your pieces are secure, then weave in any remaining loose ends with your yarn needle.
And there you have it—your very own Coral Cove Crab Applique! This delightful little creature is ready to be sewn onto a tote bag, a baby blanket, a pillow, or even used as a fun patch on a denim jacket. Because it's flat and sturdy, it's incredibly versatile. Make a whole family of crabs in different colors to create a charming coastal scene.
We hope you enjoyed this quick and satisfying project. Happy crocheting, and may your stitches always be tight and your seashells always be found!


