Cozy Cloud Sloth Free Pattern – A Knitted Snuggle Companion
Cozy Cloud Sloth Free Pattern – A Knitted Snuggle Companion
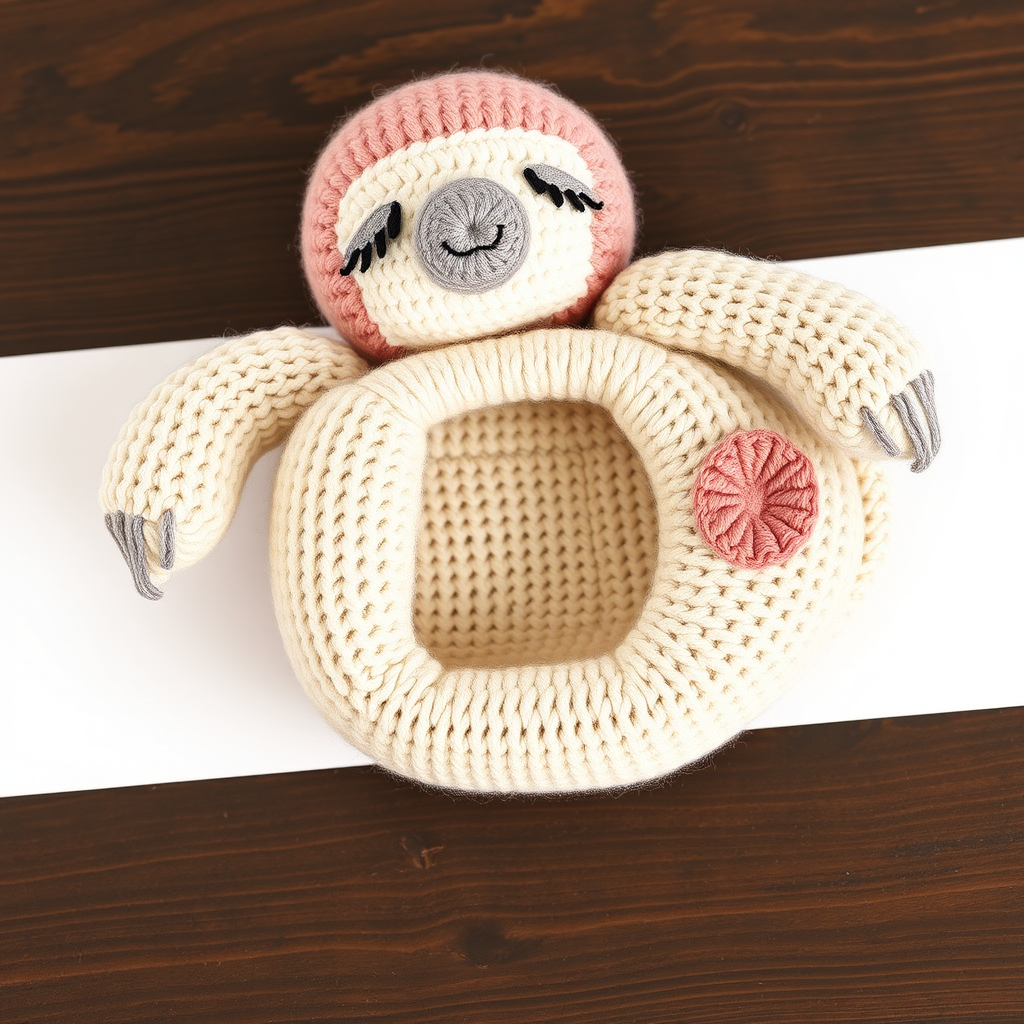
There's something magical about creating a handmade companion that feels as soft as a cloud and as comforting as a warm hug. Today, I'm thrilled to share this Cozy Cloud Sloth knitting pattern – an impossibly soft, oversized amigurumi designed with a cloud-like textured body and a gentle, sleepy expression. Whether you're looking for the perfect baby shower gift, a thoughtful present for someone going through a tough time, or simply a delightful weekend project, this knitted sloth delivers pure comfort in every stitch.
Using super bulky Bernat Blanket yarn, this project works up surprisingly quickly while maintaining that luxurious, plush feel that makes everyone want to squeeze it. The pastel palette of cream, dusty rose, and light gray creates a soothing aesthetic that fits beautifully in nurseries, bedrooms, or cozy reading nooks. Best of all, this pattern is beginner-friendly, using basic knit and purl stitches with simple shaping techniques that build confidence with every row.
Materials Needed
Before we dive into the pattern, let's gather all the supplies you'll need for this project. The beauty of this design is that it uses readily available materials, most of which you might already have in your crafting stash.
Yarn Requirements
- Bernat Blanket Yarn (or any super bulky weight #6 yarn) in:
- Cream – for the main body, head, arms, and legs (approximately 2 skeins)
- Dusty Rose – for the belly patch, inner ears, and cheeks (approximately 1 skein)
- Light Gray – for the muzzle and claws (small amount)
- Black yarn – small amount for eyes and nose embroidery
Tools and Notions
- US Size 11 (8.0 mm) knitting needles – for the body and limbs
- US Size G/6 (4.0 mm) crochet hook – for facial details and small crocheted pieces
- Tapestry needle – for sewing pieces together and weaving in ends
- Polyester fiberfill stuffing – for a soft, huggable fill
- Stitch markers – to keep track of your rounds and sections
- Scissors
Gauge Information
10 stitches and 14 rows = 4 inches in stockinette stitch with US 11 needles. While gauge isn't critical for amigurumi (since you're stuffing the piece anyway), maintaining consistent tension will ensure your sloth looks proportional and professional.
Step-by-Step Instructions
Now, let's get to the fun part! I've broken down this pattern into manageable sections, each with detailed instructions to ensure your Cozy Cloud Sloth comes together perfectly. Remember to read through each section before beginning, and don't hesitate to use stitch markers to keep track of your progress.
Abbreviations Used
- K = knit
- P = purl
- K2tog = knit two stitches together (decrease)
- M1 = make one stitch (increase)
- St(s) = stitch(es)
- Rnd = round
- Sc = single crochet
- MR = magic ring
Knitted Body (Worked Flat, Then Seamed)
The body is the foundation of your sloth, creating that rounded, huggable oval shape. We'll work it flat in stockinette stitch, then seam it together for a clean finish.
Step 1: Cast on 30 stitches with Cream yarn.
Step 2: Work in stockinette stitch (knit on right side, purl on wrong side) as follows:
- Row 1 (RS): Knit all stitches.
- Row 2 (WS): Purl all stitches.
- Repeat Rows 1-2 until the piece measures 8 inches from the cast-on edge.
Step 3: Shape the bottom of the body by decreasing:
- Row 1: K2tog, K26, K2tog (28 stitches remain)
- Row 2: Purl all stitches
- Row 3: K2tog, K24, K2tog (26 stitches remain)
- Row 4: Purl all stitches
- Row 5: K2tog, K22, K2tog (24 stitches remain)
- Row 6: Purl all stitches
Step 4: Bind off all stitches loosely.
Step 5: Fold the piece in half with right sides together. Sew the side seams using a mattress stitch or whip stitch, leaving the bottom edge open. Turn the body right side out.
Step 6: Stuff the body firmly with polyester fiberfill, paying extra attention to the corners to ensure they're well-filled. Sew the bottom opening closed with a ladder stitch for an invisible finish.
Knitted Head (Worked Flat, Then Seamed)
The head is slightly flattened to give your sloth that adorable, sleepy expression. Follow these steps carefully:
Step 1: Cast on 20 stitches with Cream yarn.
Step 2: Work in stockinette stitch (K on RS, P on WS) for 12 rows.
Step 3: Shape the top of the head:
- Row 1: K2tog, K16, K2tog (18 stitches remain)
- Row 2: Purl all stitches
- Row 3: K2tog, K14, K2tog (16 stitches remain)
- Row 4: Purl all stitches
Step 4: Bind off all stitches.
Step 5: Fold the head piece in half, right sides together. Sew the side seams, leaving the bottom edge open. Turn right side out and stuff firmly.
Step 6: Sew the head to the top of the body using a whip stitch, making sure it's centered and secure. Weave in all loose ends.
Knitted Arms (Make 2)
These tubular arms are simple to create and add that characteristic sloth charm with their rounded paws.
Step 1: Cast on 10 stitches with Cream yarn.
Step 2: Work in stockinette stitch for 6 inches.
Step 3: Shape the paw:
- Row 1: K2tog, K6, K2tog (8 stitches remain)
- Row 2: Purl all stitches
- Row 3: K2tog, K4, K2tog (6 stitches remain)
Step 4: Bind off all stitches.
Step 5: Fold the arm lengthwise with right sides together. Sew the seam, leaving the top edge open. Turn right side out and stuff lightly – you want these arms to be soft and flexible, not overly firm.
Step 6: Attach the arms to the sides of the body, positioning them slightly forward for that characteristic sloth pose. Sew securely with a whip stitch.
Knitted Legs (Make 2)
Similar to the arms but slightly wider, these legs provide stability for your sloth to sit upright.
Step 1: Cast on 12 stitches with Cream yarn.
Step 2: Work in stockinette stitch for 5 inches.
Step 3: Shape the foot:
- Row 1: K2tog, K8, K2tog (10 stitches remain)
- Row 2: Purl all stitches
- Row 3: K2tog, K6, K2tog (8 stitches remain)
Step 4: Bind off all stitches.
Step 5: Fold, sew the seam, and turn right side out. Stuff lightly to maintain flexibility.
Step 6: Attach the legs to the bottom front of the body, positioning them so your sloth can sit upright. Sew securely and weave in ends.
Knitted Belly Patch
This dusty rose oval adds a sweet pop of color and defines your sloth's belly.
Step 1: Cast on 14 stitches with Dusty Rose yarn.
Step 2: Work in stockinette stitch for 4 inches.
Step 3: Bind off all stitches.
Step 4: Position the belly patch on the front of the body, centered and slightly below the head. Sew it in place using a whip stitch, making sure the edges lie flat. Weave in all ends.
Crocheted Muzzle
This soft gray muzzle is the focal point of your sloth's face, giving it that gentle, endearing expression.
Step 1: With Light Gray yarn and your G/6 crochet hook, make a magic ring (MR).
Step 2: Work 6 single crochet (sc) into the ring. Pull the tail to tighten the ring closed.
Step 3: Round 2: Work 2 sc in each stitch around (12 sc total).
Step 4: Round 3: (Sc in next stitch, 2 sc in next stitch) around (18 sc total).
Step 5: Fasten off, leaving a long tail for sewing. Position the muzzle on the face, centered below where the eyes will be. Sew it in place securely, weaving in the tail.
Knitted Ears (Make 2)
These simple ears add the perfect finishing touch to your sloth's head.
Step 1: Cast on 6 stitches with Cream yarn.
Step 2: Work in stockinette stitch for 4 rows.
Step 3: Bind off all stitches.
Step 4: Fold each ear in half and sew the sides together to create a rounded shape.
Step 5: With Dusty Rose yarn and your crochet hook, make a small circle: MR, 6 sc in ring, pull tight, fasten off. Sew this inner ear circle onto each ear.
Step 6: Attach the ears to the sides of the head, positioning them slightly toward the back for that authentic sloth look. Sew securely.
Crocheted Claws
These tiny gray claws add realistic detail to your sloth's paws.
Step 1: For each paw (4 total – 2 arms, 2 legs), with Light Gray yarn, make a MR with 4 sc. Fasten off, leaving a short tail.
Step 2: Sew 2-3 claws onto each paw, positioning them at the rounded end. Space them evenly for a natural look.
Face Details – Bringing Your Sloth to Life
This is where your sloth's personality really shines through. Take your time with these details to achieve that perfect sleepy expression.
Step 1: With black yarn and your tapestry needle, embroider two sleepy eyes on the head, positioned above the muzzle. Use a satin stitch to create half-closed, gentle eyes. Start by bringing the needle up through the back of the head, then create small, horizontal stitches to form each eye. For a sleepy look, make the eyes slightly curved downward at the outer corners.
Step 2: Embroider a small nose on the muzzle using black yarn. A simple triangle or oval shape works beautifully – just a few satin stitches will do.
Step 3: Add a gentle smile below the nose with black yarn. Use a backstitch to create a soft, curved line that gives your sloth a content, peaceful expression.
Assembly and Finishing Touches
Step 1: Sew all parts securely, double-checking that everything is firmly attached. Weave in all loose ends with your tapestry needle.
Step 2: Optional: Add a small blush circle on each cheek using Dusty Rose yarn. Simply embroider a small, circular area with a few loose stitches to create a soft, rosy glow.
Step 3: Gently shape your sloth, fluffing the yarn with your fingers to create that cloud-like texture. The Bernat Blanket yarn naturally has a beautiful, plush quality that becomes even more pronounced with a little gentle fluffing.
Step 4: Give your Cozy Cloud Sloth a final once-over, making sure all seams are secure and the stuffing is evenly distributed. Adjust the arms and legs into a comfortable, relaxed position.
Tips for Success
As you work through this pattern, keep these helpful tips in mind:
- Take your time with the face: The sleepy expression is what gives this sloth its charm. If you're not happy with your first attempt at the eyes, simply unpick the stitches and try again.
- Stuff strategically: For a truly huggable toy, stuff the body firmly but keep the limbs slightly softer. This allows for natural posing and cuddling.
- Use stitch markers: Especially when working on the body and head, stitch markers help you keep track of your rows and prevent mistakes.
- Weave in ends as you go: This saves time at the end and prevents loose threads from getting tangled in your work.
- Block your pieces: While not strictly necessary for amigurumi, lightly steaming your knitted pieces before assembly can help them lie flat and look more professional.
Customization Ideas
Once you've mastered the basic pattern, feel free to make it your own:
- Color variations: Try different pastel combinations like lavender and mint, or go bold with jewel tones for a more vibrant look.
- Size adjustments: Use worsted weight yarn with smaller needles for a mini version, or double-strand your yarn for an extra-large companion.
- Add accessories: A tiny knitted scarf, a flower crown, or even a little heart patch would make adorable additions.
- Different expressions: Experiment with open eyes, a surprised expression, or even a little tongue sticking out for extra personality.
Care Instructions
To keep your Cozy Cloud Sloth looking its best:
- Spot clean with a damp cloth and mild soap when needed
- Air dry flat – do not put in the dryer
- Brush gently with a soft brush to restore the fluffy texture
- Store in a cool, dry place away from direct sunlight
Your Cozy Cloud Sloth is now complete and ready to bring comfort and joy to its new home! Whether you're keeping it for yourself or gifting it to someone special, this handmade companion is sure to become a treasured keepsake. The combination of plush yarn, gentle colors, and that adorable sleepy expression makes it impossible not to smile when you see it.
I'd love to see your finished sloths! Share your creations on social media using the hashtag #CozyCloudSl


