Emberglow Aurora Cowl Free Pattern – Gradient Knit with Drifting Smoke Stitches
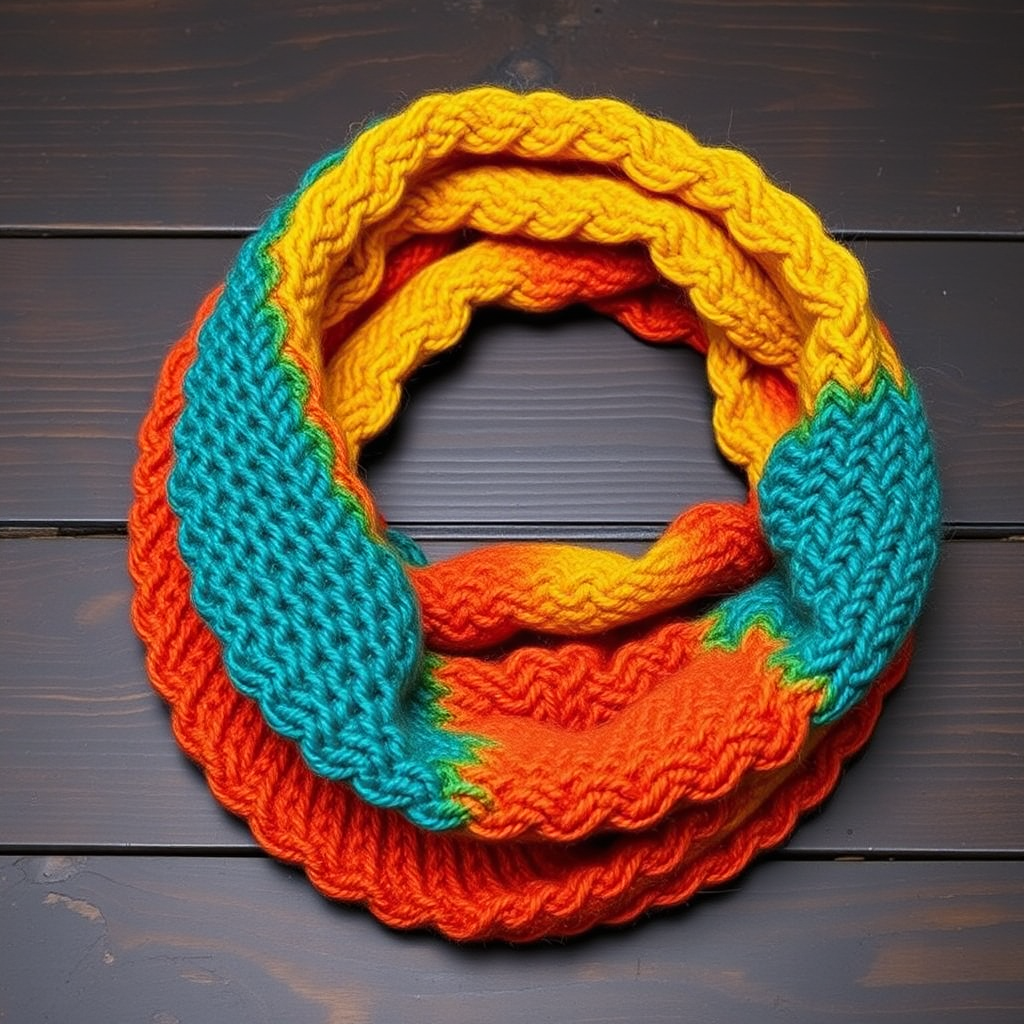
Emberglow Aurora Cowl: A Free Gradient Knitting Pattern for Cozy Winter Evenings
Wrap yourself in the shifting colors of a winter sunset with the Emberglow Aurora Cowl. This mesmerizing gradient knit transitions from deep teal through burnt orange to golden yellow, creating a wearable piece of art that catches the light beautifully. The drifting smoke stitch pattern produces a soft, wavy texture reminiscent of gentle water ripples or wisps of smoke curling upward.
Whether you're a seasoned knitter looking for a satisfying weekend project or a confident beginner ready to expand your skills, this free pattern offers the perfect balance of simplicity and visual impact. The seamless tube construction means no fiddly seaming, and the repetitive stitch pattern becomes wonderfully meditative once you find your rhythm.
Why You'll Love This Pattern
The Emberglow Aurora Cowl is more than just a winter accessory—it's a statement piece that showcases the beauty of gradient color transitions. The smoke stitch pattern, created by alternating knit and purl stitches in a staggered rhythm, produces a subtle texture that adds depth without overwhelming the color story. The result is a wide, cozy infinity scarf that drapes elegantly around the neck and can be worn doubled for extra warmth or single for a relaxed, bohemian look.
The ribbed edges at the top and bottom provide a neat, stretchy finish that keeps the cowl in place while remaining comfortable against the skin. The worsted weight yarn ensures quick progress, making this an ideal project for gift-giving or treating yourself to something special.
Materials Needed
Before you begin, gather the following materials to ensure a smooth knitting experience:
Yarn
- Worsted weight yarn in 3 colors:
- Color A: Deep teal (approximately 100g)
- Color B: Burnt orange (approximately 100g)
- Color C: Golden yellow (approximately 100g)
- Total yarn required: approximately 300g
Pro tip: Choose yarns with similar fiber content and weight to ensure consistent gauge throughout your project. A soft wool blend or superwash merino works beautifully for this cowl.
Needles and Notions
- US 8 (5mm) 16-inch circular knitting needle
- Stitch marker to mark the beginning of the round
- Tapestry needle for weaving in ends
- Scissors
- Blocking mats and pins (optional, for finishing)
Gauge
18 stitches and 24 rows = 4 inches in stockinette stitch
Always take time to knit a gauge swatch before beginning your project. This ensures your finished cowl will have the correct dimensions and drape. If your gauge is off, adjust your needle size accordingly—smaller needles for more stitches per inch, larger needles for fewer.
Step-by-Step Instructions
Follow these detailed instructions to create your Emberglow Aurora Cowl. The pattern is worked in the round, creating a seamless tube that becomes your finished cowl.
Getting Started: Cast On and Ribbing
Step 1: With Color A (deep teal), cast on 120 stitches using your preferred method. A long-tail cast on works beautifully for this project, providing a stretchy edge that complements the ribbed finish.
Step 2: Place a stitch marker on your right needle to mark the beginning of the round. Join in the round, being extremely careful not to twist your stitches. This is crucial—a twisted cast-on edge will ruin the drape of your finished cowl. Take a moment to lay your work flat and ensure all stitches are facing the same direction before joining.
Step 3: Work in k1, p1 ribbing for 1 inch (approximately 6 rounds). This creates a neat, stretchy edge that will frame your cowl beautifully. Keep your tension even and relaxed—tight ribbing will make the edge pucker.
The Smoke Stitch Pattern
The smoke stitch pattern is created by alternating knit and purl stitches in a specific sequence. This creates the subtle, wavy texture that gives the cowl its name. The pattern is worked over 4 rounds, which you'll repeat throughout the project.
Round 1: *K1, p1, k1, p1, k1, p1, k1, p1, k1, p1, k1, p1, k1, p1, k1, p1, k1, p1, k1, p1* — repeat from * to * to end of round.
Round 2: *P1, k1, p1, k1, p1, k1, p1, k1, p1, k1, p1, k1, p1, k1, p1, k1, p1, k1, p1, k1* — repeat from * to * to end of round.
Round 3: Repeat Round 1.
Round 4: Repeat Round 2.
Continue repeating Rounds 1-4 for 2 inches in Color A. The alternating knit and purl stitches create a subtle ribbed texture that shifts and flows like smoke drifting through the air. Don't worry if the pattern doesn't look like much at first—the magic reveals itself as you build more rounds.
Color Transitions: Building the Gradient
The gradient effect is achieved by switching colors at specific intervals, creating a beautiful ombré transition from deep teal through burnt orange to golden yellow, then back down through the color spectrum.
Step 4: After completing 2 inches in Color A, switch to Color B (burnt orange). To make a clean color change, simply drop Color A and pick up Color B at the beginning of a new round. Leave a tail of approximately 6 inches to weave in later. Continue working the smoke stitch pattern (Rounds 1-4) for 3 inches in Color B.
Step 5: Switch to Color C (golden yellow). Continue the smoke stitch pattern for 3 inches. This is the brightest, warmest section of your cowl—the golden heart of the sunset.
Step 6: Switch back to Color B (burnt orange). Continue the smoke stitch pattern for 2 inches. This begins the descent back through the color spectrum, creating a symmetrical gradient.
Step 7: Switch back to Color A (deep teal). Continue the smoke stitch pattern for 1 inch. This grounds the cowl, bringing it back to the deep, calming teal that started your journey.
Finishing: Bind Off and Weave In Ends
Step 8: Bind off loosely in pattern. To maintain the stretchy quality of your cowl, bind off using the same k1, p1 rhythm you've been knitting. Work the first stitch, then the second, then pass the first stitch over the second. Continue this pattern across all stitches. If you find your bind-off edge is too tight, use a needle one size larger for this final round.
Step 9: Cut your yarn, leaving a 6-inch tail. Pull the tail through the last stitch to secure it.
Step 10: Weave in all ends using your tapestry needle. Take your time with this step—neatly woven ends make your finished cowl look professional and ensure it will withstand years of wear and washing. Weave each end through the wrong side of the work, following the path of the stitches to hide the yarn completely.
Blocking: The Final Touch
Step 11: Block your cowl gently to open up the stitch pattern and even out the fabric. Soak the cowl in lukewarm water with a drop of gentle wool wash for 15-20 minutes. Gently squeeze out excess water—never wring or twist. Lay the cowl flat on a clean towel, roll it up to remove more water, then shape it on blocking mats. Allow it to dry completely before wearing.
Blocking transforms your knitting, relaxing the stitches and allowing the smoke pattern to truly shine. The result is a beautifully drapey, professional-looking cowl that you'll be proud to wear or gift.
Wearing Your Emberglow Aurora Cowl
This versatile cowl can be styled in multiple ways. Wear it single for a relaxed, draped look that showcases the full gradient effect. Or wrap it twice around your neck for extra warmth and a cozier silhouette. The ribbed edges keep the cowl in place whether you're braving winter winds or enjoying a crisp autumn evening.
The Emberglow Aurora Cowl makes a thoughtful handmade gift for friends and family who appreciate the warmth of handcrafted items. The gradient color story evokes cozy evenings by the fire, crisp walks through fall leaves, and the quiet beauty of a winter sunset.
Customization Ideas
Once you've mastered the basic pattern, feel free to make it your own:
- Change the color palette: Swap the sunset colors for ocean blues, forest greens, or your favorite combination. The smoke stitch pattern works beautifully with any color story.
- Adjust the length: Add or subtract rounds to create a shorter cowl or a longer infinity scarf.
- Experiment with yarn weights: Try DK weight yarn with smaller needles for a finer fabric, or bulky yarn with larger needles for a chunkier, quicker project.
- Add a fourth color: Introduce an additional color for an even more complex gradient.
However you choose to make it, the Emberglow Aurora Cowl is sure to become a treasured addition to your winter wardrobe. Happy knitting!


