Forest Iguana Spine Cylinder Free Pattern: Mosaic Crochet Keychain Charm
Forest Iguana Spine Cylinder: A Beginner-Friendly Mosaic Crochet Keychain Charm
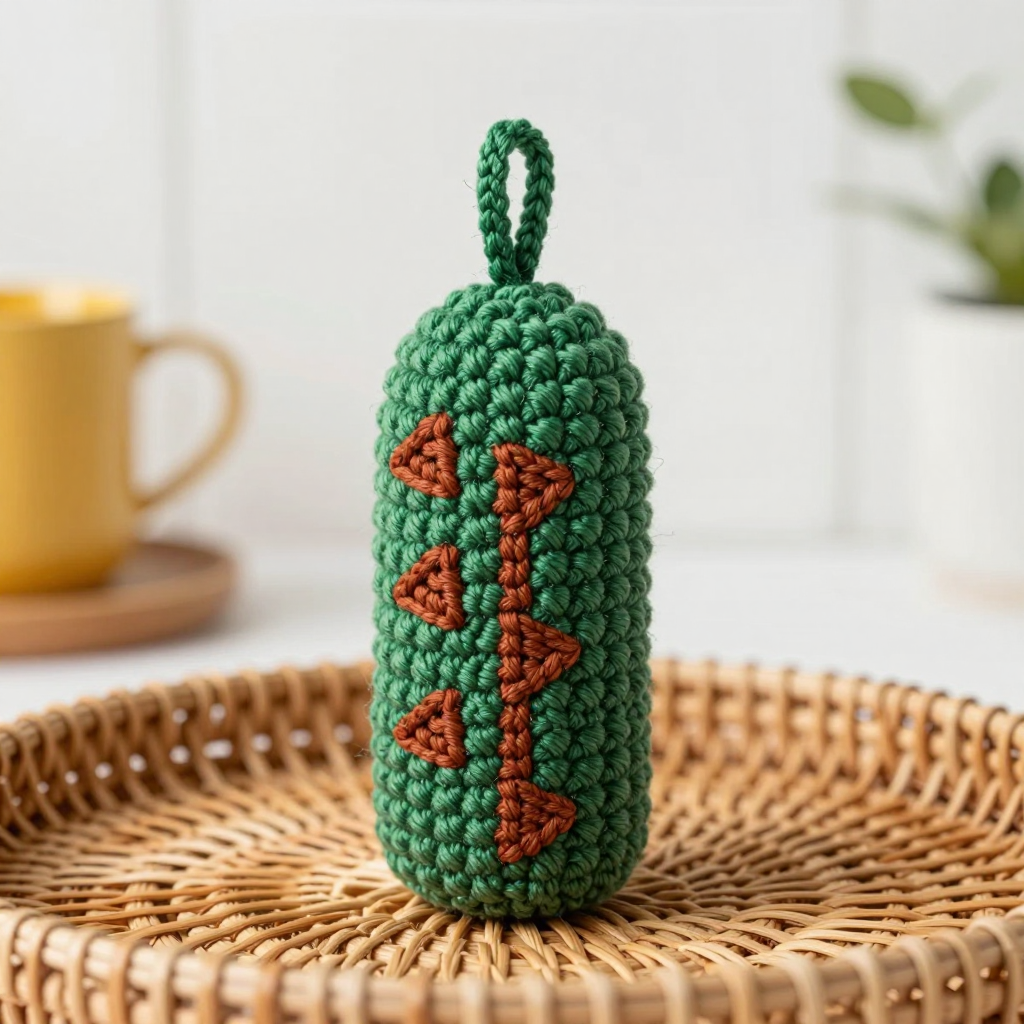
If you have never held a crochet hook before, this is the perfect first project to fall in love with the craft. This little forest iguana spine cylinder is a compact, sturdy keychain charm worked in thick, forgiving bulky wool, so your stitches are easy to see and your finished piece comes together in just a couple of hours. The body is a simple spiral of single crochet in deep forest green, and the magic happens when you add three staggered bands of rust-colored surface stitches that form a triangular ridge, just like the spines along an iguana's back. The finished charm feels dense, squishy, and wonderfully textured, about 2 inches tall and 1.75 inches wide, with a small hanging loop at the top so you can clip it to your keys or bag. It is small enough to finish in one sitting and special enough to show off to everyone you know.
Materials Needed
- Yarn: Bulky weight yarn (weight category 5), approximately 20 g total. You will need about 14 g of forest green (Color A) and 6 g of rust (Color B). Wool works best because it holds its shape and shows the texture beautifully.
- Crochet hook: 5.0 mm (US size H-8).
- Stitch marker: At least one, to keep track of where each round begins.
- Tapestry needle: A large-eyed, blunt-tipped needle for weaving in ends.
- Scissors: Any small sharp pair for trimming yarn.
- Stuffing: A small amount of polyester fiberfill (polyfill) to fill the cylinder.
- Optional: A small keyring or lobster clasp to attach to the finished loop.
- Finished size: Approximately 2 inches (5 cm) tall and 1.75 inches (4.5 cm) in diameter.
Abbreviations and Beginner Glossary
Every abbreviation used in this pattern is explained below in plain English. Read through this list once before you begin, and refer back to it whenever you need to.
- ch – chain. Make a loop of yarn on your hook, then pull the working yarn through that loop. This creates one chain stitch. A series of chains makes a foundation or a loop.
- sc – single crochet. Insert your hook into the stitch, wrap the yarn over the hook, pull up a loop (you now have 2 loops on your hook), wrap the yarn over again, and pull it through both loops. One single crochet made.
- sl st – slip stitch. Insert your hook into the stitch, wrap the yarn over, and pull it straight through both the stitch and the loop on your hook in one motion. It creates a nearly invisible joining stitch.
- st / sts – stitch / stitches. One completed unit of crochet work.
- inc – increase. Work 2 single crochet stitches into the same stitch. This adds one stitch to your round.
- dec – decrease (single crochet 2 together). Insert your hook into the first stitch, pull up a loop, insert your hook into the next stitch, pull up a loop (3 loops on hook), wrap yarn over, and pull through all 3 loops. This turns 2 stitches into 1.
- MR – magic ring (also called a magic circle). A loop of yarn you wrap around your fingers that you crochet into, then pull closed so there is no hole in the center.
- BLO – back loop only. Each single crochet stitch has two top loops (a front loop closer to you and a back loop farther away). Working in the back loop only means you insert your hook under just the back loop.
- FLO – front loop only. Same idea, but you insert your hook under only the front loop (the one closest to you).
- Surface stitch – a stitch worked on top of finished fabric rather than into the top of a stitch. You insert your hook into the fabric itself and work a slip stitch or single crochet over the surface, creating a raised design.
- Spiral rounds – working continuously in a circle without joining at the end of each round. You simply keep going around and around, moving your stitch marker up as you go.
Gauge
Gauge: 14 single crochet stitches x 16 rounds = 4 inches (10 cm) in spiral single crochet.
Gauge means how many stitches and rounds fit into a set measurement. It matters because it is how you make sure your finished charm comes out the right size. If your stitches are too loose, your cylinder will be bigger than 2 inches tall; if they are too tight, it will be smaller.
How to make a gauge swatch: With your 5.0 mm hook and forest green yarn, make a magic ring and work 6 sc into it. Work in a spiral, increasing as needed, until you have a flat circle about 3 inches across. Measure across the middle: count how many single crochet stitches fit into 4 inches, and how many rounds fit into 4 inches. If you have more than 14 stitches in 4 inches, your tension is tight, so try a slightly larger hook. If you have fewer, try a slightly smaller hook. Do not worry about being perfect; bulky yarn is forgiving, and a small difference will not ruin your charm.
Beginner Tips Before You Start
- Use your stitch marker every single round. Place it in the first stitch of each round and move it up as you go. In spiral crochet there is no seam to guide you, so the marker is your best friend.
- Do not pull your yarn too tight. Keep an even, relaxed tension. Tight stitches are hard to work into and make the cylinder stiff and lumpy.
- Count your stitches at the end of every round. The stitch count in parentheses tells you exactly how many you should have. If you are off, fix it before moving on.
- Keep your surface stitches loose. When you add the rust bands, work them gently so they sit on top of the fabric without squishing the cylinder out of shape.
- Stuff lightly and firmly. Add small pinches of fiberfill at a time. Overstuffing stretches the fabric and hides your beautiful spine ridges.
- Work in good light. Bulky wool in dark green can be hard to see. A bright lamp makes it much easier to find your stitches.
Step-by-Step Instructions
Work in a continuous spiral unless the pattern says otherwise. Do not join rounds and do not turn your work. Move your stitch marker up at the start of each new round.
Base Cylinder (Forest Green, Color A)
Round 1: Make a magic ring, then work 6 sc into the ring. Pull the tail to close the ring. (6 sts)
Round 2: Inc in each st around. (12 sts)
Round 3: [Sc in next st, inc in next st] around. (18 sts)
Round 4: [Sc in next 2 sts, inc in next st] around. (24 sts)
Round 5: [Sc in next 3 sts, inc in next st] around. (30 sts)
Rounds 6–8: Sc in each st around. (30 sts)
Round 9: [Sc in next 3 sts, dec] around. (24 sts)
Round 10: Sc in each st around. (24 sts)
Round 11: [Sc in next 2 sts, dec] around. (18 sts)
Round 12: Sc in each st around. (18 sts)
Round 13: [Sc in next st, dec] around. (12 sts)
Stuffing note: Now stuff the cylinder lightly but firmly with fiberfill, using small pinches. Keep the shape rounded but not overstuffed, so the fabric stays smooth.
Round 14: Dec around. (6 sts)
Finishing the base: Fasten off, leaving a long tail about 6 inches (15 cm). Thread the tail onto your tapestry needle and run it through the remaining 6 stitches, then pull gently to close the top. Do not cut the tail yet; you can use it later to secure the top loop area.
Rust Mosaic Spine Bands (Rust, Color B)
These bands are worked as surface stitches on top of the finished forest green cylinder. Insert your hook into the fabric itself, not into the top of a stitch, and work loosely so the stitches sit on the surface. Each band is a separate join and fasten off.
Band 1 (lower ridge): Join B with a sl st at the lower side of the cylinder. Work 3 rust surface sl sts spaced evenly, then 1 sc in the next st, then 3 rust surface sl sts. Skip 2 sts. Repeat this sequence around the cylinder, ending with a sl st join. Fasten off B.
Band 2 (middle ridge): Join B 2 rounds above Band 1. Work 2 rust surface sl sts, 1 sc, 2 rust surface sl sts, then skip 3 sts. Repeat around the cylinder. Fasten off B.
Band 3 (upper ridge): Join B 2 rounds above Band 2. Work 1 rust surface sl st, 1 sc, 1 rust surface sl st, then skip 4 sts. Repeat around the cylinder. Fasten off B.
Use your tapestry needle to weave in all rust ends securely on the inside of the cylinder.
Top Loop (Forest Green, Color A)
Loop: Join A at the top center of the cylinder. Ch 8, then sl st back into the same stitch to form a loop. Sl st around the loop once more for extra strength. Fasten off and weave in the end.
Assembly and Finishing
This project is worked as one piece, so there is no seaming to do. The finishing steps are what make it look polished.
- Weaving in ends: Thread each yarn tail onto your tapestry needle. Push the needle through the inside of the cylinder, bringing it out in a different spot, then trim the yarn close to the fabric. This hides the tail inside the stuffing. Do this for every green and rust tail.
- Shaping: Gently roll the cylinder between your palms and use your fingers to round out the top and bottom. If any surface stitches look squished, use the tip of your hook to lift them slightly.
- Blocking: Lightly mist the finished charm with water from a spray bottle, then shape it with your fingers and let it air dry completely. Do not soak it, because the fiberfill will hold water. Blocking helps the wool settle and makes the spine ridges stand out.
- Attaching the keyring: If you are using a keyring or lobster clasp, open it and slide it through the top loop, then close it securely. Give it a gentle tug to check that the loop is strong.
Pro Tips and Variations
- Change the colors: Try a sandy beige body with bright orange spines for a desert iguana, or a deep teal body with lime green spines for a tropical look. Any two contrasting bulky yarns will work.
- Adjust the size: To make a larger charm, use a 6.0 mm hook and the same instructions; your cylinder will come out bigger. To make a tiny charm, use a 4.0 mm hook and thinner bulky yarn, but check your gauge first so the proportions stay right.
- Substitute the yarn: If you do not have wool, acrylic bulky yarn works well too. Just avoid very slippery or fuzzy yarns, because they make the surface stitches harder to see and place.
- Add more ridges: For a taller iguana, work extra plain rounds in the middle of the base cylinder (for example, add 4 more rounds after Round 8) and then add a fourth rust band above Band 3, following the same staggered pattern.