Rosehip Rattle Hedgehog Snuggle: Free Crochet Pattern for a No-Sew Cottagecore Lovey
Rosehip Rattle Hedgehog Snuggle: Free Crochet Pattern for a No-Sew Cottagecore Lovey
Introduction
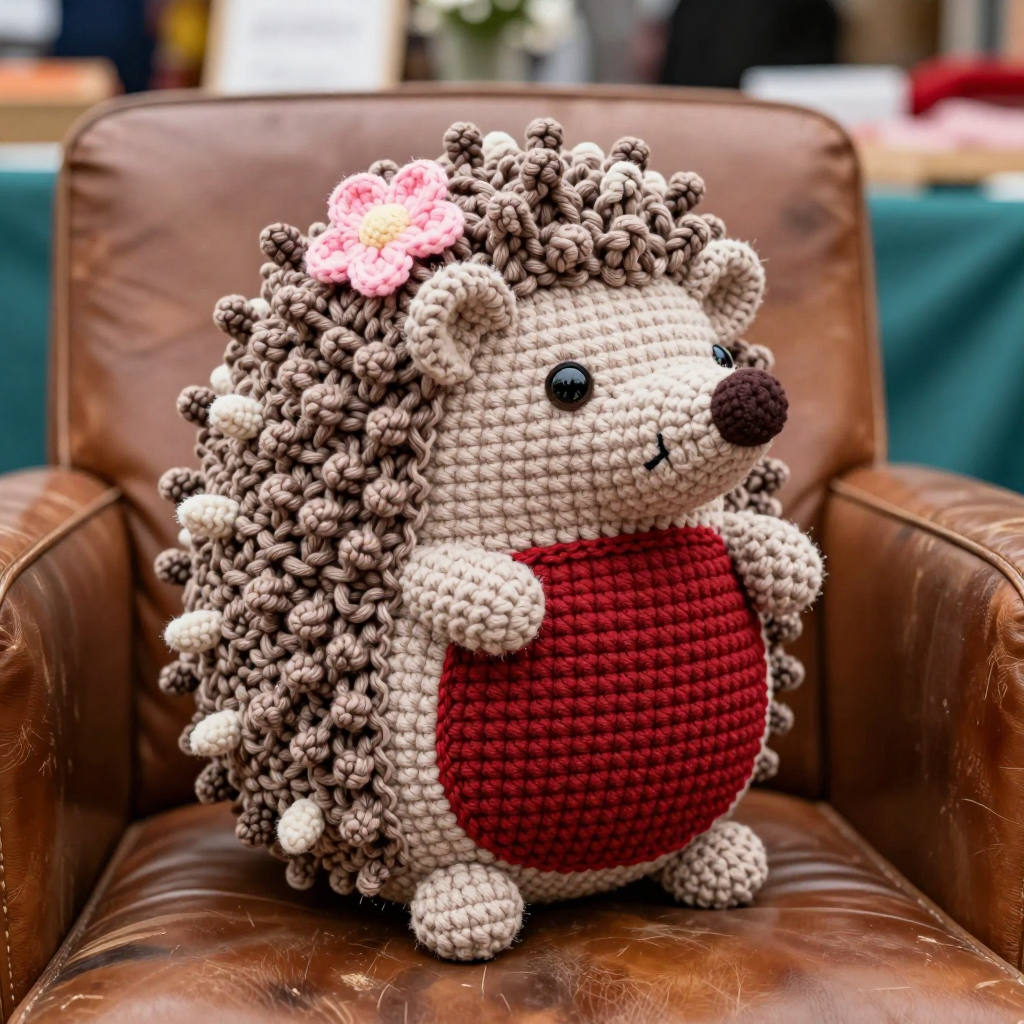
Welcome to one of the coziest little projects you will ever make! This Rosehip Rattle Hedgehog Snuggle is a compact, round hedgehog lovey with a cherry-red belly, a soft taupe back covered in bouncy little crocheted "spines," and a hidden rattle tucked into its base so it jingles gently when you shake it. It is perfect for complete beginners because it is worked almost entirely in one simple stitch (single crochet) in a continuous spiral, and there is no seaming of the body at all — the only sewing is attaching the tiny snout, ears, and a little pink flower. When finished, it looks like a plump, palm-sized woodland friend about 6 inches (15 cm) tall and 5 inches (13 cm) wide, with a soft matte cotton texture and a slightly bumpy, tactile back that babies and little hands love to explore. If you have never picked up a hook before, take a breath — by the end of this pattern you will have made something genuinely adorable.
Materials Needed
- Yarn: Worsted-weight (also called "medium" or "weight category 4") cotton yarn, approximately 4 oz / 200 yd total. You will need:
- Cherry red (Color A) — about 1 skein (approx. 60 yd used)
- Soft pink (Color B) — about 1 skein (only a small amount used, approx. 5 yd)
- Warm taupe or oatmeal (Color C) — about 1 skein (approx. 100 yd used)
- Dark brown (Color D) — a small amount for the nose and eyes (approx. 2 yd)
- Crochet hook: Size E/4 (3.5 mm) for the main body, snout, ears, and spines. A size G/6 (4.0 mm) hook is optional for the rattle casing if you want a slightly looser wrap.
- Stitch marker (or a scrap of contrasting yarn) — essential for tracking the first stitch of each round.
- Tapestry needle (also called a yarn needle) — a large, blunt-tipped needle with an eye big enough for worsted yarn, used for sewing pieces together and weaving in ends.
- Scissors for cutting yarn.
- Polyester fiberfill (toy stuffing) — a small handful, about a fist-sized amount.
- Rattle insert: one small plastic rattle insert, OR a 1 in (2.5 cm) plastic capsule (such as a clean, securely sealed Easter-egg capsule) containing 3–4 dried beans or a teaspoon of rice, sealed shut with strong tape or glue.
- Small amount of pink embroidery floss or pink yarn for the flower (Color B works fine).
Finished size: Approximately 6 inches (15 cm) tall and 5 inches (13 cm) wide.
Abbreviations and Beginner Glossary
Every abbreviation used in this pattern is listed below and explained in plain English. Read through this list once before you begin — you do not need to memorize it, just come back whenever a symbol confuses you.
- ch — chain. Make a slip knot on your hook, then wrap the yarn over the hook and pull it through the loop on your hook. That is one chain stitch. Chains look like tiny braided V's.
- sc — single crochet. Insert your hook into the stitch, wrap the yarn over the hook, pull up a loop (you now have 2 loops on the hook), wrap the yarn over again, and pull it through both loops. One single crochet made.
- inc — increase. Work 2 single crochet stitches into the same stitch. This adds one stitch to your round and makes the fabric wider.
- dec — decrease (also called "single crochet 2 together"). Insert your hook into the front of the next stitch, pull up a loop (2 loops on hook), insert your hook into the next stitch, pull up a loop (3 loops on hook), wrap the yarn over, and pull through all 3 loops. Two stitches become one, making the fabric narrower.
- sl st — slip stitch. Insert your hook into the stitch, wrap the yarn over, and pull it through both the stitch and the loop on your hook in one motion. It makes a nearly invisible joining stitch.
- dc — double crochet. Wrap the yarn over the hook first, insert the hook into the stitch, pull up a loop (3 loops on hook), wrap the yarn over and pull through 2 loops (2 loops remain), wrap the yarn over and pull through the last 2 loops. A taller stitch used only for the flower petals here.
- st / sts — stitch / stitches. One completed loop of yarn in your fabric.
- rnd / rnds — round / rounds. One complete circle of stitches worked around, as opposed to a "row," which goes back and forth in a flat line.
- FLO — front loop only. Each stitch has two loops at its top (a front loop facing you and a back loop facing away). Working in the FLO means you insert your hook only under the loop closest to you.
- BLO — back loop only. Same idea, but you insert your hook only under the loop farther from you.
- magic ring (also called a magic circle or adjustable ring) — a way to begin working in the round that lets you pull the center hole completely closed. Make a loop of yarn overlapping itself, insert your hook into the loop, pull up a loop of working yarn, chain 1 to secure, then work your stitches into the ring itself (not into stitches). After your first round, pull the short tail firmly to cinch the center shut.
- [ ] — square brackets group a set of stitches that you repeat a given number of times.
- * ... * — asterisks mark a section to be repeated. "Repeat from * around" means go back to the first asterisk and keep going until you reach the end of the round.
- ( ) — parentheses at the end of a round show the total stitch count for that round, for example (48 sts).
- fasten off — cut the yarn a few inches from your work, then pull the tail all the way through the last loop on your hook and tug gently to lock it.
- weave in ends — thread a yarn tail onto a tapestry needle and run it back and forth through the inside of the fabric so it disappears and cannot unravel.
Gauge
Gauge: 20 single crochet stitches x 22 rounds = 4 inches (10 cm) in continuous single crochet using the 3.5 mm (E/4) hook.
Why gauge matters: Gauge is simply how big your stitches turn out. If your stitches are much looser than the gauge above, your hedgehog will be larger and the stuffing may peek through the gaps; if they are much tighter, the toy will be smaller and stiffer. For a stuffed toy, a tight, dense fabric matters more than exact measurements — you want no holes where fiberfill can show through.
How to make a gauge swatch: With your taupe yarn and 3.5 mm hook, make a magic ring and work 6 sc into it. Then work 4 rounds of plain single crochet, increasing 6 stitches evenly in each round (this gives you a small flat circle). Measure across the middle: it should be roughly 2 inches (5 cm) wide. Alternatively, work a flat square of 20 sc across for 22 rows and measure it — it should be 4 inches (10 cm) square. If your square is bigger than 4 inches, switch to a smaller hook (such as 3.25 mm); if it is smaller, switch to a larger hook (such as 3.75 mm).
Beginner Tips Before You Start
- Use a stitch marker every single round. Because this toy is worked in a continuous spiral, there is no seam to tell you where a round begins. Place a marker in the first stitch of each round and move it up as you go. Without it, you will lose your place — guaranteed.
- Do not pull your yarn too tight. Beginners often tug each stitch snug, which makes the fabric stiff and painful for your hands. Let the yarn flow; aim for even, slightly firm stitches, not strangled ones.
- Count your stitches at the end of every round. The number in parentheses is your safety net. If you have 47 instead of 48, find the mistake now rather than five rounds later.
- Stuff as you go, not at the end. Small openings are hard to stuff later. Add small pinches of fiberfill once the body is a few rounds deep, and keep it light — overstuffing stretches the stitches and shows the filling.
- Make and seal the rattle first. The rattle casing is worked before the body, and the capsule must be completely sealed before it goes anywhere near your toy. Test-shake it before inserting it.
- Keep your tension loose on the spine loops. The little chain-3 loops that make the spines should be bouncy, not tight, or they will pull the back of the body out of shape.
Step-by-Step Instructions
Notes before you begin: Work in continuous spirals (going around and around without joining) unless a round says otherwise. Do not join rounds and do not turn your work. Place a stitch marker in the first stitch of each round. The hedgehog is worked from the base upward, with the rattle enclosed in the base before the body is closed. The flower is stitched on after the body is complete. All shaping is done with increases and decreases; no seaming is required except for the snout, ears, and flower.
Section 1: Rattle Casing (make first, in Color A — cherry red)
Using cherry red (A) and the 3.5 mm (E/4) hook (or the 4.0 mm / G-6 hook if you prefer a looser wrap), make a magic ring.
Rnd 1: 6 sc in ring. (6 sts)
Rnd 2: inc in each st around — that is 2 sc in every stitch. (12 sts)
Rnd 3: [sc in next st, inc] around — repeat the bracketed set 6 times total. (18 sts)
Rnd 4: [sc in next 2 sts, inc] around — repeat 6 times total. (24 sts)
Rnd 5: [sc in next 3 sts, inc] around — repeat 6 times total. (30 sts)
Rnds 6–8: sc in each st around, three rounds total, no increases. (30 sts after each round)
Fasten off, leaving a 6 in (15 cm) tail. Do not stuff yet. Insert the sealed plastic rattle insert or capsule into the casing. Set aside.
Section 2: Body (Color C for the back, Color A for the belly)
With warm taupe/oatmeal (C), make a magic ring.
Rnd 1: 6 sc in ring. (6 sts)
Rnd 2: inc in each st around. (12 sts)
Rnd 3: [sc in next st, inc] around — repeat 6 times. (18 sts)
Rnd 4: [sc in next 2 sts, inc] around — repeat 6 times. (24 sts)
Rnd 5: [sc in next 3 sts, inc] around — repeat 6 times. (30 sts)
Rnd 6: [sc in next 4 sts, inc] around — repeat 6 times. (36 sts)
Rnd 7: [sc in next 5 sts, inc] around — repeat 6 times. (42 sts)
Rnd 8: sc in each st around. (42 sts)
Rnd 9: [sc in next 6 sts, inc] around — repeat 6 times. (48 sts)
Rnd 10: sc in each st around. (48 sts)
Rnd 11: [sc in next 7 sts, inc] around — repeat 6 times. (54 sts)
Rnds 12–16: sc in each st around, five rounds total, no increases. (54 sts after each round)
Change to cherry red (A) for the belly section. To change color: work the last stitch of Rnd 16 until 2 loops remain on your hook, drop the taupe yarn, wrap the cherry red yarn over the hook, and pull it through both loops. Cut the taupe, leaving a 6 in (15 cm) tail to weave in later.
Rnd 17: sc in each st around in cherry red. (54 sts)
Rnd 18: [sc in next 7 sts, dec] around — repeat 6 times. (48 sts)
Rnd 19: sc in each st around. (48 sts)
Rnd 20: [sc in next 6 sts, dec] around — repeat 6 times. (42 sts)
Rnd 21: sc in each st around. (42 sts)
Rnd 22: [sc in next 5 sts, dec] around — repeat 6 times. (36 sts)
Rnd 23: sc in each st around. (36 sts)
Rnd 24: [sc in next 4 sts, dec] around — repeat 6 times. (30 sts)
Rnd 25: sc in each st around. (30 sts)
Rnd 26: [sc in next 3 sts, dec] around — repeat 6 times. (24 sts)
Rnd 27: sc in each st around. (24 sts)
Rnd 28: [sc in next 2 sts, dec] around — repeat 6 times. (18 sts)
Rnd 29: sc in each st around. (18 sts)
Rnd 30: [sc in next st, dec] around — repeat 6 times. (12 sts)
Rnd 31: dec around — 6 decreases total. (6 sts)
Fasten off, leaving a long tail (about 12 in / 30 cm). Do not close the opening yet.
Section 3: Assembling the Body and Rattle
Step 1: Stuff the body lightly with fiberfill, leaving room in the base for the rattle casing. Add stuffing in small pinches and check the shape as you go — you want a plump but soft hedgehog, not a rock.
Step 2: Insert the rattle casing into the base of the body, with the closed end of the casing facing the bottom of the hedgehog. The casing should sit snugly inside the body.
Step 3: Thread the long tail from the body onto your tapestry needle. Sew the opening of the body closed by passing the needle through the front loop of each of the 6 remaining stitches, going around the circle once, then pull the tail firmly to draw the hole shut. Catch the edge of the rattle casing with a couple of stitches to secure it in place so it cannot shift.
Step 4: Weave in the end on the inside of the body.
Section 4: Snout (Color C)
With taupe (C), make a magic ring.
Rnd 1: 6 sc in ring. (6 sts)
Rnd 2: inc in each st around. (12 sts)
Rnd 3: sc in each st around. (12 sts)
Rnd 4: [sc in next st, dec] around — repeat 4 times. (8 sts)
Stuff lightly. Fasten off, leaving a tail. Sew the snout to the front of the body, centered over the cherry-red belly, about 1 in (2.5 cm) below the top of the body. Use dark brown (D) yarn to embroider a small nose at the tip of the snout: thread the brown yarn on your tapestry needle, make several short straight stitches close together over the tip, and secure on the inside.
Section 5: Ears (make 2, Color C)
With taupe (C), make a magic ring.
Rnd 1: 4 sc in ring. (4 sts)
Rnd 2: inc in each st around. (8 sts)
Rnd 3: sc in each st around. (8 sts)
Fasten off, leaving a tail. Flatten each ear slightly and sew to the sides of the head, just above the snout.
Section 6: Eyes
Using dark brown (D) yarn, embroider two small French knots or short straight stitches for the eyes, placed above the snout and spaced about 1 in (2.5 cm) apart. To make a straight-stitch eye: bring the needle up through the fabric, take it back down a stitch-width away, and repeat 2–3 times in the same spot for a solid dot. Secure the yarn on the inside of the body.
Section 7: Spines (Color C)
The spines are created by working a series of small loops over the back of the body. With taupe (C), join yarn at the top of the body, just behind the head (insert hook, pull up a loop, ch 1 to secure).
Row 1: *Ch 3, sl st in the next st along the back of the body; repeat from * around the back, working in a spiral from the top of the head down to the base. Do not work over the cherry-red belly. Fasten off and weave in ends. The loops will create a textured, spiky back.
Section 8: Flower (Color B)
With soft pink (B), make a magic ring.
Rnd 1: [ch 2, 2 dc, ch 2, sl st] in ring; repeat 4 more times for 5 petals total. (5 petals)
Fasten off, leaving a tail. Sew the flower to the back of the hedgehog, just above the spines, using the tail. Weave in ends.
Assembly and Finishing
Seaming: All of the seaming in this pattern is done with a tapestry needle and the yarn tails already attached to each piece. To sew a piece on, thread the tail onto the needle, position the piece where the pattern says, and take small stitches through both the piece and the body, going all the way around its edge. Pull snug but not tight — you want the piece to sit flat against the body with no gap and no puckering.
Weaving in ends: Thread each remaining tail onto the tapestry needle and run it back and forth through the inside of the fabric for about 1 inch (2.5 cm), changing direction once or twice so it cannot work loose. Trim the yarn close to the fabric. Never knot your ends inside a stuffed toy — knots can work their way out and become a hazard.
Shaping: Use a small amount of fiberfill to shape the snout and body if needed. Gently squeeze the body into a round, plump shape with your hands. Ensure the rattle is secure and does not rattle too loudly — if it is too loud, add a small pinch of fiberfill around the casing.
Blocking: Because this is a stuffed cotton toy, blocking is minimal. If your spines look flattened, lightly mist the back with water from a spray bottle, gently fluff the loops with your fingers, and let the hedgehog air-dry completely (several hours, or overnight) away from direct heat. Do not soak a toy that contains a rattle insert.
Final safety check: Give every sewn piece a gentle tug to confirm it is secure, and check that the rattle capsule is fully enclosed and cannot be reached. The hedgehog is complete.
Pro Tips and Variations
- Change the color story: Swap the cherry red belly for mustard yellow or sage green for a different seasonal look, and use a cream flower instead of pink. Simply work the same rounds in your new colors — the stitch counts never change.
- Adjust the size: To make a larger hedgehog, use a thicker yarn (such as bulky weight) with a 5.0 mm (H/8) hook and follow the pattern exactly as written — the toy will scale up. To make a smaller keychain-size version, use sport-weight cotton with a 2.5 mm hook. Always keep the fabric tight enough that stuffing does not show.
- Substitute the yarn: Acrylic or a cotton-acrylic blend works beautifully and is often softer for babies; just check your gauge swatch, since acrylic can stretch more than cotton. Avoid fuzzy or hairy yarns for a first toy, as they hide your stitches and make counting difficult.
- Make the spines denser or sparser: For a fluffier hedgehog, work 2 slip stitches between each chain-3 loop instead of 1, which packs the loops closer together. For a smoother look, space them 2 stitches apart. Either way, stop the spines at the color-change line so the cherry-red belly stays smooth.


