Free Pattern: Cream Lace Half-Flower Wave Crochet Garland
A Calm, Beautiful Garland You Can Actually Make
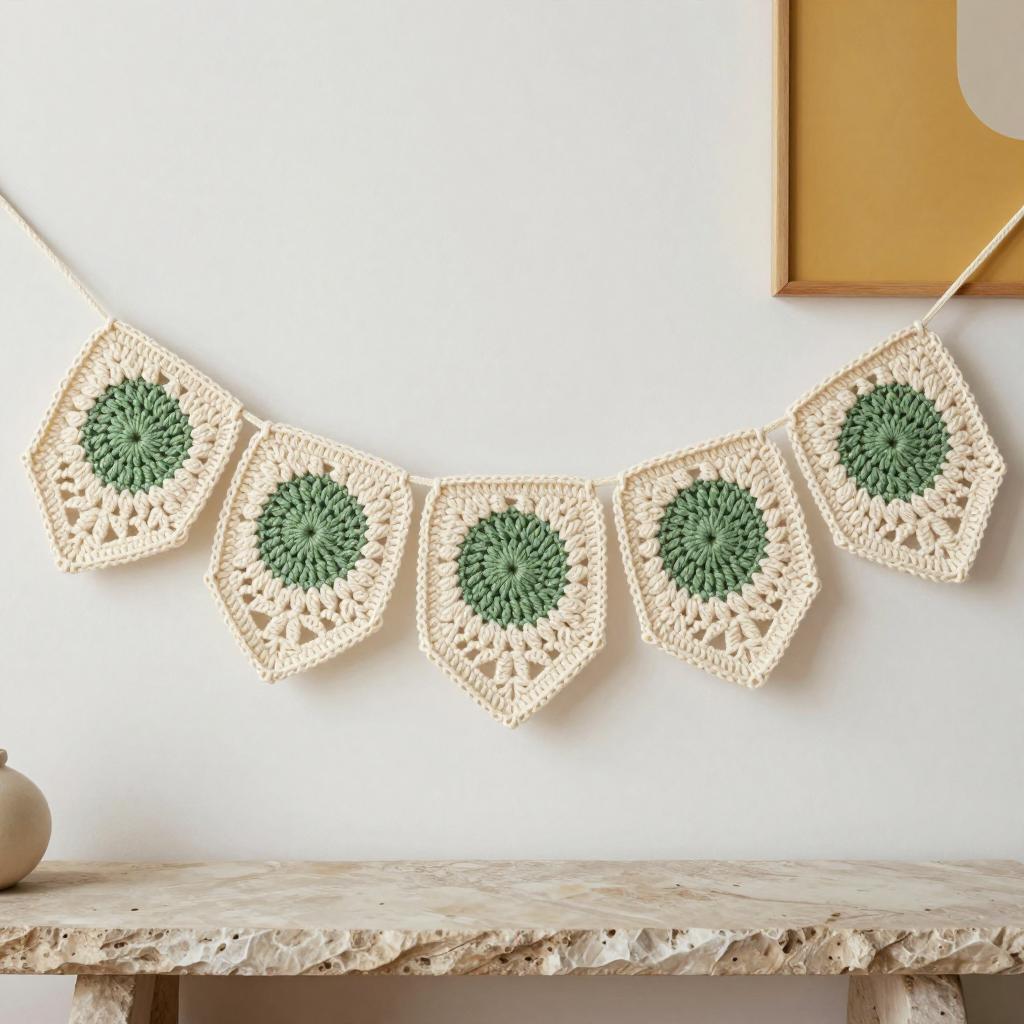
If you have never held a crochet hook before, this Cream Lace Half-Flower Wave Garland is a wonderful first real project. It is made of eight small half-flower motifs that you crochet one at a time, so you never have to keep track of a huge piece of fabric. Each motif is only seven short rows, and you repeat the same seven rows eight times, which means your hands get better and faster with every flower. The finished garland is soft and serene: a sage green half-circle center wrapped in cream petals and open lace, joined in a straight row so the top edge is flat and the bottom edge ripples into gentle points. Drape it on a wall, a mantel, a shelf, or a window and it brings a quiet, warm Japandi feeling to the room.
Materials Needed
- Yarn: Worsted weight (CYC #4) acrylic yarn, approximately 180 yards total: 130 yards cream (Color A) and 50 yards sage green (Color B). One standard skein of each is plenty.
- Crochet hook: 5.0 mm (US H-8).
- Stitch markers: At least 8, to mark the first stitch of each row and to hold your place while joining.
- Tapestry needle: A blunt-tipped needle with a large eye for weaving in ends and seaming.
- Scissors for cutting yarn.
- Blocking supplies (optional but recommended): a spray bottle of water and rust-proof pins, or a blocking mat.
Finished measurements: Each half motif measures 4 in (10 cm) wide across the flat top edge and 3.5 in (9 cm) tall from the flat edge to the point after blocking. The joined garland of 8 motifs is approximately 32 in (81 cm) long, plus a 6 in (15 cm) cord tie at each end.
Abbreviations and Beginner Glossary
Every pattern is written in shorthand. Here is every abbreviation used in this pattern, explained as if you have never crocheted before. All terms are US crochet terms.
- ch – chain. Make a loop with the yarn on your hook, wrap yarn over the hook, and pull it through the loop. That is one chain. Chains look like tiny V shapes.
- sl st – slip stitch. Insert your hook into the stitch, wrap yarn over the hook, and pull it through both the stitch and the loop on your hook at the same time. It makes a nearly invisible joining stitch.
- sc – single crochet. Insert hook into the stitch, wrap yarn over, pull up a loop (2 loops on hook), wrap yarn over again, pull through both loops. One loop remains.
- hdc – half double crochet. Wrap yarn over the hook first, insert into the stitch, pull up a loop (3 loops on hook), wrap yarn over, pull through all 3 loops at once. (Listed for reference; not used in this pattern.)
- dc – double crochet. Wrap yarn over the hook, insert into the stitch, pull up a loop (3 loops on hook), wrap yarn over and pull through 2 loops, wrap yarn over and pull through the last 2 loops.
- tr – treble crochet. Wrap yarn over the hook twice, insert into the stitch, pull up a loop, then pull through 2 loops three times. (Listed for reference; not used in this pattern.)
- sp – space. The gap created under a chain, which you work into on the next row.
- st / sts – stitch / stitches.
- beg – beginning.
- RS – right side. The front, prettier face of your work.
- yo – yarn over. Wrap the working yarn over your hook.
- pc – popcorn. Work 4 double crochet into the same stitch, remove your hook from the loop, insert the hook into the top of the first of those 4 double crochet, then pull the loose loop through. This makes a little bump.
- cl – cluster. [Yarn over, insert hook, pull up a loop, yarn over, pull through 2 loops] 3 times in the same stitch, then yarn over and pull through all 4 loops on the hook. (Listed for reference; not used in this pattern.)
- Magic ring – a loop of yarn you wrap around your fingers, work stitches into, and then pull the tail to close tightly so there is no hole in the center.
- Fasten off – cut the yarn a few inches from your work, pull the tail all the way through the last loop, and tighten.
Gauge
Gauge: One half-flower motif measures 4 in (10 cm) wide across the flat top edge and 3.5 in (9 cm) tall from the flat edge to the point after blocking.
Why gauge matters: Gauge is how big your stitches come out. If your stitches are bigger than the pattern expects, your motifs will be larger and your garland longer; if smaller, the garland will be shorter. Because this garland is made of separate motifs, gauge mostly affects the final length, but matching it keeps all eight flowers the same size and the joins neat.
How to check: Crochet one complete motif exactly as written. Block it lightly (mist with water, pin flat, let dry). Measure across the flat top edge and from the flat edge down to the point. If your motif is larger than 4 in (10 cm), try a smaller hook (4.5 mm); if smaller, try a larger hook (5.5 mm).
Beginner Tips Before You Start
- Count every row. Each row of the motif has a stitch count in parentheses. Say the count out loud at the end of each row before you turn. This catches mistakes immediately.
- Use a stitch marker in the first stitch of every row. The first stitch is easy to lose, especially after a chain-3, and missing it makes your flower lopsided.
- Do not pull your yarn too tight. Tension should feel relaxed. Tight stitches make the lace rows (Rows 5 and 7) stiff and hard to work into.
- Keep your chain-3 turning chains loose. A tight turning chain pulls the edge of the motif inward.
- Make all eight motifs before you join anything. This lets you lay them out and check that they are all the same size.
- Work the popcorn stitches with a slightly looser hand. Popcorns need room to puff out; tight popcorns look flat.
Step-by-Step Instructions
Part 1: Half-Flower Motif (make 8)
Each motif is worked flat in rows, turning at the end of every row. The flat edge is the top of the flower; the point is the bottom. Rows 1–2 are worked in sage green (B); Rows 3–7 are worked in cream (A).
With B (sage), make a magic ring.
Row 1 (RS): Ch 3 (this counts as your first dc), work 6 dc into the ring, turn. (7 dc)
Row 2: Ch 3, dc in the same stitch as the chain, then 2 dc in each stitch across, turn. (14 dc) Fasten off B.
Row 3: Join A (cream) with a sl st in the first stitch, ch 3, dc in the same stitch, [ch 1, skip 1 stitch, 2 dc in the next stitch] 6 times, ch 1, skip 1 stitch, dc in the last stitch, turn. (7 groups of 2 dc, 7 ch-1 spaces)
Row 4: Ch 1, sc in the first stitch, [sc in the next stitch, sc in the ch-1 space, sc in the next stitch] across, sc in the last stitch, turn. (21 sc)
Row 5 (petal row): Ch 3, dc in the same stitch, [ch 2, skip 2 stitches, pc in the next stitch, ch 2, skip 2 stitches, 2 dc in the next stitch] 3 times, ch 2, skip 2 stitches, pc in the next stitch, ch 2, skip 2 stitches, 2 dc in the last stitch, turn. (4 pc, 4 groups of 2 dc)
Row 6: Ch 1, sc in the first stitch, sc in the next stitch, [2 sc in the ch-2 space, sc in the pc, 2 sc in the ch-2 space, sc in the next 2 stitches] 3 times, 2 sc in the ch-2 space, sc in the pc, 2 sc in the ch-2 space, sc in the last 2 stitches, turn. (33 sc)
Row 7 (lace edge): Ch 1, sc in the first stitch, [ch 3, skip 2 stitches, sc in the next stitch] 10 times, ch 3, skip 2 stitches, sc in the last stitch. Do not turn. Fasten off A, leaving a 6-inch tail for joining. (11 ch-3 loops, 12 sc)
Repeat Rows 1–7 seven more times so you have 8 motifs total. Each motif is 7 rows.
Part 2: Joining the Motifs
Arrange your 8 motifs in a straight row with the flat edges aligned at the top and the points facing down.
Joining: With the right side facing you and using A, join the motifs along their side edges with sl st through both layers. Insert your hook through a corresponding stitch of two adjacent motifs, sl st across from the flat edge down to the point. Join all 8 motifs in this way. (7 joins total)
Part 3: Top Edging
With the right side facing you, join A at the top right corner of the garland.
Row 1: Ch 1, sc evenly across the top flat edge, working approximately 2 sc per motif edge, turn. (about 16 sc)
Row 2: Ch 1, sc in each sc across. Fasten off. (about 16 sc)
Part 4: Ties
At each end of the garland, join A at the corner.
Tie: Ch 25, sl st in each ch across to form a cord, sl st to the corner. Fasten off. (25 ch) Repeat at the other end.
Assembly and Finishing
Weave in ends: Thread each yarn tail onto your tapestry needle. Turn the work to the wrong side and weave the tail in and out through the backs of several stitches, changing direction once so it cannot pull loose. Trim the tail close to the fabric.
Blocking: Lightly mist the garland with water until it is damp but not soaking. Lay it flat on a blocking mat or a towel and pin the top edge straight and each point in place. Let it dry completely, then remove the pins. Blocking opens the lace loops and makes the points crisp.
Final check: Trim any loose tails and make sure every join lies flat.
Pro Tips and Variations
- Change the colors: Swap sage for dusty rose, mustard, or navy for a different mood. Keep the cream for the petals so the lace texture stands out.
- Make it longer or shorter: Add or remove motifs. Each motif adds about 4 in (10 cm) to the length. Make sure all motifs are the same size.
- Try a different yarn: Cotton gives a crisper, more defined lace; a soft acrylic or acrylic blend gives a softer drape. Match the worsted weight and check your gauge again.
- Add a hanging loop: Instead of a cord tie, chain 15 at each end and sl st back to the corner to make a small loop for a nail or hook.