Free Pattern: Post-Rib Hexagon Bee Bib in Plush Chenille
A Cozy Little Hive for Your Little One
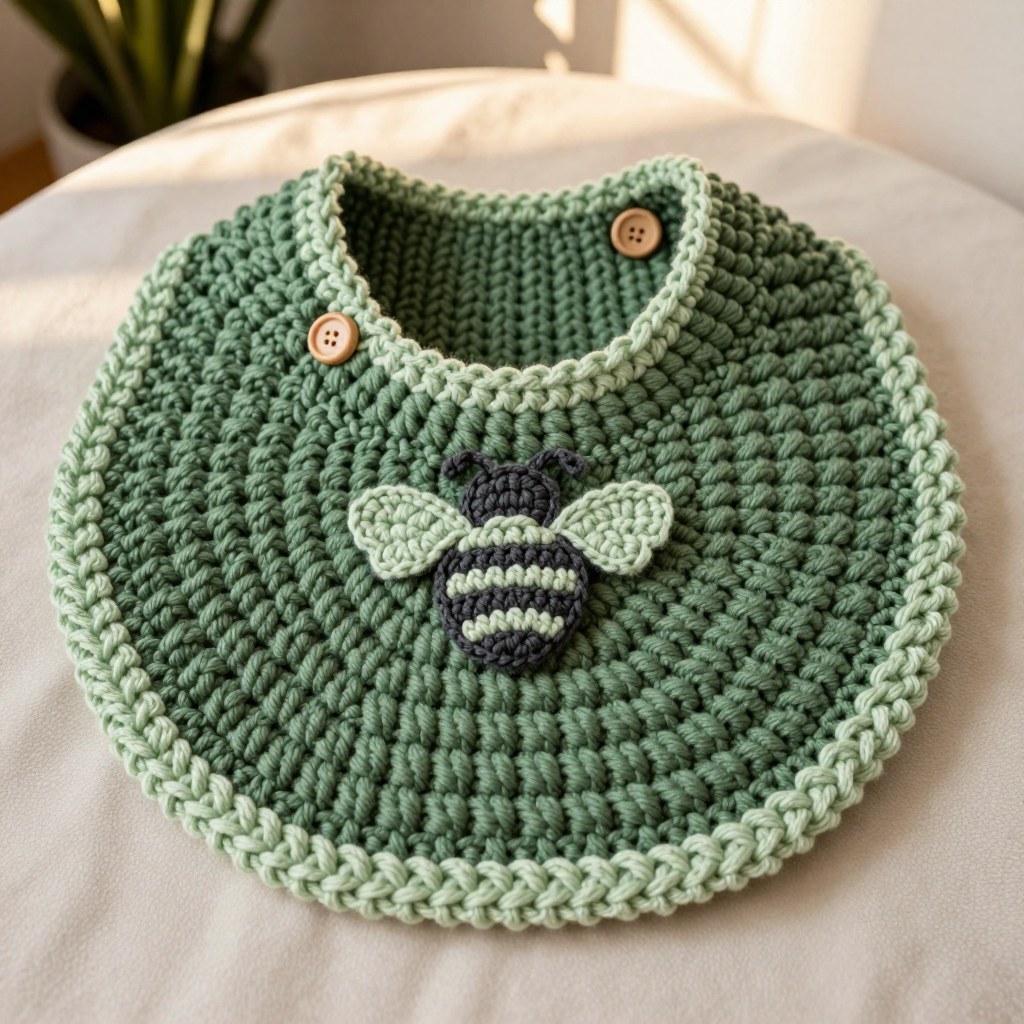
If you have never held a crochet hook before, this is the perfect first project to fall in love with the craft. The Post-Rib Hexagon Bee Bib is worked flat from the center outward in soft, plush chenille yarn, creating a raised hive-like texture that looks far more complicated than it actually is. The finished bib is a six-sided hexagon about 8.5 inches across, worked in moss green with a pale lichen green neckline and edging, and topped with one adorable rounded charcoal bee. It feels thick, squishy, and gentle against a baby's skin, and the simple button closure makes it easy to put on and take off. Best of all, every single stitch is explained below, so you can start today with total confidence.
Materials Needed
- Yarn: Super bulky (weight 6) chenille plush yarn, approximately 90 yards total: 60 yards moss green (Color A), 20 yards pale lichen green (Color B), 10 yards soft charcoal (Color C). The sample used a polyester chenille plush.
- Main hook: 6.5 mm (US K-10.5) crochet hook.
- Small hook: 5.0 mm (US H-8) crochet hook for the bee appliqué.
- Stitch markers: At least 6, to mark your corners.
- Tapestry needle: A large-eye yarn needle for seaming and weaving in ends.
- Scissors: Sharp craft scissors for cutting yarn.
- Button: One 20 mm wooden button.
- Stuffing: A small amount of fiberfill or yarn scraps for the bee body.
- Finished size: Approximately 8.5 inches (21.5 cm) point to point across the widest span and 7.4 inches (18.8 cm) flat to flat, fitting 0–6 months.
Abbreviations and Beginner Glossary
- ch – chain: yarn over the hook and pull it through the loop on your hook. This makes a small link.
- sl st – slip stitch: insert your hook into the stitch, yarn over, and pull through both the stitch and the loop on your hook at once. It joins without adding height.
- sc – single crochet: insert hook into stitch, yarn over, pull up a loop (2 loops on hook), yarn over, pull through both loops.
- hdc – half double crochet: yarn over first, insert hook into stitch, yarn over, pull up a loop (3 loops on hook), yarn over, pull through all 3 loops.
- dc – double crochet: yarn over, insert hook, yarn over, pull up a loop (3 loops), yarn over and pull through 2 loops, yarn over and pull through last 2 loops.
- FPdc – front post double crochet: work a double crochet around the vertical post of the stitch below, inserting your hook from front to back to front so the stitch pops forward.
- BPdc – back post double crochet: same as FPdc but insert your hook from back to front to back so the stitch sits behind.
- FPsc / BPsc – front post / back post single crochet: same idea as above but with a single crochet.
- sc2tog – single crochet two together (a decrease): insert hook into first stitch, pull up a loop, insert hook into next stitch, pull up a loop (3 loops on hook), yarn over, pull through all 3 loops. This turns two stitches into one.
- st(s) – stitch(es).
- sp – space.
- yo – yarn over: wrap the yarn over your hook.
- beg – beginning.
- rep – repeat.
- RS – right side: the front, public-facing side of your work.
Gauge
Gauge: In front/back post half double crochet ribbing with the 6.5 mm hook, 10 stitches x 8 rows = 4 inches (10 cm).
Why gauge matters: Gauge is how many stitches and rows fit into a set measurement. If your stitches are looser or tighter than the pattern, your bib will come out larger or smaller than intended. Since this bib is sized for a baby's neck, getting close to gauge keeps the finished piece safe and comfortable.
How to make a gauge swatch: With your 6.5 mm hook and Color A, chain 14. Work 10 rows of hdc, then measure the middle 4 inches. Count how many stitches and rows fit in that space. If you have more stitches than 10, try a larger hook; if fewer, try a smaller hook. Wash and dry your swatch the way you plan to care for the bib, since chenille can relax slightly.
Beginner Tips Before You Start
- Mark every corner. Place a stitch marker in each of the 6 increase points as you go. The hexagon grows by exactly 6 increases per round, and markers keep you from losing your place.
- Do not pull your yarn too tight. Chenille is fluffy and forgiving, but tight tension flattens the plush texture and makes post stitches hard to find. Keep your loops relaxed.
- Count at the end of every round. The stitch count in parentheses tells you exactly how many stitches you should have. If you are off, fix it before moving on.
- Turn after every join. This pattern is worked in joined rounds and then turned, which is what makes the post stitches alternate and create the ribbed hive texture.
- Work the bee on the smaller hook. The 5.0 mm hook keeps the appliqué firm and tidy so it holds its rounded shape.
- Keep your starting ring loose. A tight center ring makes Round 1 difficult. Slide the first stitches snugly together rather than yanking them.
Step-by-Step Instructions
Note on Post Ribbing Worked Flat in the Hexagon
This bib is worked flat in joined rounds, turning at the end of each round so the post stitches alternate front and back, producing a raised vertical rib that reads as a hive texture. Each round is joined with a sl st and then turned. The hexagon grows by placing 6 increases (one at each corner) evenly around.
Bib Body (Color A, moss green, 6.5 mm hook)
Foundation: Ch 4, join with sl st to first ch to form a ring.
Round 1: Ch 1 (does not count as a st here), work 6 sc into ring, join with sl st to first sc, turn. (6 sc)
Round 2: Ch 2 (counts as first hdc), FPdc around the post of the same sc just joined into, then [hdc in next sc, FPdc around the post of that same sc] 5 times, join with sl st to top of beg ch-2, turn. (12 sts: 6 hdc, 6 FPdc)
Round 3: Ch 2, hdc in first st, FPdc around the post of the next st, [hdc in next st, hdc in next st, FPdc around post of next st] 5 times, hdc in last st, join with sl st to top of beg ch-2, turn. (18 sts)
Round 4: Ch 2, hdc in first st, hdc in next st, FPdc around post of next st, [hdc in next 3 sts, FPdc around post of next st] 5 times, hdc in last st, join with sl st to top of beg ch-2, turn. (24 sts)
Round 5: Ch 2, hdc in first st, hdc in next 2 sts, FPdc around post of next st, [hdc in next 4 sts, FPdc around post of next st] 5 times, hdc in last st, join with sl st to top of beg ch-2, turn. (30 sts)
Round 6: Ch 2, hdc in first st, hdc in next 3 sts, FPdc around post of next st, [hdc in next 5 sts, FPdc around post of next st] 5 times, hdc in last st, join with sl st to top of beg ch-2, turn. (36 sts)
Round 7: Ch 2, hdc in first st, hdc in next 4 sts, FPdc around post of next st, [hdc in next 6 sts, FPdc around post of next st] 5 times, hdc in last st, join with sl st to top of beg ch-2, turn. (42 sts)
Round 8: Ch 2, hdc in first st, hdc in next 5 sts, FPdc around post of next st, [hdc in next 7 sts, FPdc around post of next st] 5 times, hdc in last st, join with sl st to top of beg ch-2, turn. (48 sts)
Round 9: Ch 2, hdc in first st, hdc in next 6 sts, FPdc around post of next st, [hdc in next 8 sts, FPdc around post of next st] 5 times, hdc in last st, join with sl st to top of beg ch-2, turn. (54 sts)
Round 10: Ch 2, hdc in first st, hdc in next 7 sts, FPdc around post of next st, [hdc in next 9 sts, FPdc around post of next st] 5 times, hdc in last st, join with sl st to top of beg ch-2, turn. (60 sts)
Round 11: Ch 2, hdc in first st, hdc in next 8 sts, FPdc around post of next st, [hdc in next 10 sts, FPdc around post of next st] 5 times, hdc in last st, join with sl st to top of beg ch-2, turn. (66 sts)
Round 12: Ch 2, hdc in first st, hdc in next 9 sts, FPdc around post of next st, [hdc in next 11 sts, FPdc around post of next st] 5 times, hdc in last st, join with sl st to top of beg ch-2, turn. (72 sts)
Round 13: Ch 2, hdc in first st, hdc in next 10 sts, FPdc around post of next st, [hdc in next 12 sts, FPdc around post of next st] 5 times, hdc in last st, join with sl st to top of beg ch-2, turn. (78 sts)
Round 14: Ch 2, hdc in first st, hdc in next 11 sts, FPdc around post of next st, [hdc in next 13 sts, FPdc around post of next st] 5 times, hdc in last st, join with sl st to top of beg ch-2, turn. (84 sts)
Round 15: Ch 2, hdc in first st, hdc in next 12 sts, FPdc around post of next st, [hdc in next 14 sts, FPdc around post of next st] 5 times, hdc in last st, join with sl st to top of beg ch-2, turn. (90 sts)
Round 16: Ch 2, hdc in first st, hdc in next 13 sts, FPdc around post of next st, [hdc in next 15 sts, FPdc around post of next st] 5 times, hdc in last st, join with sl st to top of beg ch-2, turn. (96 sts)
Round 17: Ch 2, hdc in first st, hdc in next 14 sts, FPdc around post of next st, [hdc in next 16 sts, FPdc around post of next st] 5 times, hdc in last st, join with sl st to top of beg ch-2, turn. (102 sts)
Round 18: Ch 2, hdc in first st, hdc in next 15 sts, FPdc around post of next st, [hdc in next 17 sts, FPdc around post of next st] 5 times, hdc in last st, join with sl st to top of beg ch-2, turn. (108 sts)
Round 19: Ch 2, hdc in first st, hdc in next 16 sts, FPdc around post of next st, [hdc in next 18 sts, FPdc around post of next st] 5 times, hdc in last st, join with sl st to top of beg ch-2, turn. (114 sts)
Round 20: Ch 2, hdc in first st, hdc in next 17 sts, FPdc around post of next st, [hdc in next 19 sts, FPdc around post of next st] 5 times, hdc in last st, join with sl st to top of beg ch-2, turn. (120 sts)
Round 21: Ch 2, hdc in first st, hdc in next 18 sts, FPdc around post of next st, [hdc in next 20 sts, FPdc around post of next st] 5 times, hdc in last st, join with sl st to top of beg ch-2, turn. (126 sts)
Round 22: Ch 2, hdc in first st, hdc in next 19 sts, FPdc around post of next st, [hdc in next 21 sts, FPdc around post of next st] 5 times, hdc in last st, join with sl st to top of beg ch-2, turn. (132 sts)
Round 23: Ch 2, hdc in first st, hdc in next 20 sts, FPdc around post of next st, [hdc in next 22 sts, FPdc around post of next st] 5 times, hdc in last st, join with sl st to top of beg ch-2, turn. (138 sts)
Round 24: Ch 2, hdc in first st, hdc in next 21 sts, FPdc around post of next st, [hdc in next 23 sts, FPdc around post of next st] 5 times, hdc in last st, join with sl st to top of beg ch-2, turn. (144 sts)
Do not fasten off. The hexagon should measure approx. 8.5 in (21.5 cm) point to point and 7.4 in (18.8 cm) flat to flat.
Neckline Shaping (Color B, pale lichen green)
The neck opening is created by working a shallow scoop across one flat side of the hexagon.
Row 1 (RS): With Color B, sl st to the first corner post of Round 24, ch 1, work 1 sc in each of the next 24 sts, turn. (24 sc)
Row 2: Ch 1, sc2tog, sc in next 20 sts, sc2tog, turn. (22 sc)
Row 3: Ch 1, sc2tog, sc in next 18 sts, sc2tog, turn. (20 sc)
Row 4: Ch 1, sc2tog, sc in next 16 sts, sc2tog, turn. (18 sc)
Row 5: Ch 1, sc2tog, sc in next 14 sts, sc2tog, turn. (16 sc)
Row 6: Ch 1, sc2tog, sc in next 12 sts, sc2tog, turn. (14 sc)
Row 7: Ch 1, sc2tog, sc in next 10 sts, sc2tog, turn. (12 sc)
Row 8: Ch 1, sc2tog, sc in next 8 sts, sc2tog, turn. (10 sc)
Row 9: Ch 1, sc2tog, sc in next 6 sts, sc2tog, turn. (8 sc)
Row 10: Ch 1, sc2tog, sc in next 4 sts, sc2tog, turn. (6 sc)
Row 11: Ch 1, sc2tog, sc in next 2 sts, sc2tog, turn. (4 sc)
Row 12: Ch 1, sc2tog twice. (2 sc) Fasten off.
Edging (Color B, pale lichen green)
With RS facing, join Color B with sl st at the right neck edge. Work 1 round of sc evenly around the entire outer edge of the hexagon and along the neckline, working 2 sc in each corner point and 1 sc in each st along the neckline. Join with sl st to first sc. Fasten off and weave in ends.
Button Loop (Color B)
At the left neck edge, join Color B with sl st, ch 8, sl st to the same st to form a loop, then work 10 sc around the loop. Fasten off. Sew the 20 mm wooden button to the right neck edge opposite the loop.
Bee Appliqué (5.0 mm hook)
Body (Color C, soft charcoal):
Round 1: Ch 2, work 6 sc into the first ch, join with sl st to first sc. (6 sc)
Round 2: Ch 1, 2 sc in each st around, join with sl st to first sc. (12 sc)
Round 3: Ch 1, [2 sc in next st, sc in next st] 6 times, join with sl st to first sc. (18 sc)
Round 4: Ch 1, sc in each st around, join with sl st to first sc. (18 sc)
Round 5: Ch 1, [sc2tog, sc in next st] 6 times, join with sl st to first sc. (12 sc)
Stuff lightly with a small amount of fiberfill or yarn scraps.
Round 6: Ch 1, sc2tog around, join with sl st to first sc. (6 sc) Fasten off, leaving a long tail.
Bee Stripes (Color B): With Color B, embroider two horizontal stripes across the bee body using straight stitches, one across the middle and one slightly below, leaving charcoal bands visible between them.
Bee Wings (Color B, make 2): Ch 6, work 1 sc in second ch from hook, 1 hdc in next ch, 1 dc in next ch, 1 hdc in next ch, 1 sc in last ch. Fasten off, leaving a tail. Sew one wing to each side of the bee body at the upper edge, angling outward.
Assembly and Finishing
Sewing on the bee: Thread the long tail from the bee body onto your tapestry needle. Place the bee centered on the hexagon, about 1 inch above the neckline scoop. Take small stitches around the lower edge of the bee, catching only the surface of the bib so the stitches do not show through the front. Secure with two extra stitches and weave the tail into the back.
Attaching the button: Thread your needle with Color B. Bring it up through the right neck edge, pass through one hole of the wooden button, down through the opposite hole, and back through the fabric. Repeat three or four times for a secure hold, then weave the end into the back of the work.
Weaving in ends: Turn the bib to the wrong side. Thread each loose end onto the tapestry needle and weave it in and out through the backs of several stitches in one direction, then back the other way. Trim close to the fabric. Never knot your ends, as knots can work loose in the wash.
Blocking: Lightly mist the bib with cool water and pin the hexagon flat to a towel or blocking mat, keeping the post ribbing raised and the corners sharp. Let it dry completely, about 4 to 6 hours. Do not press with a hot iron, which can melt chenille fibers.
Pro Tips and Variations
- Change the colors: Swap the moss green for dusty rose or oatmeal, and use a contrasting color for the bee stripes. Keep the charcoal bee for a classic Scandinavian look, or try mustard for a warmer feel.
- Adjust the size: To make a larger bib for 6–12 months, continue the hexagon increase rounds (each round adds 6 stitches) until the piece measures about 10 inches point to point, then work the neckline scoop over more stitches.
- Substitute yarn: Any super bulky weight 6 yarn works here. If you use a smoother yarn instead of chenille, check your gauge again, since the texture and drape will change.
- Make it a gift set: Work a second bee in a different color and attach it to a matching washcloth or small lovey for a coordinated baby shower gift.