Frosted Fern Lace Wrap Free Knitting Pattern – Winter Botanical Shawl
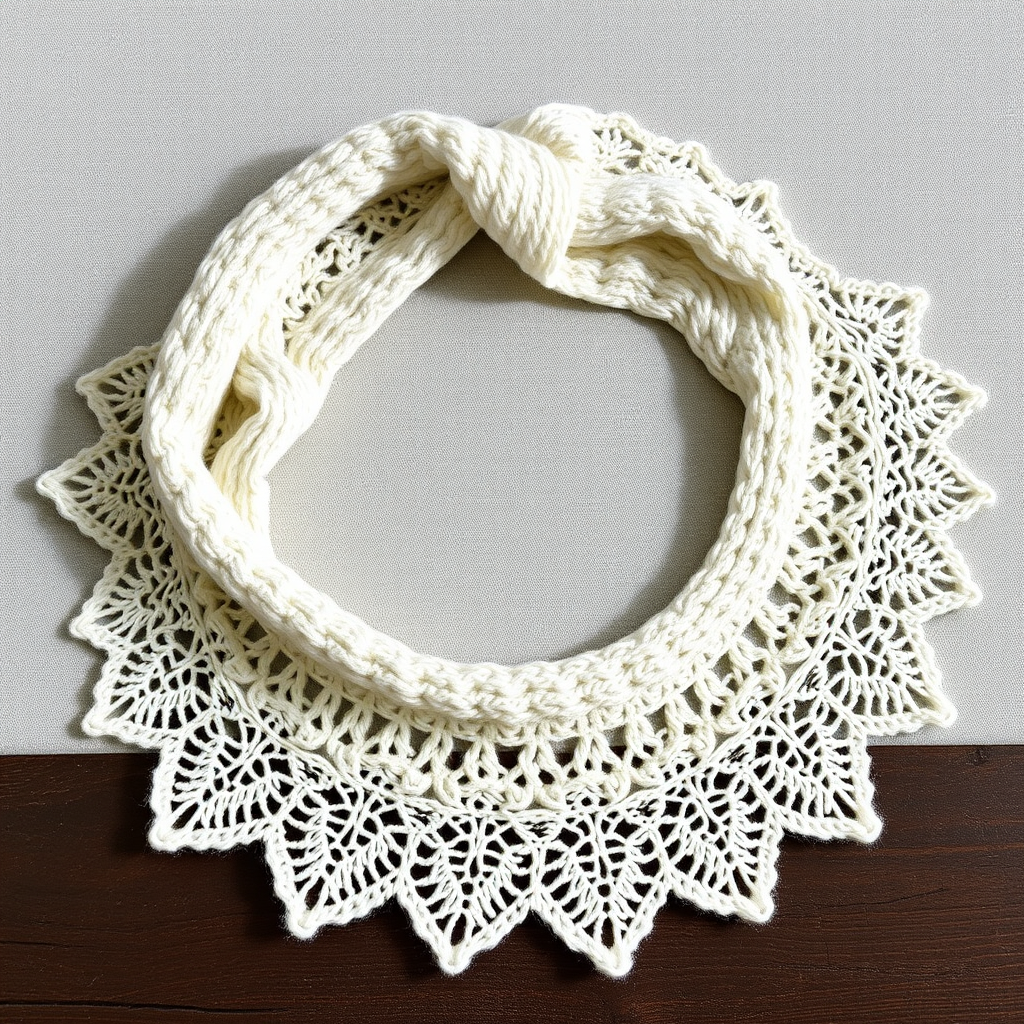
Frosted Fern Lace Wrap Free Knitting Pattern – Winter Botanical Shawl
Wrap yourself in the delicate beauty of a winter garden with this lace-knit shawl, featuring cascading fern motifs and a frosty, shimmering edge. This serene, sophisticated project transforms simple stitches into an heirloom-quality accessory that evokes fresh snow and botanical elegance. Whether you're a seasoned knitter looking for a relaxing, memorizable pattern or a confident beginner ready to tackle lace, the Frosted Fern Lace Wrap is a rewarding journey into texture and drape. The worsted-weight yarn makes this project quicker than traditional lace shawls, while the crescent shape ensures it sits beautifully on the shoulders. Let's dive into creating this stunning winter botanical piece.
Materials Needed
Before you begin, gather the following supplies to ensure a smooth knitting experience. The key to this project's success is using a soft, heathered yarn that will show off the lace stitches clearly while providing warmth and drape.
- Yarn: Worsted weight yarn in a soft, heathered white (e.g., Cascade 220 Heathers in 'Arctic Mist') – 800 yards (approx. 3 skeins). The subtle heathering mimics the look of frost on ferns.
- Needle: US 7 (4.5 mm) circular knitting needle, 32-inch cable. The long cable is essential to accommodate the growing number of stitches as the shawl expands.
- Notions: Stitch markers (at least 2), tapestry needle for weaving in ends, blocking mats and pins (or a clean towel) for finishing.
- Gauge: 18 stitches and 24 rows = 4 inches in stockinette stitch (blocked). While gauge is important for size, the lace pattern is forgiving; focus on consistent tension.
Step-by-Step Instructions
This shawl is worked from the top down, starting with a simple garter tab and increasing outward to create a graceful crescent shape. The lace pattern is charted in repeats, making it easy to memorize and relaxing to knit. Follow the instructions carefully, and you'll be rewarded with a beautifully textured wrap.
Abbreviations
- k = knit
- p = purl
- yo = yarn over
- k2tog = knit two together (right-leaning decrease)
- ssk = slip, slip, knit (left-leaning decrease)
- kfb = knit front and back (increase)
- pm = place marker
- sm = slip marker
- rep = repeat
Setup: The Garter Tab
This initial step creates the foundation for the crescent shape. It's a classic technique that ensures a clean, seamless center back.
- Cast on 5 stitches using your preferred method (long-tail is recommended).
- Knit 10 rows of garter stitch (knit every row). You will have a small, square tab.
- Now, rotate the tab 90 degrees. Pick up and knit 5 stitches along the side edge (one for every two rows, but 5 total is correct for this pattern).
- Rotate again and pick up and knit 5 stitches from the cast-on edge. You now have 15 stitches on the needle.
- Place a marker after the first 3 stitches and before the last 3 stitches. These 3 stitches on each edge will be your garter stitch borders, which prevent curling and create a neat finish.
Increase Section (Rows 1-20)
This section shapes the top of the shawl, creating the gentle curve. The increases are placed just inside the garter borders.
- Row 1 (RS): k3, yo, k to last 3 sts, yo, k3. (2 stitches increased)
- Row 2 (WS): k3, p to last 3 sts, k3. (Purl the center, knit the borders)
- Repeat these two rows until you have 55 stitches on the needle, ending with a WS row. You will have worked approximately 20 rows total in this section. The yarn overs create the increases that fan out the fabric.
Lace Pattern Section
Now the magic begins! The fern lace pattern is a 12-row repeat, worked over the center stitches (between the 3-stitch garter borders). The pattern is built on a foundation of yarn overs and paired decreases (ssk and k2tog) that create the cascading fern fronds. Read the pattern carefully, noting that the yarn overs at the beginning and end of each RS row maintain the shawl's expansion.
Row 1 (RS): k3, yo, *k1, yo, ssk, k3, k2tog, yo, k1, yo, ssk, k3, k2tog, yo*; rep from * to * until 3 sts remain, yo, k3.
Row 2 and all WS rows: k3, p to last 3 sts, k3.
Row 3: k3, yo, *k2, yo, ssk, k1, k2tog, yo, k3, yo, ssk, k1, k2tog, yo*; rep from * to * until 3 sts remain, yo, k3.
Row 5: k3, yo, *k3, yo, ssk, k1, k2tog, yo, k5, yo, ssk, k1, k2tog, yo*; rep from * to * until 3 sts remain, yo, k3.
Row 7: k3, yo, *k4, yo, ssk, k1, k2tog, yo, k7, yo, ssk, k1, k2tog, yo*; rep from * to * until 3 sts remain, yo, k3.
Row 9: k3, yo, *k5, yo, ssk, k1, k2tog, yo, k9, yo, ssk, k1, k2tog, yo*; rep from * to * until 3 sts remain, yo, k3.
Row 11: k3, yo, *k6, yo, ssk, k1, k2tog, yo, k11, yo, ssk, k1, k2tog, yo*; rep from * to * until 3 sts remain, yo, k3.
Repeat these 12 rows until the shawl measures approximately 24 inches from the center back, ending with a WS row. The number of repeats will depend on your desired size and yarn availability. The pattern naturally grows wider with each repeat, so the shawl will become more crescent-shaped as you progress.
Edging
The edging provides a clean, structured finish that contrasts beautifully with the airy lace. It's worked in garter stitch, which is simple and creates a subtle scalloped effect when blocked.
- Work the edging in garter stitch (all knit rows) while increasing at the beginning and end of every RS row. To increase, simply kfb in the first and last stitch of the RS rows.
- Continue until the edging is 2 inches deep. This will create a lovely, textured border that frames the lace.
- Bind off loosely. A loose bind-off is crucial to prevent the edge from pulling in. Consider using a larger needle or a stretchy bind-off method like the "Jeny's Surprisingly Stretchy Bind-Off."
Finishing and Blocking
Blocking is the most critical step in lace knitting. It transforms the fabric, opening up the yarn overs and defining the fern motifs. Do not skip this step!
- Weave in all ends using a tapestry needle, being careful not to distort the stitches.
- Soak the shawl in lukewarm water with a drop of wool wash (like Eucalan or Soak) for 20 minutes. This allows the fibers to relax.
- Gently squeeze out excess water. Do not wring or twist, as this can felt the wool. Roll the shawl in a clean towel to remove additional moisture.
- Lay the shawl flat on blocking mats or a clean, dry towel. Shape it to the desired dimensions, gently stretching the lace points and the garter edging. Use blocking pins to secure the points and edges, creating the full crescent shape.
- Allow to dry completely, which may take 24-48 hours depending on humidity. Once dry, remove the pins and enjoy your beautiful, heirloom-quality wrap.
Your Frosted Fern Lace Wrap is now complete! The combination of the worsted-weight yarn and the intricate lace pattern creates a piece that is both cozy and elegant. Whether draped over your shoulders on a chilly evening or given as a thoughtful handmade gift, this shawl is sure to be treasured for years to come. Happy knitting!



