Mid-Century Colorblock Crochet Stitch Cushion Cover Free Pattern
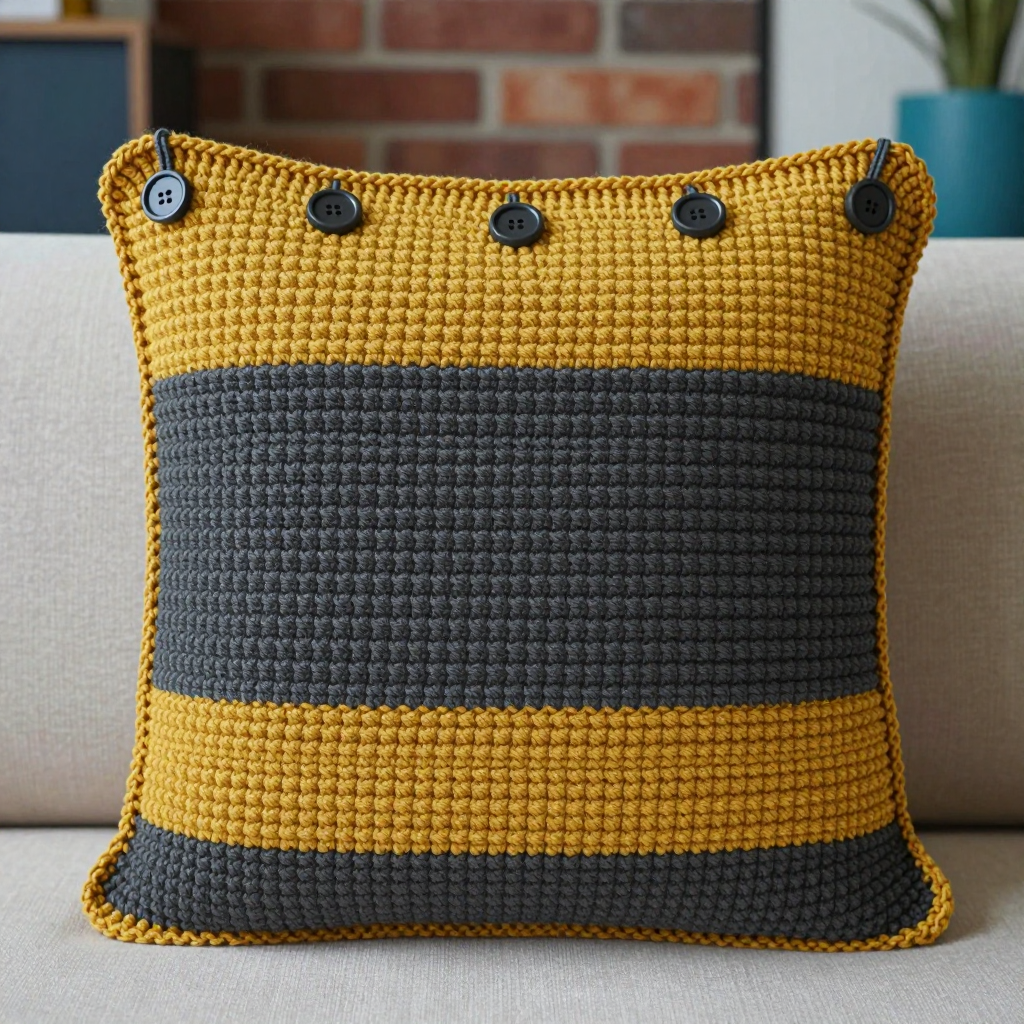
Mid-Century Colorblock Crochet Stitch Cushion Cover — Free Beginner Pattern
Introduction
If you have never held a crochet hook before, this cushion cover is the perfect first real project for you. It is made almost entirely of one simple stitch — single crochet — worked back and forth in flat rows, so there is no shaping, no complicated stitch patterns, and nothing to memorise. What makes it special is the bold mid-century color blocking: two wide mustard bands framing a deep charcoal center, finished with a crisp mustard border and five chunky button loops along the top. The finished cover is a firm, dense 18-inch square with a slightly ridged, satisfying texture that looks far more expensive than the few hours it takes to make. It feels sturdy and squishy in the hand, holds its shape beautifully on a sofa, and the button closure means you can slip the insert out and wash the cover whenever you like.
Materials Needed
- Yarn: Worsted weight (category 4) acrylic or cotton blend — approximately 380 yards total: 200 yards mustard (Color A) and 180 yards charcoal (Color B).
- Crochet hook: US H/8 (5.0 mm), or whatever size you need to match the gauge below.
- Stitch markers: at least 4 (to mark corners and the button-loop positions).
- Tapestry needle: a blunt-tipped yarn needle for weaving in ends and sewing on buttons.
- Scissors for cutting yarn.
- 5 buttons, about ¾ inch (2 cm) across.
- One 18-inch (45.5 cm) square pillow insert.
- Finished size: 18 x 18 inches (45.5 x 45.5 cm).
Abbreviations and Beginner Glossary
- ch — chain. Make a loop with the yarn, then pull a new loop through it. Each loop you pull through is one chain. Chains form your foundation row.
- sc — single crochet. Insert your hook into the stitch, yarn over (wrap the yarn around the hook), pull up a loop (you now have 2 loops on the hook), yarn over again, and pull through both loops. One single crochet made.
- sl st — slip stitch. Insert your hook into the stitch, yarn over, and pull that loop straight through the loop already on your hook. It makes a nearly invisible joining stitch.
- st(s) — stitch or stitches. One completed sc is one stitch.
- sp — space. A gap in the fabric, usually between stitches.
- yarn over — wrap the working yarn around your hook from back to front.
- turn — flip your work over so you can crochet back along the row you just finished.
- fasten off — cut the yarn a few inches from your work, pull the tail all the way through the last loop, and tug gently to lock it.
- join yarn — make a slip knot with the new color, place it on your hook, and pull it through the first stitch.
- right side / wrong side — the right side is the "public" face of your fabric; the wrong side is the back.
- 3 sc in corner — work three single crochets into the same corner stitch so the fabric turns the corner without pulling tight.
Gauge
14 single crochet stitches x 16 rows = 4 inches (10 cm).
Gauge simply means how big your stitches come out. If your stitches are bigger than this, your cover will be too large for the insert; if smaller, it will be too tight. To check, chain 24, work 20 rows of single crochet, and measure the middle 4 inches with a ruler. If you get more than 14 stitches in 4 inches, switch to a larger hook; if fewer, switch to a smaller hook. Always make a swatch before starting — it takes ten minutes and saves hours.
Beginner Tips Before You Start
- Count every row. Single crochet rows are easy to lose track of. Write the row numbers down or use a row counter app.
- Do not pull your yarn too tight. Tension should feel relaxed — if the fabric is stiff as cardboard, loosen your grip.
- Change color on the last stitch of a row. Work the final yarn-over of the last stitch with the new color so the color change is clean.
- Use stitch markers in the first and last stitch of each row so you never accidentally add or drop a stitch at the edge.
- Carry the unused color loosely up the side edge, or fasten off and rejoin — either is fine for a beginner.
- Keep your chain loose. A tight foundation chain makes Row 1 miserable. If needed, use a hook one size larger just for the chain.
Step-by-Step Instructions
Front Panel (Colorblock)
With Color A (mustard), ch 64.
Row 1: Sc in 2nd ch from hook and in each ch across. (63 sc)
Rows 2–24: Ch 1, turn. Sc in each st across. (63 sc) Fasten off Color A.
Join Color B (charcoal) at the beginning of Row 25.
Rows 25–48: Ch 1, turn. Sc in each st across. (63 sc) Fasten off Color B.
Join Color A (mustard) at the beginning of Row 49.
Rows 49–64: Ch 1, turn. Sc in each st across. (63 sc) Fasten off Color A.
The front panel measures approximately 18 inches wide (63 sts ÷ 14 sts per 4 in = 18 in) and 16 inches tall (64 rows ÷ 16 rows per 4 in = 16 in). If your panel is short of 18 inches, work 8 additional rows in Color A to reach the full height.
Back Panel (Solid with Button Band)
With Color B (charcoal), ch 64.
Row 1: Sc in 2nd ch from hook and in each ch across. (63 sc)
Rows 2–64: Ch 1, turn. Sc in each st across. (63 sc)
Row 65 (button band): Ch 1, turn. Sc in each st across. (63 sc) Do not fasten off yet — leave a 24-inch tail when you do.
Button Loops
With Color B, join yarn at the right corner of the back panel's top edge.
Loop 1: Ch 6, sl st in the same st to form a loop, then sl st in each of the next 9 sts. (1 loop made)
Loops 2–5: Repeat Loop 1 four more times, spacing them evenly across the top edge and ending with a sl st in the final st. (5 loops total) Fasten off and weave in ends.
Joining and Border
Place the front and back panels together with wrong sides facing (right sides out).
Round 1: Join Color A in any corner. Ch 1, work sc evenly around the outer edge through both layers, working 1 sc in each st along the sides and 3 sc in each corner. Join with sl st to the first sc. (Approx. 250 sc)
Round 2: Ch 1, sc in each sc around, working 3 sc in each corner. Join with sl st. (Approx. 258 sc) Fasten off and weave in ends.
Buttons
Sew 5 buttons evenly spaced along the top edge of the front panel, aligning each with a button loop on the back panel.
Assembly and Finishing
Seaming: The two panels are joined by the border rounds, so no separate seaming is needed — simply hold them wrong sides together and work Round 1 through both layers, catching one stitch from each panel as you go.
Weaving in ends: Thread each tail onto the tapestry needle and run it back and forth through the wrong side of the fabric for about 2 inches, then trim close to the work.
Blocking: Lightly mist the finished cover with water, pin it to an 18-inch square on a towel or blocking mat, and let it dry completely. This evens out the stitches and sharpens the color blocks.
Finishing: Insert the 18-inch pillow insert through the button opening and button closed.
Pro Tips and Variations
- Change the palette: Swap mustard and charcoal for teal and cream, or rust and oatmeal, for a different mid-century mood.
- Adjust the size: For a 20-inch insert, add 7 chains to the foundation (70 sts) and work 8 extra rows per color band.
- Try a different yarn: Cotton gives a crisper, more matte look; acrylic is softer and cheaper. Just re-check your gauge.
- Add texture: Work the charcoal band in half double crochet (hdc) for a subtle raised stripe — remember to adjust your row count to keep the height at 18 inches.


