Mini Crown Candy Cat Topper Free Crochet Pattern: A Pastel C2C Crown Hat for Cats
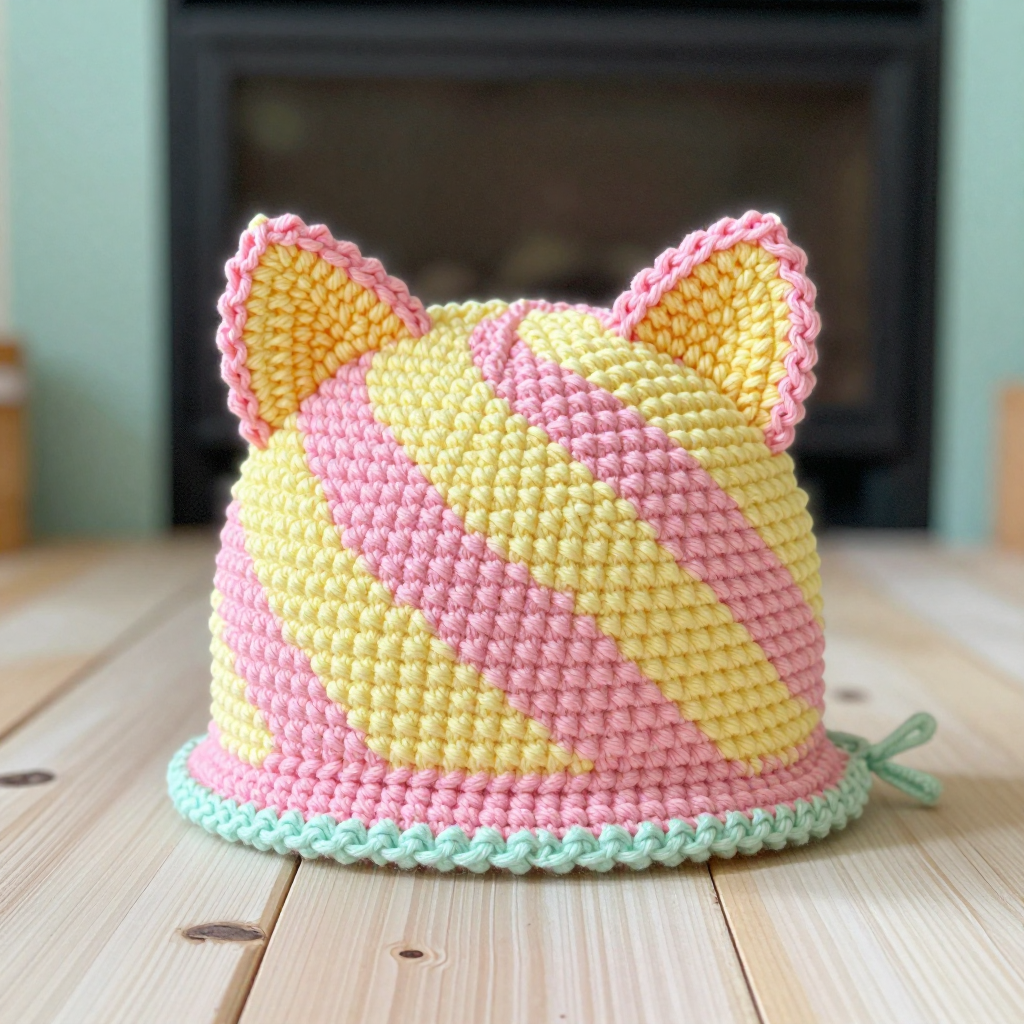
Mini Crown Candy Cat Topper: A Beginner-Friendly Crochet Crown for Your Cat
This tiny pastel candy crown is the perfect first project for anyone who has never held a crochet hook before. It is worked in corner-to-corner (C2C) crochet, which simply means you build the fabric one small square "block" at a time, so you only ever need to know two basic stitches. The finished topper is a soft, short cylinder about 10–11 inches around and 3.5 inches tall, striped in diagonal blocks of baby pink and butter yellow, with a gently wavy top edge made of five little triangular points that look just like a candy crown. It sits lightly between your cat's ears like a sweet little royal hat, and because it uses only a few yards of yarn, it is a wonderful way to use up leftovers. Best of all, every single step is spelled out below, so you can make this even if this is the very first thing you have ever crocheted.
Materials Needed
- Yarn: Worsted weight yarn (CYC category 4) in acrylic. You will need Color A – pastel baby pink, approx. 45 yd; Color B – pastel butter yellow, approx. 25 yd; and a small amount of Color C – pale mint, approx. 10 yd for the optional ties.
- Crochet hook: Size H/8 (5.0 mm), or whatever size you need to match the gauge below.
- Stitch markers: At least 4 (or use small safety pins or scrap yarn loops).
- Tapestry needle: A blunt-tipped yarn needle with a large eye, for seaming and weaving in ends.
- Scissors: Any sharp pair for cutting yarn.
- Finished size: Circumference approx. 10–11 in (25–28 cm); height approx. 3.5 in (9 cm) before the crown points. Each C2C block measures approx. 0.75 in (2 cm) square.
Abbreviations and Beginner Glossary
- ch – chain. Make a loop of yarn on your hook, then pull the yarn through the loop. Each loop you pull through is one chain. Chains are the foundation "ladder" you build on.
- dc – double crochet. Yarn over (wrap yarn around hook), insert hook into the stitch or space, yarn over and pull up a loop (3 loops on hook), yarn over and pull through 2 loops (2 loops left), yarn over and pull through the last 2 loops. That is one double crochet.
- sl st – slip stitch. Insert hook into the stitch or space, yarn over, and pull the yarn straight through both the stitch and the loop on your hook in one motion. It makes a nearly invisible joining stitch.
- C2C block – corner-to-corner block. A small square made of ch 3, then 3 dc worked into the ch-3 space of the block below. One block = one little square of the grid.
- ch-3 space – the little hole or gap made by the 3 chains at the top of a block. You will work your next block into this gap.
- st(s) – stitch(es).
- turn – flip your work over (like turning a page) so you can work back across the row you just made.
- fasten off – cut the yarn leaving a 4–6 inch tail, then pull the tail all the way through the last loop on your hook to lock it.
- join with sl st – attach a new color by making a slip stitch into the place where you want to begin.
- whipstitch – a simple seaming stitch: pass the needle over the edge and back through both layers, over and over, like lacing.
- block / steam block – gently shaping the finished piece with steam or water so it holds its shape.
Gauge
Gauge: 1 C2C block (ch 3 + 3 dc) = approx. 0.75 in (2 cm) square; 4 blocks = approx. 3 in (7.5 cm).
Why gauge matters: Gauge is simply how big your stitches come out. If your blocks are larger than 0.75 in, your hat will be too big and slide off your cat; if they are smaller, the hat will be too tight. Because this hat is small, even a tiny difference adds up quickly.
How to make a gauge swatch: With Color A and your H/8 hook, work Rows 1–4 of the C2C rectangle exactly as written below. Lay the swatch flat and measure across 4 blocks. If it measures about 3 in (7.5 cm), you are on track. If it is bigger, try a smaller hook (such as G/6, 4.0 mm); if it is smaller, try a larger hook (such as I/9, 5.5 mm).
Beginner Tips Before You Start
- Count your blocks every row. C2C is all about the block count. Before you turn, count the little squares across. The number in parentheses at the end of each row tells you exactly how many you should have.
- Use stitch markers to track the increase and decrease ends. Place a marker in the first block of each row so you never lose your place, and move it up as you go.
- Do not pull your yarn too tight. Keep your chains and double crochets relaxed and even. Tight tension makes stiff, tiny blocks that are hard to work into.
- Keep your ch-3 spaces open. Those little gaps are where your next blocks go. If you squash them, your hook will fight you.
- Change colors at the start of a row. Finish the last stitch of the previous row, then fasten off and join the new color with a slip stitch. This keeps the color changes neat.
- Work in good light and take breaks. Small projects with fine counting are much easier when your eyes are fresh.
Step-by-Step Instructions
Pattern notes: This topper is worked flat in corner-to-corner crochet as a rectangle, then seamed into a short cylinder. You will increase to the widest point, work even, then decrease. All terms are US crochet terms. Always supervise pets wearing accessories.
Body: C2C Rectangle
Row 1 (increase): With Color A, ch 4. Dc in the 4th ch from hook and in each of the next 2 ch (this makes your first block). Turn. (1 block)
Row 2 (increase): Ch 3, work 3 dc into the ch-3 space of the previous block. Turn. (2 blocks)
Row 3 (increase): Ch 3, 3 dc in the first ch-3 space, sl st in the next ch-3 space, ch 3, 3 dc in that same space. Turn. (3 blocks)
Row 4 (increase): Ch 3, 3 dc in the first ch-3 space, *sl st in the next ch-3 space, ch 3, 3 dc in that same space; repeat from * across. Turn. (4 blocks)
Rows 5–12: Continue increasing as established, adding 1 block at the end of each row, until you have 12 blocks in Row 12. Fasten off Color A. (12 blocks)
Color Change and Even Section
Row 13: Join Color B with a sl st in the first ch-3 space. Ch 3, 3 dc in that same space, then work 1 block in each remaining ch-3 space across. Turn. (12 blocks)
Rows 14–16: Work even in C2C blocks across, keeping 12 blocks per row. (12 blocks)
Row 17: Change to Color A and work even across. (12 blocks)
Row 18: Work even in Color A across. Fasten off. (12 blocks)
Decrease Section
Row 19: With Color B, sl st across the first block, then ch 3 and work 3 dc in the next ch-3 space. Work 1 block in each remaining ch-3 space across. Turn. (11 blocks)
Rows 20–29: Continue decreasing 1 block at the beginning of each row until 1 block remains in Row 29. Fasten off and weave in all ends. (1 block)
Crown Points (Wavy Top Edge)
The top edge of the cylinder is finished with 5 small C2C triangles worked directly into the edge to create the wavy candy-crown shape.
Triangle 1: Join Color B at the seam edge of the top opening. Ch 3, 3 dc in the same space. Turn. (1 block) Ch 3, 3 dc in the ch-3 space, sl st in the next edge space, ch 3, 3 dc in that same space. Turn. (2 blocks) Ch 3, 3 dc in the first ch-3 space, sl st in the next ch-3 space, ch 3, 3 dc in that same space, sl st in the next edge space, ch 3, 3 dc in that same space. Fasten off, leaving a tail. (3 blocks) This forms one small triangular point.
Triangles 2–5: Skip approx. 1 block space along the top edge and repeat Triangle 1, alternating Color A and Color B for each point. You will have 5 triangular points total, creating a gently wavy crown edge.
Optional Ties
Tie (make 2): With Color C, ch 25. Sl st in each ch across to make a tie. Fasten off. Sew one tie to each side of the hat near the lower brim edge, approx. 1 in (2.5 cm) from the center seam, so the hat can be secured gently under the cat's chin. Do not tie tightly.
Assembly and Finishing
Seaming the cylinder: Fold the C2C rectangle so the two short diagonal edges meet to form a short cylinder. With right sides facing (the smoother, "public" side of the blocks facing each other), whipstitch or slip stitch the side edges together using Color A. Work your needle over the edge and back through both layers, over and over, keeping the stitches small and even. Turn the hat right side out. The lower edge is the brim edge; the upper edge receives the crown points.
Weaving in ends: Thread each yarn tail onto your tapestry needle and run it through the back of several stitches (about 1 inch), then trim close. Never knot your ends; weaving hides them securely.
Blocking: Lightly steam block the crown points so they stand up. Hold a steam iron a few inches above the points (do not press the iron directly onto acrylic, as it can melt), let the steam relax the yarn, then shape the points with your fingers and let them dry flat. Try the hat on your cat briefly to check fit; it should rest lightly without covering the eyes or ears. Never leave a cat unattended while wearing the hat.
Pro Tips and Variations
- Change the candy colors: Swap the pink and yellow for any two pastels you love, such as lavender and peach, or mint and baby blue. Keep one color for the body and one for the band and alternating points.
- Adjust the size: To make the hat slightly larger or smaller, add or remove one increase row before the even section (each block adds about 0.75 in / 2 cm to the height and width). Keep the even section and decrease section balanced so the shape stays symmetrical.
- Substitute yarn: Any worsted weight (CYC 4) yarn works, including cotton or a soft acrylic blend. Always check your gauge with the new yarn, since fiber content changes how the blocks measure.
- Skip the ties for a slip-on crown: If your cat dislikes ties, leave them off and simply let the crown rest between the ears. You can also add a tiny pom-pom or a small crocheted flower to the center point for extra sweetness.