Ripple Candy Stripe Crochet Towel Free Pattern
Ripple Candy Stripe Crochet Towel: A Cheerful First Project
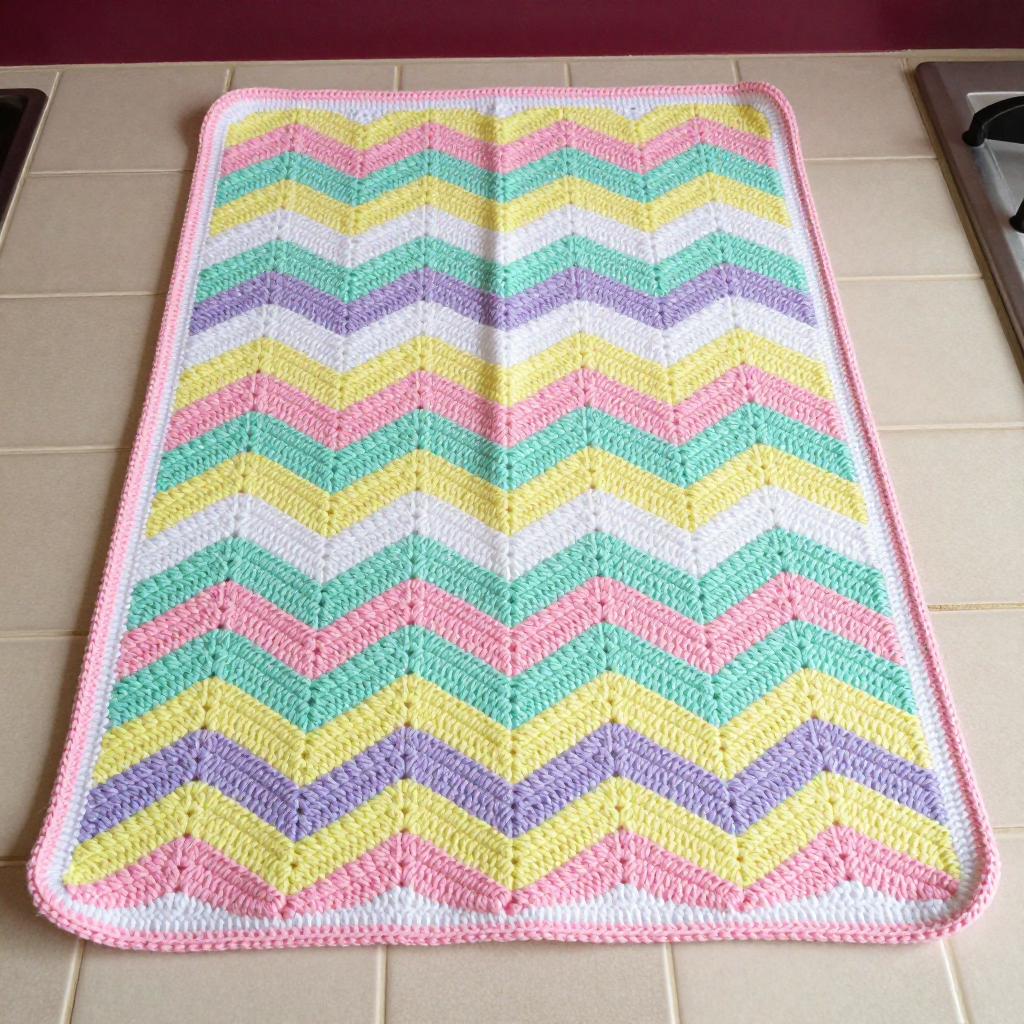
If you have never held a crochet hook before, this Ripple Candy Stripe Towel is the perfect place to begin. It is a flat, rectangular kitchen towel worked in soft pastel stripes, so there is no shaping, no fitting, and nothing to sew together at the end. The ripple stitch creates gentle waves with peaks and valleys across the width, and the finished towel feels soft, absorbent, and wonderfully vintage, like something pulled straight from a 1970s kitchen. By the time you finish, you will have practiced the two most important stitches in crochet, and you will own a practical, cheerful towel you can actually use every day.
Materials Needed
- Yarn: Worsted weight (category 4) cotton yarn, approximately 420–450 yards total. You will need about 90 yards each of pastel pink, pastel yellow, pastel mint green, and pastel lavender, plus about 60 yards of white. Cotton is best because it is absorbent and machine washable.
- Crochet hook: Size H/8 (5.0 mm).
- Stitch markers: At least 4, to mark your first stitch and your corners.
- Tapestry needle: A blunt-tipped needle with a large eye, for weaving in yarn ends.
- Scissors: Sharp craft scissors for cutting yarn.
- Measuring tape or ruler: For checking your gauge and finished size.
- Finished size: Approximately 12 inches wide by 18 inches long.
Abbreviations and Beginner Glossary
- ch – chain: Yarn over the hook and pull the loop through the loop already on your hook. This makes a small link in a chain.
- sc – single crochet: Insert hook into the stitch, yarn over, pull up a loop (2 loops on hook), yarn over, pull through both loops. One loop remains.
- dc – double crochet: Yarn over, insert hook into the stitch, yarn over, pull up a loop (3 loops on hook), yarn over, pull through 2 loops (2 loops remain), yarn over, pull through the last 2 loops. One loop remains.
- dc2tog – double crochet 2 together (a decrease): Yarn over, insert hook into the next stitch, yarn over, pull up a loop, yarn over, pull through 2 loops (2 loops on hook). Yarn over, insert hook into the following stitch, yarn over, pull up a loop, yarn over, pull through 2 loops (3 loops on hook). Yarn over and pull through all 3 loops. This turns two stitches into one.
- st(s) – stitch(es): A single completed loop or the space where you work your next stitch.
- sk – skip: Do not work into that stitch or chain; move past it to the next one.
- rep – repeat: Do the same instruction again.
- RS – right side: The front, public face of your work.
- sl st – slip stitch: Insert hook into the stitch, yarn over, and pull the loop straight through both the stitch and the loop on your hook. It joins without adding height.
- 2 dc in next st – work two double crochet stitches into the same stitch. This is an increase and makes a peak.
- turn – flip your work over so you can crochet back along the row you just made.
- fasten off – cut the yarn a few inches from your work, then pull the tail all the way through the last loop to lock it.
Gauge
16 stitches and 8 rows = 4 inches in ripple pattern.
Gauge means how big your stitches turn out. If your stitches are larger than the pattern expects, your towel will come out bigger than 12 by 18 inches; if smaller, it will shrink. To check, crochet a small practice piece about 5 inches square in the ripple pattern, lay it flat, and measure 4 inches across the middle. Count the stitches and rows inside that 4-inch space. If you have more than 16 stitches, try a larger hook; if fewer, try a smaller hook. This small test saves you from a disappointing surprise at the end.
Beginner Tips Before You Start
- Count your stitches at the end of every row. You should always have 48 stitches. The ripple pattern hides mistakes easily, so counting is your best friend.
- Use a stitch marker in your first stitch of each row. The chain-3 at the start of a row counts as a stitch, and it is easy to lose track of it.
- Do not pull your yarn too tight. Keep a relaxed, even tension so the towel stays soft and your hook slides easily.
- Change colors at the end of a row. Work the last stitch of the row until only two loops remain, drop the old color, and pull the new color through to finish the stitch.
- Keep your peaks and valleys lined up. The two dc2tog stitches form a valley and the two 2-dc increases form a peak. If they drift, rip back a row and try again.
- Work in good light and take breaks. Ripple stitch is repetitive, which makes it relaxing but also easy to zone out on.
Step-by-Step Instructions
Understanding the Ripple Pattern
The ripple pattern repeats a group of stitches across the row: dc in next 5 sts, dc2tog, dc2tog, dc in next 5 sts, 2 dc in next st, 2 dc in next st. That group of 14 stitches is one "wave." Your starting chain of 50 gives you three full waves plus a few edge stitches. Every row after the first is identical, which is why the pattern simply says "Rep Row 2."
Towel Body
Set-up: With pastel pink, ch 50.
Row 1 (RS): Dc in 4th ch from hook (the skipped 3 ch counts as first dc), dc in next ch, [dc in next 5 ch, dc2tog, dc2tog, dc in next 5 ch, 2 dc in next ch, 2 dc in next ch] rep across, ending with dc in last ch. Turn. (48 sts)
Row 2: Ch 3, dc in next st, [dc in next 5 sts, dc2tog, dc2tog, dc in next 5 sts, 2 dc in next st, 2 dc in next st] rep across, ending with dc in last st. Turn. (48 sts)
Rows 3–4: Rep Row 2 in pastel pink. (48 sts)
Change to white.
Rows 5–8: Rep Row 2 in white. (48 sts)
Change to pastel yellow.
Rows 9–12: Rep Row 2 in pastel yellow. (48 sts)
Change to white.
Rows 13–16: Rep Row 2 in white. (48 sts)
Change to pastel mint green.
Rows 17–20: Rep Row 2 in pastel mint green. (48 sts)
Change to white.
Rows 21–24: Rep Row 2 in white. (48 sts)
Change to pastel lavender.
Rows 25–28: Rep Row 2 in pastel lavender. (48 sts)
Change to white.
Rows 29–32: Rep Row 2 in white. (48 sts)
Change to pastel pink.
Rows 33–36: Rep Row 2 in pastel pink. (48 sts)
Change to white.
Rows 37–40: Rep Row 2 in white. (48 sts)
Change to pastel yellow.
Rows 41–44: Rep Row 2 in pastel yellow. (48 sts)
Change to white.
Rows 45–48: Rep Row 2 in white. (48 sts)
Change to pastel mint green.
Rows 49–52: Rep Row 2 in pastel mint green. (48 sts)
Change to white.
Rows 53–56: Rep Row 2 in white. (48 sts)
Change to pastel lavender.
Rows 57–60: Rep Row 2 in pastel lavender. (48 sts)
Change to white.
Rows 61–64: Rep Row 2 in white. (48 sts)
Change to pastel pink.
Rows 65–68: Rep Row 2 in pastel pink. (48 sts)
Do not fasten off. You now have 68 rows total, which at 8 rows per 4 inches gives you approximately 18 inches of length.
Border
Round 1: With pastel pink, ch 1, sc evenly around the entire towel, working 1 sc in each stitch along the sides and 1 sc in each row-end along the top and bottom edges, with 3 sc in each corner. Join with sl st to first sc. Fasten off.
Round 2: Join white with sl st in any sc, ch 1, sc in each sc around, working 3 sc in each corner. Join with sl st to first sc. Fasten off.
Assembly and Finishing
There is no seaming in this project, which is one of the reasons it is so beginner-friendly. Your only finishing work is hiding the yarn tails and blocking the towel.
Weaving in ends: Thread each loose yarn tail onto your tapestry needle. Turn the towel to the wrong side and weave the tail in and out through the backs of several stitches, changing direction once or twice so it cannot work loose. Trim the end close to the fabric.
Blocking: Lay the towel flat on a clean towel or blocking mat. Lightly mist it with water until damp but not soaking. Gently pat and stretch it into a neat 12 by 18 inch rectangle, straightening the ripple peaks and flattening the border. Let it dry completely before moving it.
Pro Tips and Variations
- Change the colors: Swap the pastels for bold jewel tones, or use a single solid color for a calm, modern look. Any worsted cotton works.
- Adjust the size: To make a wider towel, add 14 chains for each extra wave. To make it longer, simply work more color stripes, keeping the same 4-row rhythm.
- Try a different yarn: Cotton is ideal for absorbency, but a cotton-linen blend gives a lovely rustic texture. Avoid acrylic, which does not absorb water well.
- Add a hanging loop: After the border, ch 12, sl st back into the same corner to form a loop, then fasten off. Perfect for hanging by the sink.