Mood Bloom Cushion Free Pattern – A Crocheted Emoji Flower Pillow
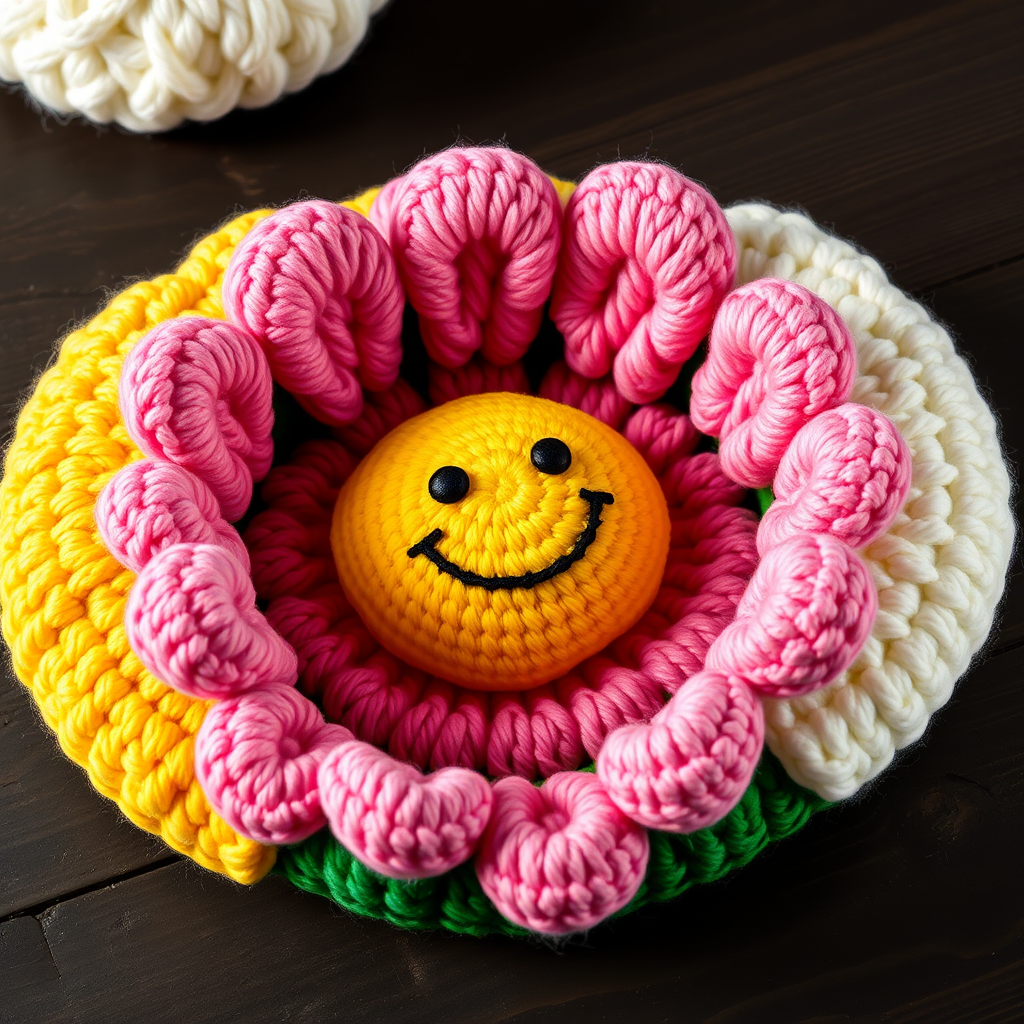
Turn Your Feelings Into a Cozy Garden: The Mood Bloom Cushion
Imagine a pillow that doesn't just decorate your space but also speaks to your soul. The Mood Bloom Cushion is a delightful crochet project that transforms the universal language of emojis into a soft, squishy, and utterly charming flower pillow. With a sunny yellow center featuring a hand-embroidered smiling face, surrounded by plump, rounded petals, this cushion is more than just home decor—it's a conversation starter about emotions, a cozy companion for your couch, and a vibrant splash of handmade joy.
Whether you're an experienced crocheter looking for a fun weekend project or a beginner eager to tackle something impressive, this pattern is designed to be accessible and rewarding. The construction is cleverly simple: two large circles form the pillow body, and individual petals are sewn around the edge to create the flower effect. The result is a sturdy, huggable cushion that measures about 12 inches in diameter—perfect for leaning on while reading, or for giving as a heartfelt, handmade gift.
Materials Needed: Gather Your Crochet Toolkit
Before you begin your journey to creating this emotional garden, make sure you have all the necessary supplies on hand. The beauty of this project is that it uses basic, readily available materials.
Yarn Requirements
Choose a worsted weight (Category 4) cotton or acrylic yarn for the best stitch definition and durability. Cotton is excellent for a firmer, more structured pillow, while acrylic will give you a softer, fluffier result. You will need the following colors:
- Yellow: For the main pillow body (the flower's center). Approximately 250-300 yards.
- Pink & White: For the petals. You'll need about 50 yards of each color to make 4 petals in each shade.
- Green (optional): For a stem-like base or leaf accents, if desired.
- Black: For embroidering the emoji faces.
Tools and Notions
- Crochet Hook: A 5.0 mm (H-8) crochet hook is essential for achieving the correct gauge.
- Yarn Needle: A large-eyed tapestry needle for sewing pieces together and weaving in ends.
- Polyester Fiberfill: Approximately 12-16 ounces for a firm, squishy stuffing.
- Stitch Markers: To keep track of your rounds.
- Scissors: For cutting yarn.
Gauge Information
To ensure your pillow turns out the perfect size, it's crucial to check your gauge. The pattern calls for 4 inches = 16 single crochet stitches and 18 rows when worked in continuous rounds. If your gauge is off, adjust your hook size accordingly—use a smaller hook if your stitches are too loose, or a larger hook if they're too tight.
Step-by-Step Instructions: Crafting Your Mood Bloom
This pattern is worked in the round, starting with a magic ring. Don't be intimidated by the magic ring—it's a simple technique that creates a tight, seamless center. If you're unfamiliar with it, you can alternatively chain 2 and work your first round into the second chain from the hook.
Part 1: The Main Pillow Body (Make 2)
You will create two identical circles. The first will be closed completely, and the second will be left open for stuffing. Follow the instructions carefully, counting your stitches at the end of each round.
Round 1: Create a magic ring. Work 6 single crochet (sc) into the ring. Pull the tail to close the ring tightly. (6 stitches)
Round 2: Work 2 sc into each stitch around. (12 stitches)
Round 3: *Sc in the next stitch, 2 sc in the next stitch* — repeat this pattern around. (18 stitches)
Round 4: *Sc in the next 2 stitches, 2 sc in the next stitch* — repeat around. (24 stitches)
Round 5: *Sc in the next 3 stitches, 2 sc in the next stitch* — repeat around. (30 stitches)
Round 6: *Sc in the next 4 stitches, 2 sc in the next stitch* — repeat around. (36 stitches)
Round 7: *Sc in the next 5 stitches, 2 sc in the next stitch* — repeat around. (42 stitches)
Round 8: *Sc in the next 6 stitches, 2 sc in the next stitch* — repeat around. (48 stitches)
Round 9: *Sc in the next 7 stitches, 2 sc in the next stitch* — repeat around. (54 stitches)
Round 10: *Sc in the next 8 stitches, 2 sc in the next stitch* — repeat around. (60 stitches)
Round 11: *Sc in the next 9 stitches, 2 sc in the next stitch* — repeat around. (66 stitches)
Round 12: *Sc in the next 10 stitches, 2 sc in the next stitch* — repeat around. (72 stitches)
Rounds 13-24: Work 1 sc in each stitch around for 12 straight rounds. Do not increase. (72 stitches each round)
At this point, your circle should measure approximately 12 inches in diameter. If it's smaller, you can add a few more increase rounds; if larger, consider frogging back.
Round 25: *Sc in the next 10 stitches, sc2tog (single crochet 2 together)* — repeat around. (66 stitches)
Round 26: *Sc in the next 9 stitches, sc2tog* — repeat around. (60 stitches)
Round 27: *Sc in the next 8 stitches, sc2tog* — repeat around. (54 stitches)
Round 28: *Sc in the next 7 stitches, sc2tog* — repeat around. (48 stitches)
Round 29: *Sc in the next 6 stitches, sc2tog* — repeat around. (42 stitches)
Round 30: *Sc in the next 5 stitches, sc2tog* — repeat around. (36 stitches)
Round 31: *Sc in the next 4 stitches, sc2tog* — repeat around. (30 stitches)
Round 32: *Sc in the next 3 stitches, sc2tog* — repeat around. (24 stitches)
Round 33: *Sc in the next 2 stitches, sc2tog* — repeat around. (18 stitches)
Round 34: *Sc in the next stitch, sc2tog* — repeat around. (12 stitches)
Round 35: Sc2tog around. (6 stitches)
Finishing the First Piece: Fasten off, leaving a long tail (about 12 inches). Thread the tail onto a yarn needle and weave it through the front loops of the remaining 6 stitches. Pull tight to cinch the hole closed. Weave in the end securely.
Finishing the Second Piece: Repeat all rounds for the second piece, but do not fasten off after Round 35. Instead, cut the yarn leaving a long tail (about 18 inches) and pull it through the last loop to secure it. Leave the small hole open—this will be used for stuffing.
Part 2: The Petals (Make 8)
Each petal is worked in rows, not rounds. You'll make 4 petals in pink and 4 in white, or alternate colors as you prefer. These petals are designed to be slightly curved and plump, giving the flower its dimensional look.
Row 1: Chain 10. Work 1 sc into the 2nd chain from the hook, then 1 sc into each of the remaining chains across. (9 stitches)
Row 2: Chain 1, turn your work. Work 1 sc into each stitch across. (9 stitches)
Row 3: Chain 1, turn. Work sc2tog, then 1 sc into the next 5 stitches, then sc2tog. (7 stitches)
Row 4: Chain 1, turn. Work sc2tog, then 1 sc into the next 3 stitches, then sc2tog. (5 stitches)
Row 5: Chain 1, turn. Work sc2tog, then 1 sc into the next stitch, then sc2tog. (3 stitches)
Row 6: Chain 1, turn. Work sc3tog (single crochet 3 together) to decrease all remaining stitches into one. (1 stitch)
Finishing the Petals: Fasten off, leaving a long tail (about 10 inches) for sewing. To give the petal its characteristic curve, gently fold it in half lengthwise at the base and pinch it. This will create a slight cup shape that makes the petal look plump and realistic.
Part 3: Embroidering the Emoji Faces
Before assembling the pillow, you need to add the personality—the emoji faces! Using the black yarn and your yarn needle, embroider directly onto the center of both pillow pieces. This is best done before stuffing, as it's much easier to work with flat fabric.
Happy Face: Create two small French knots for eyes, positioned about 1 inch apart. For the smile, use a backstitch to create a gentle curve below the eyes. Start at one end of the smile, bring the needle up, and make small, even stitches following the curve.
Heart-Eyes Face: For each eye, use a satin stitch to create a small heart shape. Bring the needle up at the bottom point of the heart, then make diagonal stitches to fill in the two lobes of the heart. For the smile, use a simple backstitch as described above.
Laughing Face: For the eyes, make two short, curved lines using a backstitch, with the curve facing downward like closed, happy eyes. For the mouth, create an open oval shape using a satin stitch—fill in a small oval area completely with black yarn.
Feel free to mix and match faces! You could make one side a happy face and the other a heart-eyes face for a pillow that expresses different moods.
Part 4: Assembly and Final Touches
Now comes the satisfying part—bringing all your pieces together to create the finished Mood Bloom Cushion.
Step 1: Stuffing the Pillow. Take the pillow piece that is still open. Firmly stuff it with polyester fiberfill. Be generous—you want the pillow to be plump and squishy, not limp. Use small handfuls of stuffing to ensure it's evenly distributed, especially toward the edges.
Step 2: Closing the Pillow. Place the second pillow piece (the one that's closed) on top of the stuffed piece, with the right sides facing out. The embroidered faces should be on the outside. Using the long tail from the open piece, whip stitch the two pieces together around the edge. Insert your needle through both layers, going over the edge, and pull tight. Continue around the entire circumference.
Step 3: Adding More Stuffing. Before you close the final gap, check the firmness of the pillow. If it feels too soft, add more stuffing through the remaining opening. Once you're happy with the squish factor, finish the whip stitch and secure the yarn with a knot. Weave in the end.
Step 4: Attaching the Petals. Now, take your 8 finished petals. Position them evenly around the edge of the pillow, spacing them about 2 inches apart. They should point outward like a sunburst. Using the long tails left on the petals, sew each one securely to the pillow. Insert your needle through the base of the petal and into the pillow body, making several firm stitches to ensure it's well-attached. Repeat for all 8 petals.
Step 5: Weaving in Ends. Finally, use your yarn needle to weave in any remaining loose ends. Thread the needle through the inside of the pillow or along the seam, being careful not to pull too tightly and distort the shape. Trim any excess yarn.
Congratulations! You've just completed your very own Mood Bloom Cushion. Place it on your bed, sofa, or favorite reading chair. It's a beautiful, functional piece of art that brings a smile to anyone who sees it. And because you made it yourself, it carries an extra special warmth that no store-bought pillow can match. Happy crocheting!


