Mossy Munchkin Monster Free Pattern – Crochet a Cuddly Garden Guardian
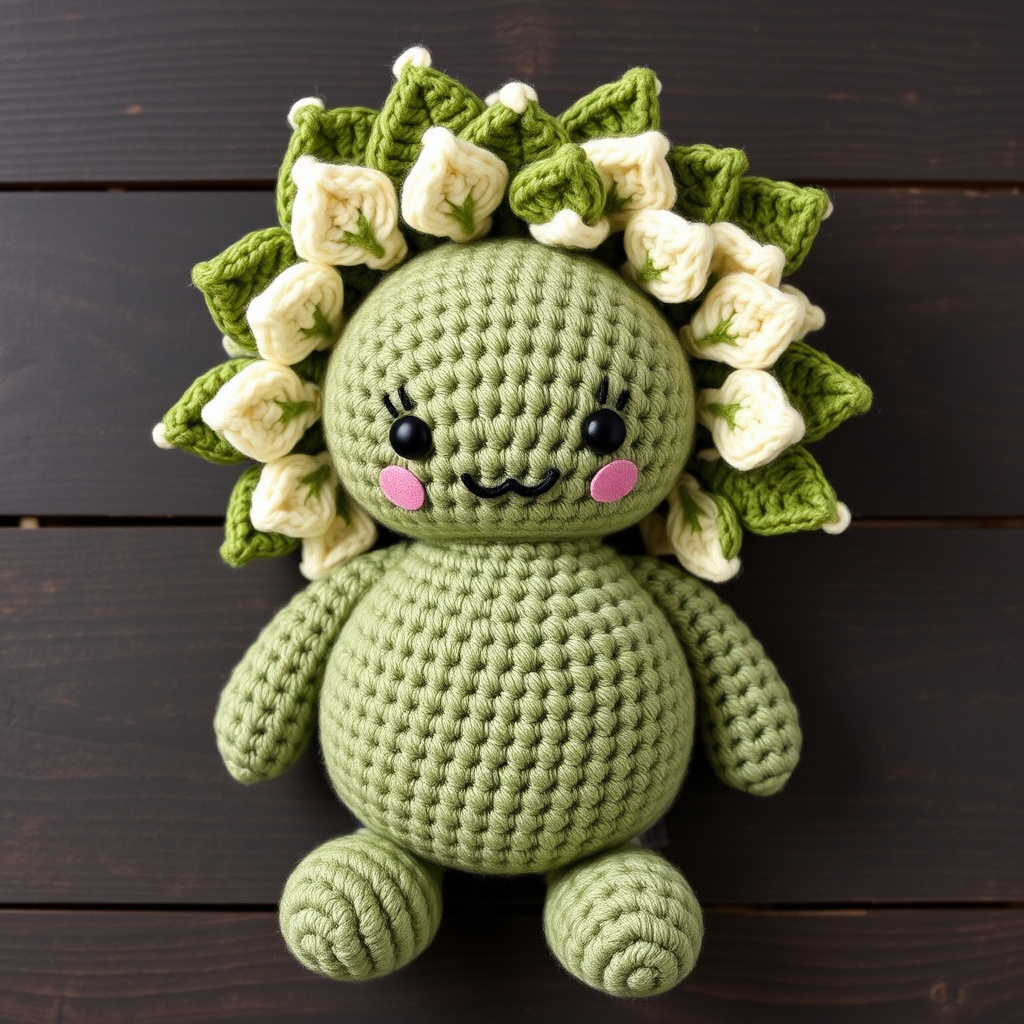
Meet the Mossy Munchkin: Your New Favorite Crochet Companion
Welcome to the enchanting world of amigurumi, where a simple ball of yarn transforms into a creature bursting with personality! Today, I'm thrilled to share the free pattern for the Mossy Munchkin Monster—a whimsical, cuddly garden guardian with a leafy mane and a heart of pure coziness. This little fellow is the perfect project for both beginners looking to expand their skills and seasoned crocheters seeking a quick, delightful make. Whether he's destined for a nursery shelf, a baby's gift basket, or simply to guard your own sofa, the Mossy Munchkin is sure to bring a touch of woodland magic to any space. Let's grab our hooks and bring this adorable monster to life!
Materials Needed: Gather Your Woodland Treasures
Before we dive into the magic, let's ensure you have everything you need. This project is wonderfully portable and uses simple, readily available materials. Here’s your crafting checklist:
- Yarn: Worsted weight (#4) cotton or acrylic blend in the following colors:
- Sage Green (for the head and arms)
- Moss Green (for the body, legs, and some leaves)
- Cream (for the eyes and some leaves)
- Soft Blush Pink (for the cheeks)
- A small scrap of black yarn for the smile
- Crochet Hook: 3.5 mm (E) crochet hook
- Other Notions:
- Stitch marker (to keep track of your rounds)
- Yarn needle for weaving in ends and embroidery
- Polyester fiberfill for stuffing
- Scissors
Note on Gauge: The pattern specifies 4 sc x 4 rows = 1 inch. While gauge isn't critical for this project, maintaining consistent tension will help you achieve a nicely shaped, firm monster.
Step-by-Step Instructions: Crafting Your Mossy Munchkin
This pattern is worked in continuous spiral rounds unless otherwise noted. This means you won't join your rounds with a slip stitch; instead, you'll work continuously in a spiral. Always use a stitch marker to mark the first stitch of each round so you don't lose your place!
Part 1: The Head (in Sage Green)
We'll start with the head, which is the largest and most expressive part of your Munchkin.
- R1: Magic ring, 6 sc in ring (6)
- R2: Inc in each st around (12)
- R3: (Sc in next st, inc) around (18)
- R4: (Sc in next 2 sts, inc) around (24)
- R5: (Sc in next 3 sts, inc) around (30)
- R6: (Sc in next 4 sts, inc) around (36)
- R7-12: Sc in each st around (36) – This is 6 rounds even. Your head is now a nice, round ball.
- R13: (Sc in next 4 sts, dec) around (30)
- R14: (Sc in next 3 sts, dec) around (24)
- R15: (Sc in next 2 sts, dec) around (18)
- Stuff firmly with polyester fiberfill. Make sure to shape it nicely as you go.
- R16: (Sc in next st, dec) around (12)
- R17: Dec around (6)
- Fasten off, leaving a tail to weave in. The head is complete!
Part 2: The Body (in Moss Green)
Next, we'll create the plump, huggable body.
- R1: Magic ring, 6 sc in ring (6)
- R2: Inc in each st around (12)
- R3: (Sc in next st, inc) around (18)
- R4: (Sc in next 2 sts, inc) around (24)
- R5: (Sc in next 3 sts, inc) around (30)
- R6-10: Sc in each st around (30) – 5 rounds even.
- R11: (Sc in next 3 sts, dec) around (24)
- R12: (Sc in next 2 sts, dec) around (18)
- Stuff firmly to give the body a nice, solid shape.
- R13: (Sc in next st, dec) around (12)
- R14: Dec around (6)
- Fasten off, but this time leave a long tail (about 12-15 inches) for sewing the body to the head later.
Part 3: The Arms (Make 2, in Sage Green)
These little stubs are perfect for hugging!
- R1: Magic ring, 5 sc in ring (5)
- R2: Inc in each st around (10)
- R3-6: Sc in each st around (10) – 4 rounds even.
- Stuff lightly – you want them soft and squishy.
- R7: (Sc in next 3 sts, dec) around (8)
- Fasten off, leaving a long tail for sewing. Set aside.
Part 4: The Legs (Make 2, in Moss Green)
These will help your Munchkin sit up nice and stable.
- R1: Magic ring, 6 sc in ring (6)
- R2: Inc in each st around (12)
- R3: (Sc in next st, inc) around (18)
- R4-5: Sc in each st around (18) – 2 rounds even.
- Stuff lightly.
- R6: (Sc in next st, dec) around (12)
- Fasten off, leaving a long tail for sewing.
Part 5: The Leafy Mane (Make 5 Leaves)
This is the Munchkin's crowning glory! Alternate between cream and moss green to create a lush, woodland crown.
- For each leaf: Ch 8.
- Sc in 2nd ch from hook, hdc in next, dc in next 3, hdc in next, sc in last.
- Fasten off, leaving a tail for sewing. You should have a nice, leaf-shaped piece.
- Repeat to make a total of 5 leaves, alternating colors (e.g., cream, moss, cream, moss, cream).
Part 6: The Face
Now for the most important part—giving your monster its gentle, endearing expression!
- Eyes: Using the cream yarn and a yarn needle, embroider two oval shapes on the head. Place them about 4-5 rounds apart, centered on the face. If you prefer, you can use safety eyes, but be sure to insert them before you close the head (around R12). For this pattern, we'll stick to embroidery for a softer, baby-friendly finish.
- Cheeks: With the blush pink yarn, embroider two small, tight circles on the cheeks, just below and to the outside of the eyes.
- Smile: Using a small piece of black yarn, embroider a gentle, curved smile between and slightly below the eyes.
Part 7: Assembly – Bringing It All Together
Time to make your Munchkin whole!
- Sew the Arms: Position the arms on the sides of the body, just below the neck. Sew them on securely using the long tails.
- Sew the Legs: Attach the legs to the bottom of the body, placing them slightly apart for stability. This will help your monster sit up on its own.
- Sew the Head to the Body: Using the long tail from the body, sew the head to the body with a whip stitch, making sure the seam is hidden. Go around the join at least twice for a secure hold.
- Attach the Mane: Now for the fun part! Arrange the 5 leaves around the top of the head in a fan shape, overlapping them slightly to create a lush, full mane. Sew each leaf on securely, hiding the stitches under the leaves.
Part 8: Finishing Touches
- Weave in all remaining ends securely using your yarn needle.
- Optional: Add a small tuft of cream yarn on the very top of the head for extra charm. Simply tie a few strands of yarn together and sew them in place.
- Give your Munchkin a gentle block if needed to help shape the leaves and smooth out any uneven stitches.
And there you have it—your very own Mossy Munchkin Monster! This little garden guardian is ready to bring comfort and joy to its new home. I'd love to see your creations! Share your photos on social media with the hashtag #MossyMunchkinPattern. Happy crocheting!


