Sugar Plum Herringbone Knit Blazer Free Pattern: A Ballet-Core Box Jacket
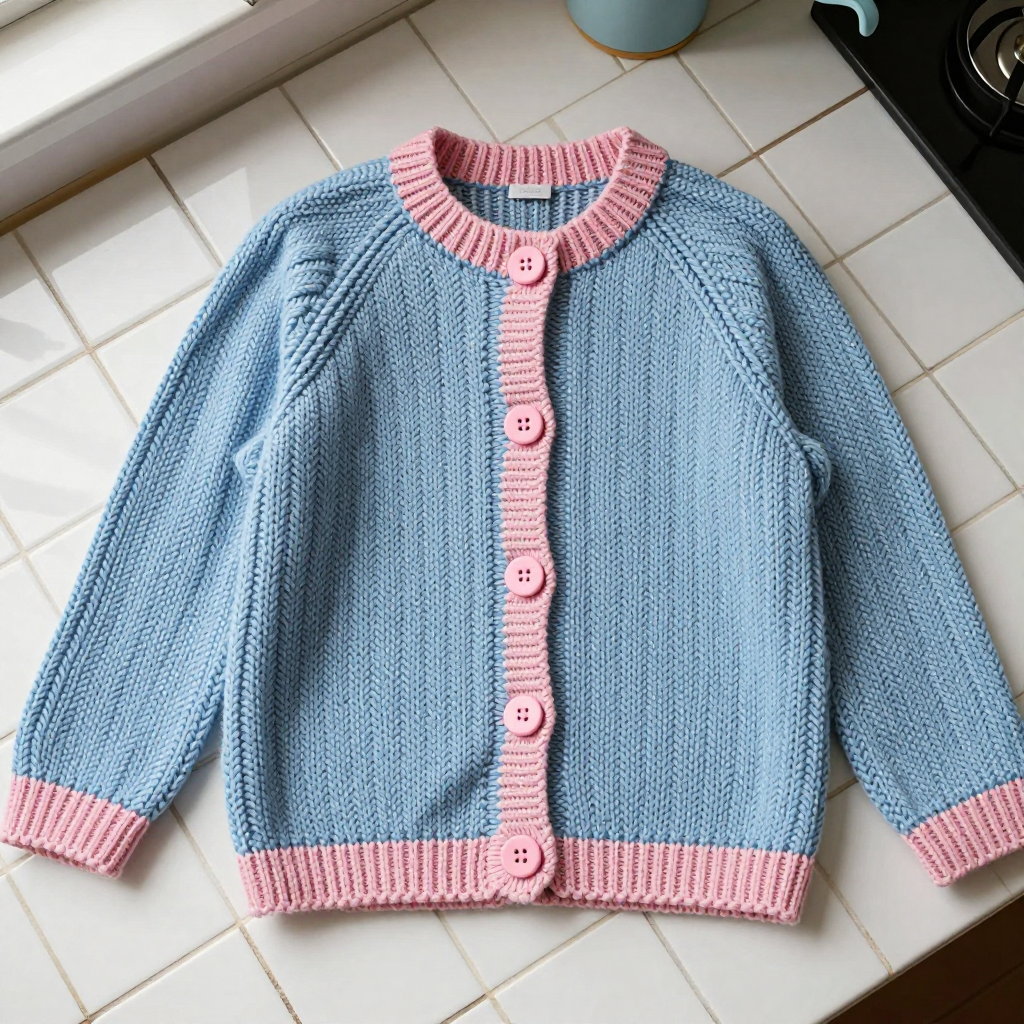
The Sugar Plum Herringbone Knit Blazer
If you have ever looked at a knitted blazer and thought "that looks way too hard for me," this is the pattern that will change your mind. The Sugar Plum Herringbone Knit Blazer is built from four simple flat panels — a back, two fronts, and two sleeves — so you never have to juggle a complicated garment all at once. The magic happens in the herringbone stitch, a two-row repeat that creates a dense, woven, chevron-like texture that looks far more advanced than it is. Knitted in soft baby blue aran wool with cotton candy pink ribbed button bands and two little knitted buttons, the finished jacket is boxy, straight, and gently tailored-looking, with a cozy, structured feel that drapes like a favorite cardigan. It is perfect for a first garment, a first button band, or anyone who wants a ballet-core layer that feels handmade in the best way.
Materials Needed
- Yarn: Aran weight wool blend (approx. 20% wool, 80% acrylic; 170 m / 186 yds per 100 g skein). Main color (MC) baby blue: 5 (6, 6, 7, 7, 8) skeins. Contrast color (CC) cotton candy pink: 1 skein for all sizes.
- Needles: 5.0 mm (US 8) straight or circular needles, plus a spare 5.0 mm (US 8) needle for the three-needle bind-off.
- Crochet hook: 5.0 mm (US H-8) crochet hook for the button loops.
- Notions: Stitch markers, stitch holders or waste yarn, a tapestry needle (a big blunt needle for sewing seams and weaving in ends), and scissors.
- Finished size: Finished bust 96 (106, 116, 126, 136, 146) cm / 38 (42, 46, 50, 54, 58) in. Suggested ease: 8–12 cm / 3–5 in positive ease (this means the jacket measures a little bigger than your body so it layers comfortably). Sample shown in size 2 (106 cm / 42 in).
Abbreviations and Beginner Glossary
- st / sts – stitch / stitches (one loop on your needle is one stitch).
- RS – right side (the outside of the jacket that people see).
- WS – wrong side (the inside of the jacket).
- k – knit (insert needle into the stitch, wrap yarn, pull a loop through).
- p – purl (insert needle into the stitch from front to back, wrap yarn, pull a loop through).
- k2tog – knit two stitches together (decreases by one stitch).
- p2tog – purl two stitches together (decreases by one stitch).
- kfb – knit front and back (knit into the front of the stitch, then into the back of the same stitch before dropping it — this increases by one stitch).
- yo – yarn over (wrap the yarn around the needle to create an extra loop — this makes a buttonhole).
- sl 1 wyif – slip one stitch with yarn in front (move the stitch from the left needle to the right needle without knitting it, keeping the working yarn toward you).
- St st – stockinette stitch (knit on RS rows, purl on WS rows).
- MC – main color (baby blue).
- CC – contrast color (cotton candy pink).
- approx. – approximately (about).
- Herringbone pair – the special two-stitch move described in the Stitch Guide below. It looks fancy but is just a knit (or purl) that you work twice before dropping the stitches.
Gauge
16 sts and 24 rows = 10 cm / 4 in in herringbone stitch on 5.0 mm needles, after blocking. 18 sts and 24 rows = 10 cm / 4 in in k1, p1 rib on 5.0 mm needles.
Why gauge matters: Gauge is how many stitches and rows fit into 4 inches of your knitting. If your stitches are bigger than the pattern's, your jacket will come out too large; if smaller, too small. How to swatch: Cast on about 30 stitches, work in herringbone stitch for about 15 cm / 6 in, then lay the swatch flat and measure 10 cm / 4 in across the middle. Count the stitches and rows inside that space. If you have more stitches than 16, go up a needle size; if fewer, go down. Wash and dry your swatch the way you plan to care for the jacket, because the fabric can change after blocking.
Beginner Tips Before You Start
- Use stitch markers to track your sections. Place a marker after every 10 stitches when you cast on, and move them up as you go. Counting 82 stitches is much easier in groups of 10.
- Do not pull your yarn too tight. Herringbone stitches need a little breathing room. If your fabric feels stiff and hard to work, relax your tension — the texture should look woven, not cramped.
- Count your stitches at the end of every row. The stitch counts in parentheses are your safety net. If a count is off, fix it before moving on.
- Write down your row numbers. Keep a simple tally on paper so you always know where you are in the pattern.
- Work the herringbone pair slowly at first. Knit two together but do not drop the stitches, knit the first stitch again, then drop both. Once your hands learn the motion, it becomes automatic.
- Try the buttonhole row on a scrap swatch first. A yarn over and k2tog is simple, but practicing once makes the real band stress-free.
Step-by-Step Instructions
Stitch Guide
Herringbone Stitch (worked flat, multiple of 2 sts + 2 edge sts):
Row 1 (RS): Sl 1 wyif, *k2tog but do not drop sts from left needle, knit first st again, then drop both sts from left needle (this is the herringbone pair); rep from * to last st, k1.
Row 2 (WS): Sl 1 wyif, *p2tog but do not drop sts from left needle, purl first st again, then drop both sts from left needle; rep from * to last st, p1.
Repeat Rows 1–2 for pattern. The fabric pulls in widthwise; the stitch counts below already account for this.
K1, P1 Rib (odd number of sts):
Row 1 (RS): K1, *p1, k1; rep from * to end.
Row 2 (WS): P1, *k1, p1; rep from * to end.
Repeat Rows 1–2.
Back Panel
With MC, cast on 82 (90, 98, 106, 114, 122) sts.
Work in Herringbone Stitch until the piece measures 38 (39, 40, 41, 42, 43) cm / 15 (15.5, 15.75, 16, 16.5, 17) in from the cast-on edge, ending with a WS row.
Shape armholes: Bind off 5 (6, 7, 8, 9, 10) sts at the beginning of the next 2 rows. (72 (78, 84, 90, 96, 102) sts remain.)
Continue straight in Herringbone Stitch until the armhole measures 18 (19, 20, 21, 22, 23) cm / 7 (7.5, 8, 8.25, 8.75, 9) in, ending with a WS row.
Shape shoulders and back neck: Bind off 8 (9, 10, 11, 12, 13) sts at the beginning of the next 2 rows, then 8 (9, 10, 11, 12, 13) sts at the beginning of the following 2 rows. Place the remaining 40 (42, 44, 46, 48, 50) sts on a stitch holder for the back neck.
Left Front Panel
With MC, cast on 42 (46, 50, 54, 58, 62) sts.
Work in Herringbone Stitch until the piece measures 38 (39, 40, 41, 42, 43) cm / 15 (15.5, 15.75, 16, 16.5, 17) in from the cast-on edge, ending with a WS row.
Shape armhole: Bind off 5 (6, 7, 8, 9, 10) sts at the beginning of the next RS row. (37 (40, 43, 46, 49, 52) sts remain.)
Continue straight until the armhole measures 14 (15, 16, 17, 18, 19) cm / 5.5 (6, 6.25, 6.75, 7, 7.5) in, ending with a RS row.
Shape front neck: Bind off 5 (5, 6, 6, 7, 7) sts at the beginning of the next WS row, then 3 sts at the beginning of the following WS row, then 2 sts at the beginning of the next 2 WS rows, then 1 st at the beginning of the next 2 (3, 3, 4, 4, 5) WS rows. (24 (27, 30, 33, 36, 39) sts remain.)
Continue straight until the armhole measures 18 (19, 20, 21, 22, 23) cm / 7 (7.5, 8, 8.25, 8.75, 9) in, ending with a WS row.
Shape shoulder: Bind off 8 (9, 10, 11, 12, 13) sts at the beginning of the next RS row, then 8 (9, 10, 11, 12, 13) sts at the beginning of the following RS row, then 8 (9, 10, 11, 12, 13) sts at the beginning of the next RS row. Fasten off.
Right Front Panel
Work as for the Left Front, reversing all shaping (armhole and shoulder bind-offs at the beginning of WS rows; neck bind-offs at the beginning of RS rows).
Sleeves (make 2)
With MC, cast on 42 (46, 50, 54, 58, 62) sts.
Work in Herringbone Stitch, increasing 1 st at each end of every 8th row 8 (8, 9, 9, 10, 10) times. (58 (62, 68, 72, 78, 82) sts.)
Continue straight until the sleeve measures 44 (45, 46, 47, 48, 49) cm / 17.25 (17.75, 18, 18.5, 19, 19.25) in from the cast-on edge, ending with a WS row.
Shape sleeve cap: Bind off 5 (6, 7, 8, 9, 10) sts at the beginning of the next 2 rows, then 2 sts at the beginning of the next 4 rows, then 1 st at the beginning of the next 6 rows, then 2 sts at the beginning of the next 4 rows. Bind off the remaining 20 (22, 26, 28, 32, 34) sts.
Joining the Shoulders
Place the back and front shoulder stitches on separate needles and join them with a three-needle bind-off on the RS for a neat, stable seam. Join both shoulders.
Neckband
With RS facing and CC, pick up and knit 1 st in each st around the entire neckline (approx. 96 (100, 104, 108, 112, 116) sts), including the held back-neck sts.
Work in K1, P1 Rib for 3 cm / 1.25 in. Bind off all sts in rib.
Button Bands
Left Front Band (buttonhole band): With RS facing and CC, pick up and knit 1 st in every row along the left front edge from the bottom cast-on edge to the neckband edge (approx. 110 (114, 118, 122, 126, 130) sts).
Work in K1, P1 Rib for 2 cm / 0.75 in.
Buttonhole row (RS): Work in rib to the first buttonhole position (approx. 8 cm / 3 in from the bottom edge), then *yo, k2tog, work in rib for 12 cm / 4.75 in; rep from * for a total of 2 buttonholes, then work in rib to end.
Continue in rib for another 1.5 cm / 0.5 in. Bind off all sts in rib.
Right Front Band (button band): With RS facing and CC, pick up and knit 1 st in every row along the right front edge from the bottom cast-on edge to the neckband edge (same count as the left band). Work in K1, P1 Rib for 3.5 cm / 1.5 in. Bind off all sts in rib.
Knitted Fabric-Style Buttons (make 2)
With CC, cast on 12 sts.
Row 1: Purl.
Row 2: K1, *kfb, k1; rep from * to last st, k1. (18 sts.)
Row 3: Purl.
Row 4: K1, *kfb, k2; rep from * to last st, k1. (24 sts.)
Work in St st for 4 rows.
Next row (RS): *K2tog; rep from * to end. (12 sts.)
Next row: Purl.
Next row: *K2tog; rep from * to end. (6 sts.)
Cut the yarn, thread it through the remaining sts, and pull tight. Sew the cast-on and bound-off edges together to form a small stuffed disc. Make a second button the same way. Sew one button to the right front band opposite each buttonhole.
Sleeve Set-In
Pin the sleeves into the armholes, matching the center of the sleeve cap to the shoulder seam. Sew in place using mattress stitch. Sew the side and sleeve seams with mattress stitch.
Assembly and Finishing
Seaming with mattress stitch: Lay the two pieces flat with the RS facing up. Thread a tapestry needle with the same yarn. Bring the needle under the horizontal bar between the first and second stitch on one edge, then under the matching bar on the other edge, and pull gently. Work up the seam, keeping the tension even so the seam lies flat.
Weaving in ends: Thread each loose end onto a tapestry needle and weave it in and out of the back of the fabric for about 5 cm / 2 in, then trim. Do not knot the ends.
Blocking: Mist the jacket lightly with water, pin it to the finished measurements on a towel or blocking mat, and allow it to dry flat. Do not press the herringbone fabric flat; steam gently from the wrong side to preserve the texture.
Pro Tips and Variations
- Change the colors: Swap the baby blue and pink for any two shades you love — a cream body with sage bands, or a dusty rose body with ivory bands, both look beautiful in this ballet-core style.
- Adjust the length: Add or remove rows before the armhole shaping to make the jacket longer or shorter. Each 2 rows adds about 1 cm / 0.4 in.
- Substitute yarn: Any aran weight yarn that meets the gauge works. Always swatch first, because different fibers behave differently after blocking.
- Try a different closure: Skip the buttonholes and add a large statement button, or use the 5.0 mm crochet hook to make simple chain loops instead of yarn-over buttonholes.