Sun-Kissed Citrus Tote Bag Free Pattern – A Knitted Summer Market Bag
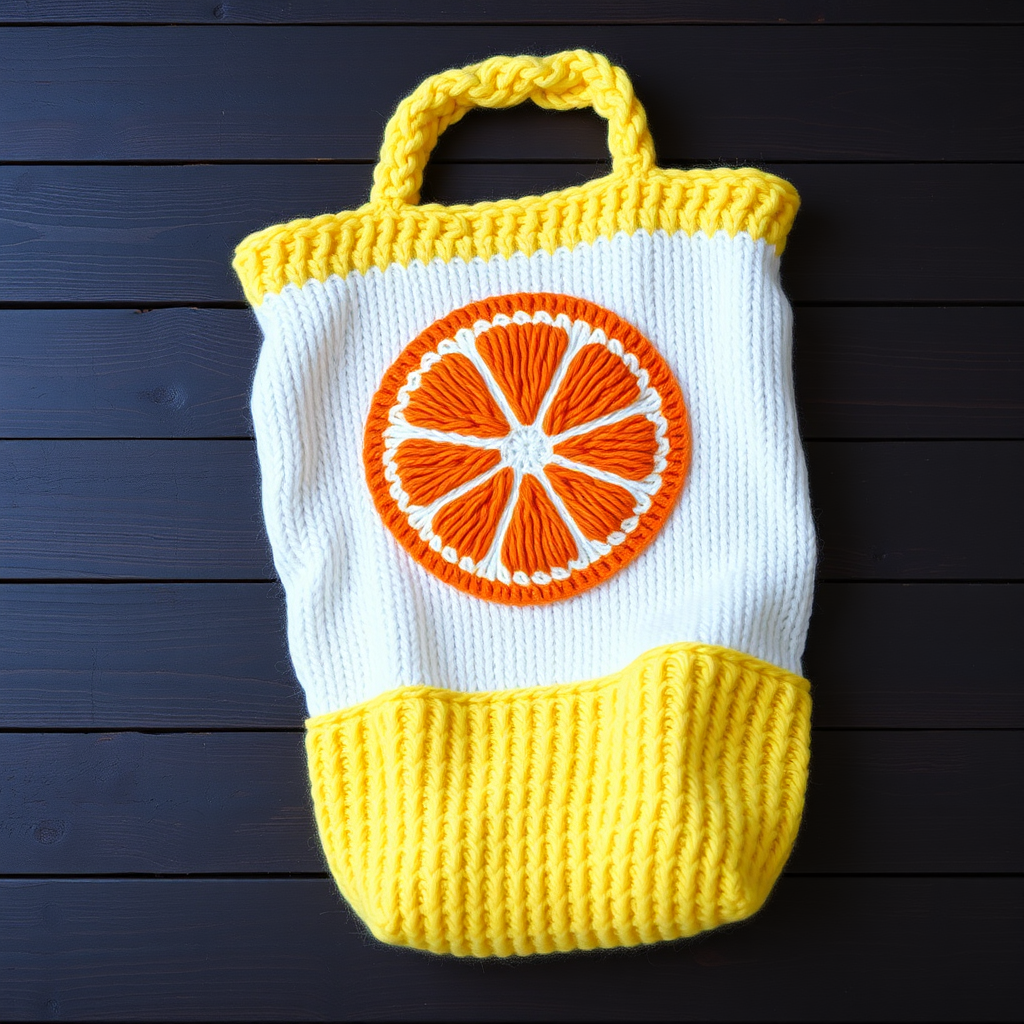
Carry a Slice of Sunshine: Knit the Sun-Kissed Citrus Tote Bag
There's something magical about a handmade bag—it's not just an accessory, but a little piece of art you can carry with you. The Sun-Kissed Citrus Tote Bag is exactly that: a vibrant, textured market bag that brings a burst of summer cheer to any outing. Whether you're heading to the farmers' market, planning a beach day, or just running everyday errands, this sturdy and stylish tote is the perfect companion. With its cheerful citrus hues and a clever intarsia motif, this pattern is a delightful project for knitters ready to explore colorwork while creating something truly functional.
This pattern is designed to be approachable, using simple knit and purl stitches with a touch of intarsia to create a stunning orange slice motif. The result is a bag that's as beautiful as it is practical, with a flat bottom, sturdy garter-stitch handles, and a roomy rectangular shape. Let's dive in and start knitting your own slice of sunshine!
Materials Needed
Before you begin, gather your supplies. This project uses worsted weight cotton yarn, which is perfect for a sturdy, durable bag that holds its shape beautifully.
Yarn
- Worsted weight cotton yarn (e.g., Lion Brand 24/7 Cotton)
- Color A (Lemon Yellow): Approximately 250g (for the main body and handles)
- Color B (Tangerine Orange): Approximately 150g (for the outer citrus slice)
- Color C (White): Approximately 100g (for the inner citrus slice)
Needles & Notions
- US 7 (4.5 mm) knitting needles
- Tapestry needle (for seaming and weaving in ends)
- Stitch markers (optional, but helpful for keeping track of sections)
Gauge
20 stitches and 26 rows = 4 inches in stockinette stitch. Be sure to check your gauge before starting to ensure your bag turns out the right size.
Step-by-Step Instructions
This bag is knitted flat in two identical panels, which are then seamed together. Each panel features a textured citrus slice motif created with intarsia and simple knit/purl textures. Don't worry if you're new to intarsia—the pattern is straightforward, and the results are well worth it!
Panel 1 (Make 2)
Cast On & Garter Border
Cast on: With yarn A (Lemon), cast on 40 stitches.
Rows 1-6 (Garter border): Knit all stitches. This creates a sturdy, bumpy edge that will form the top and bottom of your bag panel.
Main Body with Citrus Motif
Now we'll begin the main body of the panel, which features a stockinette stitch center with garter stitch edges. The citrus motif will be worked using intarsia, where you use separate balls of yarn for each color section.
Rows 7-20 (Stockinette with garter edges):
- Row 7 (RS): Knit 5 (garter edge), purl 30, knit 5 (garter edge).
- Row 8 (WS): Knit 5, knit 30, knit 5. (This is a knit row, creating stockinette on the RS.)
- Repeat rows 7-8 for 6 more times (a total of 14 rows of stockinette with garter edges). This gives you a solid yellow base before the motif begins.
Rows 21-32 (Citrus Slice Motif): This is where the magic happens! You'll be working with multiple colors. Remember to twist the yarns together when changing colors to avoid holes.
- Row 21 (RS): Knit 5 (A), with yarn B (Tangerine) knit 10, with yarn A knit 10, with yarn B knit 10, knit 5 (A).
- Row 22 (WS): Knit 5 (A), with B purl 10, with A purl 10, with B purl 10, knit 5 (A).
- Rows 23-24: Repeat rows 21-22. This creates the first section of the orange outer ring.
- Row 25 (RS): Knit 5 (A), with B knit 10, with C (White) knit 10, with B knit 10, knit 5 (A).
- Row 26 (WS): Knit 5 (A), with B purl 10, with C purl 10, with B purl 10, knit 5 (A).
- Rows 27-28: Repeat rows 25-26. Now you have the white inner circle started.
- Row 29 (RS): Knit 5 (A), with B knit 10, with A knit 10, with B knit 10, knit 5 (A).
- Row 30 (WS): Knit 5 (A), with B purl 10, with A purl 10, with B purl 10, knit 5 (A).
- Rows 31-32: Repeat rows 29-30. This completes the orange ring around the white center.
Rows 33-40 (Finish body): Continue in stockinette with garter edges using yarn A only.
- Row 33 (RS): Knit 5, purl 30, knit 5.
- Row 34 (WS): Knit all stitches.
- Repeat rows 33-34 for 3 more times (a total of 8 rows). This gives you a nice yellow border below the citrus motif.
Garter Border & Bind Off
Rows 41-46 (Garter border): Knit all stitches.
Bind off: Bind off all stitches loosely. This prevents the top edge from being too tight.
Repeat for the second panel. Make sure both panels are identical.
Seaming the Panels
Now it's time to bring your bag together!
- Prepare: Place the two panels with right sides together.
- Sew side seams: Using your tapestry needle and yarn A, sew the side seams using the mattress stitch. This creates an invisible, sturdy seam.
- Sew bottom seam: Sew the bottom seam the same way, leaving the top open.
- Turn: Turn the bag right side out. You should now have a rectangular bag with a flat bottom.
Handles (Make 2)
These sturdy garter-stitch handles are simple to knit and incredibly strong.
- Cast on: With yarn A, cast on 8 stitches.
- Knit: Knit in garter stitch (knit every row) until the handle measures 18 inches long.
- Bind off: Bind off all stitches.
- Attach: Sew one handle to each side of the bag opening. Place them about 3 inches apart from the side seams, ensuring they are evenly spaced and securely attached.
Finishing Touches
- Weave in ends: Carefully weave in all loose ends using your tapestry needle. Make sure they are secure so they don't unravel with use.
- Optional lining: For extra durability and to prevent items from poking through, you can add a fabric lining. Cut a piece of fabric to fit the inside of the bag, sew it into a bag shape, and hand-stitch it inside the knitted bag.
And there you have it—your very own Sun-Kissed Citrus Tote Bag! This vibrant, handmade accessory is perfect for carrying everything from fresh produce to beach essentials. The cheerful colors and textured motif are sure to brighten your day and draw compliments wherever you go. Happy knitting!


