The Frosted Tundra Bear Free Pattern – A Crocheted Polar Bear with Snowdrift Texture
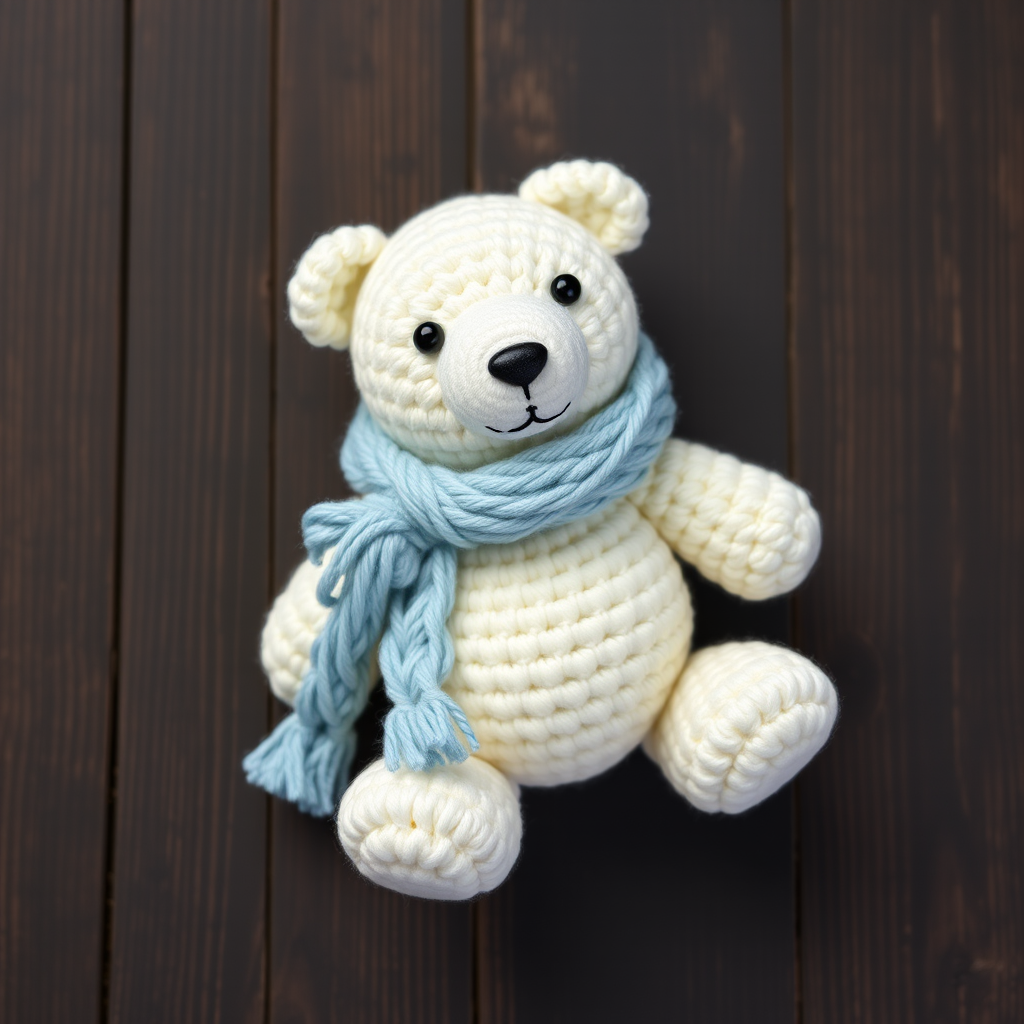
The Frosted Tundra Bear: A Beginner-Friendly Crochet Polar Bear Pattern
There is something deeply calming about the quiet beauty of the Arctic—the soft glow of snow, the gentle hush of a winter landscape, and the serene presence of its most iconic inhabitant. With this free crochet pattern, you can bring that peaceful winter magic into your home. The Frosted Tundra Bear is a plush, cuddly polar bear amigurumi with a snow-kissed body and delicate frost-blue accents. Whether you're looking for a cozy winter decoration, a heartfelt handmade gift for a loved one, or simply a delightful weekend project, this pattern is designed with beginners in mind. Grab your hook, settle in with your favorite yarn, and let's create something truly special together.
Materials Needed
Before we begin, let's gather everything you'll need for this project. The Frosted Tundra Bear uses simple, readily available materials, making it an accessible project for crocheters of all skill levels.
- Yarn: Worsted weight yarn in three colors:
- Ivory white (main color for the body)
- Soft blue (for the scarf accent)
- Black (for the nose and mouth details)
- Crochet Hook: 3.5mm (E) hook
- Stuffing: Polyester fiberfill or your preferred amigurumi stuffing
- Yarn needle: For sewing pieces together and weaving in ends
- Stitch markers: To keep track of your rounds
- Scissors
- Optional: Safety eyes (6mm) or black embroidery thread for the eyes
Gauge: 4 sc x 4 rows = 1 inch. Gauge is not critical for amigurumi, but maintaining consistent tension throughout your work will ensure a neat, professional finish.
Step-by-Step Instructions
This pattern is worked in continuous spiral rounds unless otherwise noted. Do not join at the end of rounds unless specified—just keep working in a spiral. Use a stitch marker to mark the beginning of each round.
Head
Start with your ivory white yarn.
- Round 1: Magic ring, 6 sc into the ring. (6 stitches)
- Round 2: Increase in each stitch around. (12 stitches)
- Round 3: (Sc in next stitch, inc in next stitch) repeat around. (18 stitches)
- Round 4: (Sc in next 2 stitches, inc in next stitch) repeat around. (24 stitches)
- Round 5: (Sc in next 3 stitches, inc in next stitch) repeat around. (30 stitches)
- Rounds 6-10: Sc in each stitch around. (30 stitches) — Work 5 rounds even.
- Round 11: (Sc in next 3 stitches, decrease) repeat around. (24 stitches)
- Round 12: (Sc in next 2 stitches, decrease) repeat around. (18 stitches)
Stuff the head firmly with fiberfill. The head should be nice and round, so make sure to stuff it well, especially at the top. Leave a long tail for sewing the head to the body later.
Body
Using ivory white yarn.
- Round 1: Magic ring, 6 sc into the ring. (6 stitches)
- Round 2: Increase in each stitch around. (12 stitches)
- Round 3: (Sc in next stitch, inc in next stitch) repeat around. (18 stitches)
- Round 4: (Sc in next 2 stitches, inc in next stitch) repeat around. (24 stitches)
- Round 5: (Sc in next 3 stitches, inc in next stitch) repeat around. (30 stitches)
- Rounds 6-12: Sc in each stitch around. (30 stitches) — Work 7 rounds even.
- Round 13: (Sc in next 3 stitches, decrease) repeat around. (24 stitches)
- Round 14: (Sc in next 2 stitches, decrease) repeat around. (18 stitches)
Stuff the body firmly. Leave a long tail for sewing the body to the head.
Ears (Make 2)
Using ivory white yarn.
- Round 1: Magic ring, 6 sc into the ring. (6 stitches)
- Round 2: Increase in each stitch around. (12 stitches)
- Rounds 3-4: Sc in each stitch around. (12 stitches) — Work 2 rounds even.
Do not stuff the ears. Fold each ear flat and sew the opening closed. Set aside for assembly.
Muzzle
Using ivory white yarn (or a slightly lighter shade if you have it).
- Round 1: Magic ring, 6 sc into the ring. (6 stitches)
- Round 2: Increase in each stitch around. (12 stitches)
- Round 3: (Sc in next stitch, inc in next stitch) repeat around. (18 stitches)
Fasten off, leaving a long tail for sewing. The muzzle will be a flat oval—do not stuff it. Set aside for assembly.
Eyes
Using black yarn, embroider the eyes, or attach safety eyes if you prefer. Position the eyes between Rounds 7 and 8 of the head, spaced approximately 6 stitches apart. If embroidering, use a yarn needle and black yarn to create small, neat French knots or satin stitches. For safety eyes, insert them before stuffing the head fully—ideally after Round 10 so you can secure them properly from the inside.
Arms (Make 2)
Using ivory white yarn.
- Round 1: Magic ring, 6 sc into the ring. (6 stitches)
- Round 2: (Sc in next stitch, inc in next stitch) repeat around. (9 stitches)
- Rounds 3-8: Sc in each stitch around. (9 stitches) — Work 6 rounds even.
Stuff the arms lightly—just enough to give them shape, but keep them soft and flexible. Flatten the opening and sew it closed. Set aside for assembly.
Legs (Make 2)
Using ivory white yarn.
- Round 1: Magic ring, 6 sc into the ring. (6 stitches)
- Round 2: Increase in each stitch around. (12 stitches)
- Rounds 3-6: Sc in each stitch around. (12 stitches) — Work 4 rounds even.
Stuff the legs firmly. Flatten the opening and sew it closed. Set aside for assembly.
Tail
Using ivory white yarn.
- Round 1: Magic ring, 6 sc into the ring. (6 stitches)
- Round 2: (Sc in next stitch, inc in next stitch) repeat around. (9 stitches)
- Rounds 3-4: Sc in each stitch around. (9 stitches) — Work 2 rounds even.
Stuff the tail lightly. Flatten the opening and sew it closed. Set aside for assembly.
Snowdrift Scarf
Using soft blue yarn.
- Row 1: Chain 40. Sc in the 2nd chain from the hook and in each chain across. (39 stitches) Turn.
- Rows 2-4: Chain 1, sc in each stitch across. (39 stitches) Turn.
Fasten off and weave in the ends. The scarf will be a simple rectangle that wraps around the bear's neck.
Assembly
Now comes the fun part—bringing your Frosted Tundra Bear to life! Follow these steps carefully to ensure a polished, professional finish.
Step 1: Attach the Muzzle and Face Details
Position the muzzle on the front of the head, centered between where the eyes will be. Sew it in place using the long tail left from the muzzle. Using black yarn, embroider a small triangle or oval nose at the top center of the muzzle. Then, create a gentle smile by stitching a curved line downward from the nose. Keep the expression soft and serene—this bear is calm and friendly.
Step 2: Attach the Ears
Position the ears on either side of the head, about 3-4 rounds down from the top. They should sit slightly toward the back of the head, not directly on top. Sew them securely using the tails left from the ears.
Step 3: Attach the Head to the Body
Align the head on top of the body, making sure the muzzle faces forward. Using the long tail from the body, sew the head to the body with a whip stitch, going through both pieces. Take your time to ensure the head is centered and secure. Weave in the end.
Step 4: Attach the Arms
Position the arms on either side of the body, about 2-3 rounds down from the neck seam. They should be angled slightly forward, as if the bear is ready for a hug. Sew them securely using the tails left from the arms.
Step 5: Attach the Legs
Position the legs at the bottom of the body, spaced evenly apart. They should be centered under the body so the bear can sit or stand comfortably. Sew them securely using the tails left from the legs.
Step 6: Attach the Tail
Position the tail on the back of the body, slightly above the bottom edge. Sew it securely using the tail left from the tail piece.
Step 7: Add the Scarf
Wrap the blue scarf around the bear's neck, positioning it so the ends hang down the front. You can either sew it in place or tie it in a loose knot. For a more polished look, sew the scarf to the body at a few points to keep it from shifting.
Step 8: Final Touches
Weave in all remaining ends. Give your bear a gentle squeeze to make sure all parts are secure. If any stuffing feels lumpy, adjust it through the seams. Your Frosted Tundra Bear is now complete!
Tips for a Perfect Finish
- Consistent tension: Keep your stitches even throughout. This is the key to a smooth, professional-looking amigurumi.
- Stuffing: Use small amounts of stuffing at a time to avoid lumps. The head and body should be firm, but the arms and tail should be soft.
- Invisible decreases: When decreasing, use the invisible decrease technique (insert hook into the front loop of the next two stitches, yarn over, pull through, yarn over, pull through both loops) for a cleaner finish.
- Take breaks: If your hands get tired, take a break. Crocheting should be relaxing, not stressful.
Your Frosted Tundra Bear is now ready to bring a touch of arctic serenity to your home. Whether perched on a shelf, nestled in a cozy corner, or gifted to someone special, this little bear is sure to warm hearts all winter long. Happy crocheting!


