The Midnight Web Weaver: A Free Crochet Pattern for a Textured Spider and Web Wall Hanging
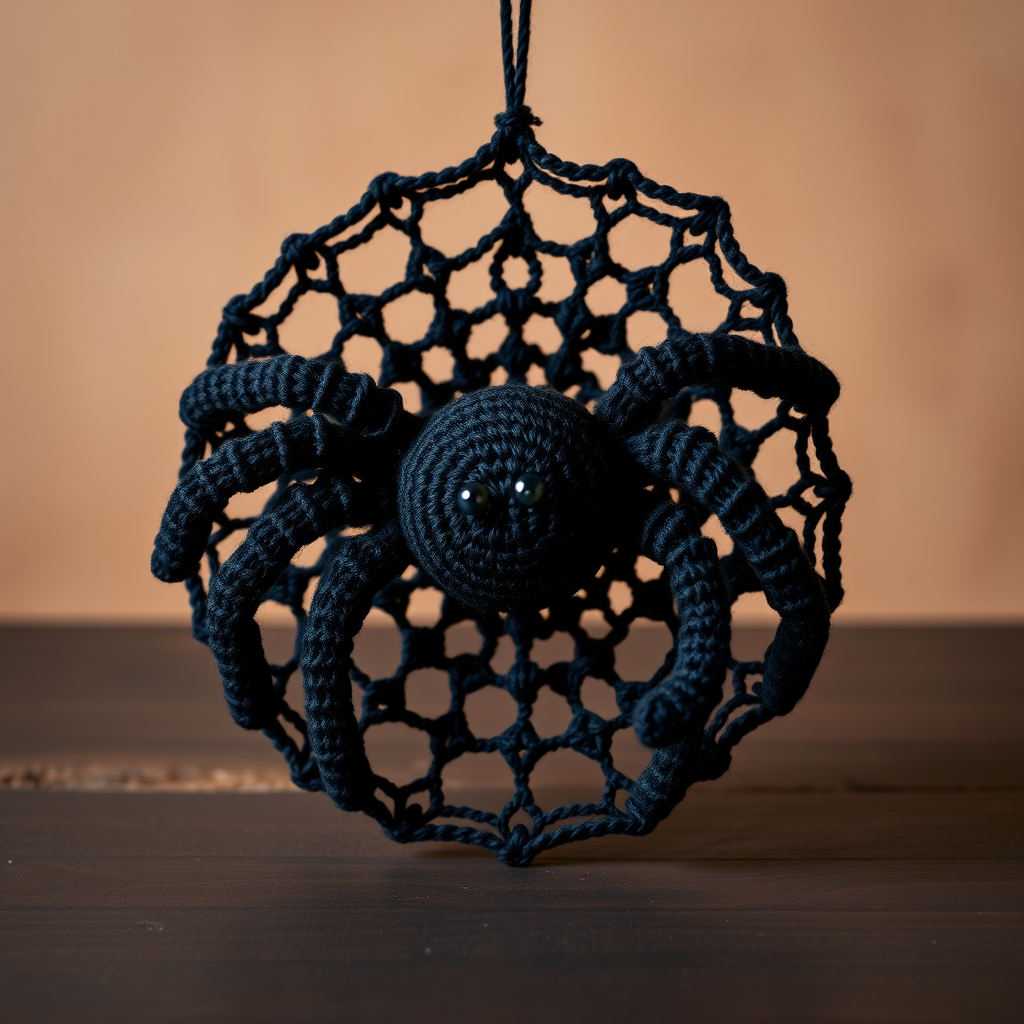
Introducing the Midnight Web Weaver: A Textured Spider & Web Wall Hanging
Are you ready to add a touch of cozy, gothic elegance to your home decor? The Midnight Web Weaver is a stunning, dimensional crochet wall hanging that combines the charm of amigurumi with the delicate beauty of lacework. This free pattern guides you through creating a plush, textured spider and a lacy, symmetrical web, resulting in a unique handmade accent perfect for Halloween, gothic interiors, or any room that needs a bit of whimsical edge. Using simple stitches and worsted-weight yarn, you’ll craft a piece that is both soft and visually striking—a true conversation starter.
Materials Needed
Before you begin, gather the following supplies. Gauge is not critical for this project, but using the recommended hook sizes will ensure the correct texture and drape.
- Yarn: Worsted weight (#4) yarn in black (for the spider and web), a contrasting color like deep purple or silver (for spider details), and a small amount of white for the eyes.
- Crochet Hooks: Size G (4.0 mm) for the spider, size H (5.0 mm) for the web.
- Notions: Tapestry needle, stitch markers, and a small amount of polyester fiberfill for stuffing the spider.
- Gauge (for web reference): A 4-inch square of double crochet with the H hook should have approximately 12 stitches and 6 rows.
Step-by-Step Instructions
Part 1: Crocheting the Spider Body (Make 2 Pieces, Then Join)
Note: The spider body is worked in continuous rounds. Use a stitch marker to mark the beginning of each round.
Round 1: With black yarn and the 4.0 mm hook, make a magic ring. Work 6 single crochet (sc) into the ring. Pull the tail to close the ring tightly. (6 stitches)
Round 2: Increase (inc) in each stitch around. To inc, work 2 sc into the same stitch. (12 stitches)
Round 3: *Sc in the next stitch, inc in the next stitch.* Repeat from * to * around. (18 stitches)
Round 4: *Sc in the next 2 stitches, inc in the next stitch.* Repeat from * to * around. (24 stitches)
Rounds 5-8: Sc in each stitch around. Do not increase or decrease. (24 stitches per round)
Round 9: *Sc in the next 2 stitches, decrease (dec) over the next 2 stitches.* Repeat from * to * around. To dec, insert hook into the next stitch, yarn over and pull up a loop, insert hook into the following stitch, yarn over and pull up a loop, yarn over and pull through all 3 loops on hook. (18 stitches)
Round 10: *Sc in the next stitch, dec over the next 2 stitches.* Repeat from * to * around. (12 stitches)
Fasten off, leaving a long tail (about 12 inches) for sewing. Repeat these 10 rounds to make a second identical piece. Do not fasten off the second piece. Instead, place both pieces together with wrong sides facing each other. Using the working yarn from the second piece, single crochet through both layers around the entire edge. Before closing the seam completely, lightly stuff the spider body with fiberfill through the remaining opening. Continue sc around to close, then slip stitch to the first sc. Fasten off and weave in the end.
Part 2: Making the Spider Legs (Make 8)
Each leg is a simple chain of slip stitches, creating a thin, flexible appendage.
With black yarn and the 4.0 mm hook, chain 25. Starting in the 2nd chain from the hook, slip stitch (sl st) in each chain across. Fasten off, leaving a 6-inch tail for sewing. Repeat to make a total of 8 legs.
Attaching the Legs: Sew 4 legs to each side of the spider body. Position them evenly along the sides, spacing them about 1 inch apart. The legs should curve slightly outward and downward.
Part 3: Creating the Spider Eyes (Make 2)
With white yarn and the 4.0 mm hook, make a magic ring. Work 6 sc into the ring. Pull the tail to close. Fasten off, leaving a 4-inch tail. Sew one eye onto the front of the spider body, near the top center. Repeat for the second eye, placing it next to the first. Using black yarn and a tapestry needle, embroider a small French knot or a straight stitch in the center of each white eye to create the pupil.
Part 4: Crocheting the Lacy Spider Web
Use the 5.0 mm hook and black yarn for the web. The web is worked in joined rounds.
Foundation Ring: Chain 6, slip stitch to the first chain to form a ring.
Round 1: Chain 3 (counts as a double crochet, dc). Work 2 dc into the ring. Chain 3. *Work 3 dc into the ring, chain 3.* Repeat from * to * 3 more times (4 groups of 3 dc total). Slip stitch to the top of the beginning chain-3 to close the round.
Round 2: Slip stitch into the next chain-3 space. Chain 3 (counts as dc). In the same space, work (2 dc, chain 3, 3 dc). Chain 1. *In the next chain-3 space, work (3 dc, chain 3, 3 dc). Chain 1.* Repeat from * to * around. Slip stitch to the top of the beginning chain-3.
Round 3: Slip stitch into the next chain-3 space. Chain 3 (counts as dc). In the same space, work (2 dc, chain 3, 3 dc). Chain 2. Single crochet (sc) in the next chain-1 space. Chain 2. *In the next chain-3 space, work (3 dc, chain 3, 3 dc). Chain 2. Sc in the next chain-1 space. Chain 2.* Repeat from * to * around. Slip stitch to the top of the beginning chain-3.
Round 4: Slip stitch into the next chain-3 space. Chain 3 (counts as dc). In the same space, work (2 dc, chain 3, 3 dc). Chain 3. Sc in the next chain-2 space. Chain 3. Sc in the next chain-2 space. Chain 3. *In the next chain-3 space, work (3 dc, chain 3, 3 dc). Chain 3. Sc in the next chain-2 space. Chain 3. Sc in the next chain-2 space. Chain 3.* Repeat from * to * around. Slip stitch to the top of the beginning chain-3.
Round 5: Slip stitch into the next chain-3 space. Chain 3 (counts as dc). In the same space, work (2 dc, chain 3, 3 dc). Chain 4. Sc in the next chain-3 space. Chain 4. Sc in the next chain-3 space. Chain 4. Sc in the next chain-3 space. Chain 4. *In the next chain-3 space, work (3 dc, chain 3, 3 dc). Chain 4. Sc in the next chain-3 space. Chain 4. Sc in the next chain-3 space. Chain 4. Sc in the next chain-3 space. Chain 4.* Repeat from * to * around. Slip stitch to the top of the beginning chain-3. Fasten off and weave in the end.
Part 5: Assembly and Finishing
Attaching the Spider: Position the stuffed spider in the center of the web. Using a tapestry needle and black yarn, sew the spider securely to the web, stitching through the bottom of the spider body and the web’s center ring. Make sure it is firmly attached.
Creating a Hanging Loop: With black yarn and the 5.0 mm hook, attach the yarn to the top of the web (between two of the outer chain-4 spaces). Chain 20. Slip stitch back into the same spot on the web to form a loop. Fasten off and weave in the ends.
Final Touches: Weave in all remaining yarn tails using a tapestry needle. Gently shape the web and spider legs as desired. Your Midnight Web Weaver is now ready to hang and enjoy!


