The Moonlit Grove Guardian Owl Free Pattern – Crochet a Celestial Woodland Charm
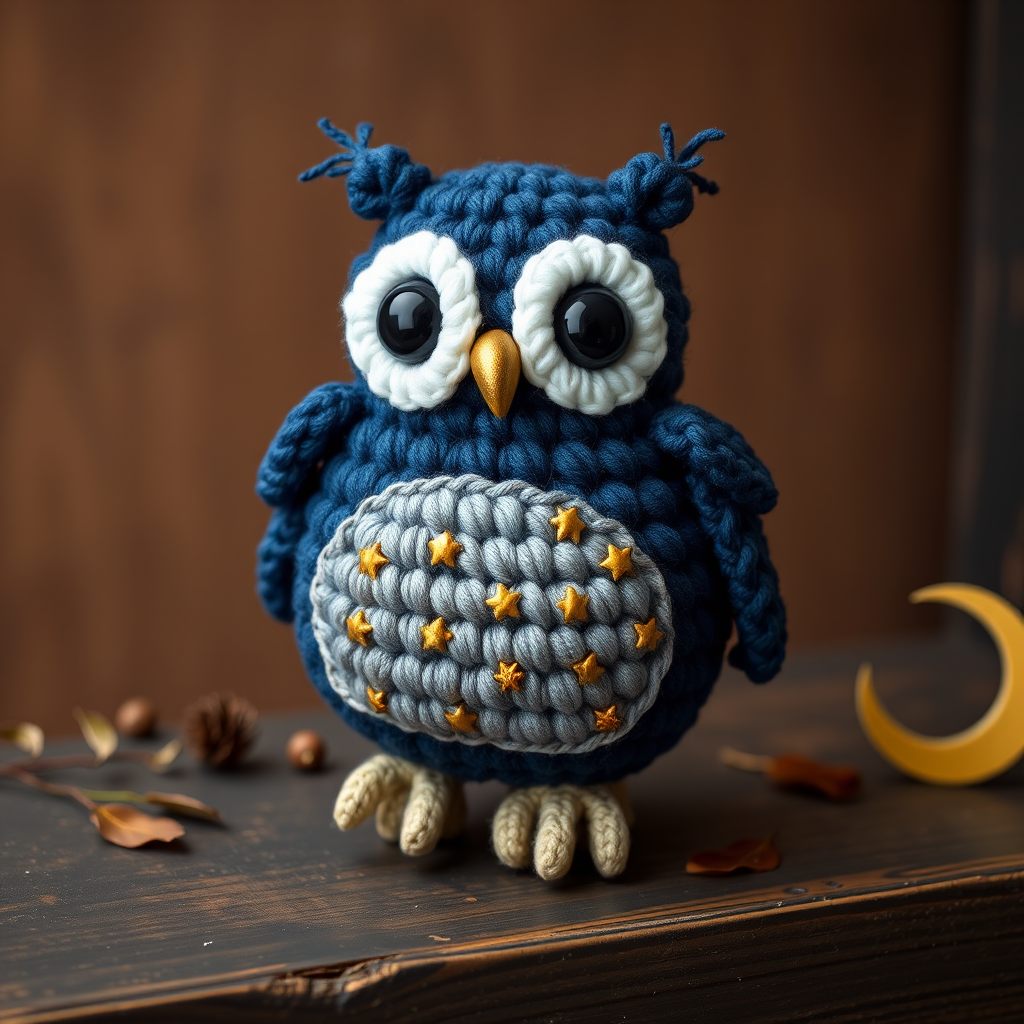
The Moonlit Grove Guardian Owl – A Celestial Crochet Companion
There's something magical about bringing a bit of twilight indoors. This enchanting amigurumi owl, with its deep indigo body and silver, star-speckled belly, is more than just a crochet project—it's a tiny guardian of dreams. Whether perched on a nursery shelf, a cozy reading nook, or given as a handmade gift, this celestial woodland charm is sure to capture hearts. With its oversized, luminous eyes and soft, feathered texture, this pattern is perfect for intermediate beginners ready to try something special. Let's gather our materials and bring this moonlit guardian to life!
Materials Needed
Before we begin our crochet journey, let's ensure you have everything you need. This project uses thick, plush yarn for a wonderfully soft and huggable finish.
- Yarn: Premier Yarns Parfait Chunky (100% polyester, 100g/120yds) in the following colors:
- Indigo (main body and wings) – 1 skein
- Silver (belly patch) – 1 skein
- White (eyes) – small amount
- Gold (beak, feet, and star embroidery) – small amount
- Hook: US Size G/6 (4.0mm) crochet hook
- Other Supplies:
- Stitch marker (to track rounds)
- Tapestry needle (for sewing and embroidery)
- Fiberfill stuffing
- Scissors
Note on gauge: Gauge is not critical for amigurumi, but consistency is key. Aim for 4 rounds of single crochet (sc) to equal 2 inches in diameter. This ensures your owl is firm enough to hold its shape but soft enough to be cuddly.
Step-by-Step Instructions
This pattern is worked in continuous spirals unless otherwise noted. Always use a stitch marker to track your rounds—it's a lifesaver! Let's begin with the main body and head, which are worked as one seamless piece.
Head & Body (Worked as One Piece)
We'll start at the top of the head and work our way down to the base of the body.
- Round 1: With Indigo yarn, make a magic ring, work 6 single crochet (sc) into the ring. (6 stitches)
- Round 2: Work 2 sc in each stitch around. (12 stitches)
- Round 3: *Sc in next stitch, 2 sc in next stitch*; repeat from * to * around. (18 stitches)
- Round 4: *Sc in next 2 stitches, 2 sc in next stitch*; repeat around. (24 stitches)
- Round 5: *Sc in next 3 stitches, 2 sc in next stitch*; repeat around. (30 stitches)
- Round 6: *Sc in next 4 stitches, 2 sc in next stitch*; repeat around. (36 stitches)
- Round 7: *Sc in next 5 stitches, 2 sc in next stitch*; repeat around. (42 stitches)
- Round 8: *Sc in next 6 stitches, 2 sc in next stitch*; repeat around. (48 stitches)
- Rounds 9-16: Sc in each stitch around. (48 stitches) – This creates the tall, round head and upper body.
- Round 17: *Sc in next 6 stitches, sc2tog (single crochet 2 together)*; repeat around. (42 stitches)
- Round 18: *Sc in next 5 stitches, sc2tog*; repeat around. (36 stitches)
- Round 19: *Sc in next 4 stitches, sc2tog*; repeat around. (30 stitches)
- Round 20: *Sc in next 3 stitches, sc2tog*; repeat around. (24 stitches)
- Stuff firmly: Now is the time to stuff your owl with fiberfill. Make sure it's nice and plump, but not so tight that the stitches stretch.
- Round 21: *Sc in next 2 stitches, sc2tog*; repeat around. (18 stitches)
- Round 22: *Sc in next stitch, sc2tog*; repeat around. (12 stitches)
- Round 23: Sc2tog around. (6 stitches)
- Finish: Fasten off, leaving a long tail. Weave the tail through the remaining front loops and pull tight to close the hole. Weave in the end securely.
Belly Patch
This silver patch will become the owl's starry night sky. It's worked in a flat spiral.
- Round 1: With Silver yarn, make a magic ring, 6 sc in ring. (6)
- Round 2: 2 sc in each stitch around. (12)
- Round 3: *Sc in next stitch, 2 sc in next stitch*; repeat around. (18)
- Round 4: *Sc in next 2 stitches, 2 sc in next stitch*; repeat around. (24)
- Round 5: *Sc in next 3 stitches, 2 sc in next stitch*; repeat around. (30)
- Finish: Fasten off, leaving a long tail for sewing.
Add the Stars: Using your tapestry needle and Gold yarn, embroider small, random stars across the silver belly. A simple star can be made with a straight stitch in a plus or asterisk shape. Get creative—each owl will have its own unique constellation!
Wings (Make 2)
These are worked in flat rows, not spirals, to create a slightly pointed wing shape.
- Row 1: With Indigo yarn, chain (ch) 6. Sc in the 2nd ch from the hook and in each ch across. (5 stitches)
- Row 2: Ch 1, turn. Sc in next 4 stitches, sc2tog. (4 stitches)
- Row 3: Ch 1, turn. Sc in next 3 stitches, sc2tog. (3 stitches)
- Row 4: Ch 1, turn. Sc in next 2 stitches, sc2tog. (2 stitches)
- Row 5: Ch 1, turn. Sc2tog. (1 stitch)
- Finish: Fasten off, leaving a long tail for sewing. The wings should look like small, neat triangles.
Eyes (Make 2)
These large, luminous eyes are what give the owl its wise and gentle expression.
- Round 1: With White yarn, make a magic ring, 6 sc in ring. (6)
- Round 2: 2 sc in each stitch around. (12)
- Round 3: *Sc in next stitch, 2 sc in next stitch*; repeat around. (18)
- Finish: Fasten off, leaving a long tail for sewing.
Add the Pupils: Using Indigo yarn and a tapestry needle, embroider a large, filled-in pupil in the center of each eye using a satin stitch. Make them big and bold for maximum charm!
Beak
This tiny gold beak is worked in a simple oval shape.
- With Gold yarn, ch 4. Sc in the 2nd ch from the hook, sc in the next ch, work 3 sc in the last ch. Now, working around the other side of the chain, sc in the next ch, and 2 sc in the last ch.
- Finish: Fasten off, leaving a tail for sewing. This creates a small, rounded diamond shape.
Ear Tufts (Make 2)
These little points add so much personality to the owl's head.
- With Indigo yarn, ch 5. Sc in the 2nd ch from the hook and in the next 3 chs. (4 stitches)
- Finish: Fasten off, leaving a tail for sewing. These will be small, flat triangles.
Feet (Make 2)
These cute little gold ovals will ground your owl.
- Round 1: With Gold yarn, make a magic ring, 6 sc in ring. (6)
- Round 2: *Sc in next stitch, 2 sc in next stitch*; repeat around. (9)
- Rounds 3-4: Sc in each stitch around. (9)
- Finish: Fasten off, leaving a long tail for sewing. Stuff lightly before closing.
Assembly
Now for the fun part—bringing your owl to life! Use the long tails left on each piece and your tapestry needle for sewing.
- Belly Patch: Position the silver belly patch on the front of the body, centered below the head area. Whip-stitch it securely in place, hiding your stitches within the yarn.
- Wings: Sew the wings to the sides of the body, positioning them slightly angled upward for a lively look.
- Eyes: Sew the eyes onto the head, placing them close together for that adorable, wise owl expression.
- Beak: Sew the beak between and slightly below the eyes, centered on the face.
- Ear Tufts: Sew the ear tufts to the top of the head, slightly to the sides for a tufted look.
- Feet: Sew the feet to the bottom of the body, ensuring your owl sits up straight.
Once everything is attached, weave in all ends securely. Give your owl a gentle squeeze to shape it, and admire your handiwork!
Your Moonlit Grove Guardian Owl is now complete. This celestial companion is perfect for gifting, decorating, or simply adding a touch of woodland magic to your day. Happy crocheting!


