The Snuggle-Snout Teddy Bear Hat: A Free Crochet Pattern for a Textured, Heirloom-Quality Animal Hat
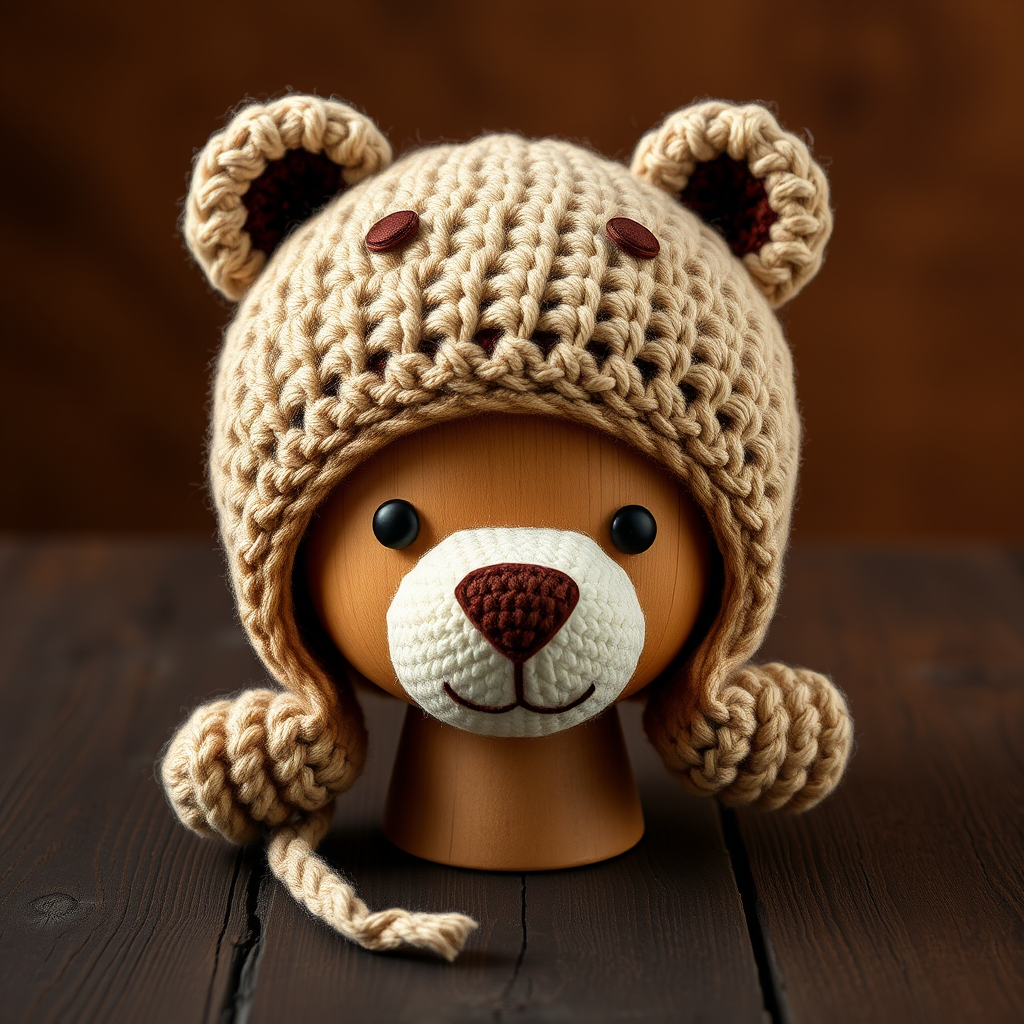
Introduction: A Wearable Hug for Your Little One
This isn't just a hat; it's a wearable hug. The Snuggle-Snout Teddy Bear Hat combines a classic, cozy beanie with a fully dimensional, snout-forward teddy bear face, creating a charming and unique accessory for little ones. Designed to be an heirloom-quality piece, this textured hat is perfect for babies and toddlers, offering both warmth and undeniable cuteness. The combination of a warm oatmeal base, chocolate brown accents, and a pale cream snout gives it a soft, rustic, handmade feel that will be treasured for years. Whether for a photoshoot, a chilly day, or a thoughtful gift, this pattern is a joy to create.
Materials Needed
Before you begin, gather the following materials. Using the exact yarn weight and hook size is essential to achieve the correct gauge and finished size.
- Yarn: Worsted weight (Category 4) yarn in three colors:
- Main Color (MC): Warm oatmeal – approximately 200 yards
- Contrast Color 1 (CC1): Soft chocolate brown – approximately 50 yards
- Contrast Color 2 (CC2): Pale cream – approximately 30 yards
- Hook: Size G/6 (4.0 mm) crochet hook, or size needed to obtain gauge.
- Notions: Tapestry needle for weaving ends and sewing pieces together.
- Gauge: 16 sc x 18 rows = 4 inches (10 cm) in single crochet. Gauge is critical for hat size. Always make a gauge swatch before starting.
Step-by-Step Instructions
This pattern is worked in the round for the hat body and snout, then assembled. The hat is designed to fit a toddler/child (approx. 18-20 inch head circumference). Adjust hook size for different sizes. All pieces are worked in continuous rounds unless otherwise stated.
HAT BODY (worked in continuous rounds with MC)
Note: Do not join at the end of rounds; use a stitch marker to keep track of the first stitch of each round.
- Round 1: Make a magic ring, work 6 single crochet (sc) into the ring. (6 sts)
- Round 2: Work 2 sc in each stitch around. (12 sts)
- Round 3: *Sc in next stitch, 2 sc in next stitch* repeat around. (18 sts)
- Round 4: *Sc in next 2 stitches, 2 sc in next stitch* repeat around. (24 sts)
- Round 5: *Sc in next 3 stitches, 2 sc in next stitch* repeat around. (30 sts)
- Round 6: *Sc in next 4 stitches, 2 sc in next stitch* repeat around. (36 sts)
- Round 7: *Sc in next 5 stitches, 2 sc in next stitch* repeat around. (42 sts)
- Round 8: *Sc in next 6 stitches, 2 sc in next stitch* repeat around. (48 sts)
- Round 9: *Sc in next 7 stitches, 2 sc in next stitch* repeat around. (54 sts)
- Round 10: *Sc in next 8 stitches, 2 sc in next stitch* repeat around. (60 sts)
- Rounds 11-20: Sc in each stitch around. (60 sts) - This creates the hat depth. For a larger size, add more rounds here (e.g., 2-4 more rounds for an adult size).
- Round 21 (Optional Shaping): *Sc in next 8 stitches, sc2tog (single crochet two together)* repeat around. (54 sts) - This creates a slight taper for a snug fit. If you prefer a straight edge, skip this round.
- Fasten off, leaving a 6-inch tail. Weave the tail through the last round stitches and pull tight to close the top if desired, or simply weave in the end. Weave in all ends securely.
EAR FLAPS (make 2 with MC)
Worked in rows. These will be sewn to the bottom edge of the hat.
- Row 1: Chain 8. Single crochet in the 2nd chain from the hook and in each chain across. (7 sts)
- Row 2: Chain 1, turn. Single crochet two together (sc2tog), single crochet in the next 3 stitches, sc2tog. (5 sts)
- Row 3: Chain 1, turn. Sc2tog, single crochet in the next stitch, sc2tog. (3 sts)
- Row 4: Chain 1, turn. Single crochet three together (sc3tog). (1 st)
- Fasten off, leaving a long tail (approx. 12 inches) for sewing. Sew ear flaps to the bottom edge of the hat, centered under where the ears will be placed (see assembly).
EARS (make 2 with CC1)
Worked in continuous rounds.
- Round 1: Magic ring, work 6 sc into the ring. (6 sts)
- Round 2: 2 sc in each stitch around. (12 sts)
- Round 3: *Sc in next stitch, 2 sc in next stitch* repeat around. (18 sts)
- Round 4: Sc in each stitch around. (18 sts)
- Fasten off, leaving a long tail (approx. 12 inches) for sewing. Sew ears to the top of the hat, slightly forward of center (about 2-3 inches apart, depending on head size).
SNOUT (worked in continuous rounds with CC2)
- Round 1: Magic ring, work 6 sc into the ring. (6 sts)
- Round 2: 2 sc in each stitch around. (12 sts)
- Round 3: *Sc in next stitch, 2 sc in next stitch* repeat around. (18 sts)
- Round 4: *Sc in next 2 stitches, 2 sc in next stitch* repeat around. (24 sts)
- Round 5: Sc in each stitch around. (24 sts)
- Fasten off, leaving a long tail (approx. 12 inches) for sewing. Using CC1 (chocolate brown), embroider a small triangle for the nose at the center of the snout. To do this, bring the needle up from the back, make a few straight stitches to form a triangle, and secure the end on the back. Sew snout to the front of the hat, centered below the ears and above the ear flaps.
EYES (make 2 with CC1)
- Round 1: Magic ring, work 6 sc into the ring. (6 sts)
- Fasten off, leaving a long tail (approx. 8 inches). Sew eyes above the snout, spaced evenly (about 1-1.5 inches apart).
ASSEMBLY
- Position the Ears: Place the ears on the top of the hat, slightly forward of the center point. Pin them in place. Sew securely using the long tails, making sure the stitches are hidden on the inside of the hat.
- Position the Snout: Center the snout on the front of the hat, below the ears. Pin it in place. Sew around the edge using the long tail, keeping the stitches even and tight.
- Position the Eyes: Place the eyes above the snout, about 1-1.5 inches apart. Pin and sew securely.
- Attach Ear Flaps: Position the ear flaps on the bottom edge of the hat, directly below the ears. Sew them securely using the long tails.
- Final Touches: Weave in all remaining ends with the tapestry needle. Trim any excess yarn. Gently shape the hat and pieces. Your Snuggle-Snout Teddy Bear Hat is complete!


