The Whispering Willow Wisp Free Pattern – A Knitted Glow-in-the-Dark Forest Spirit Amigurumi
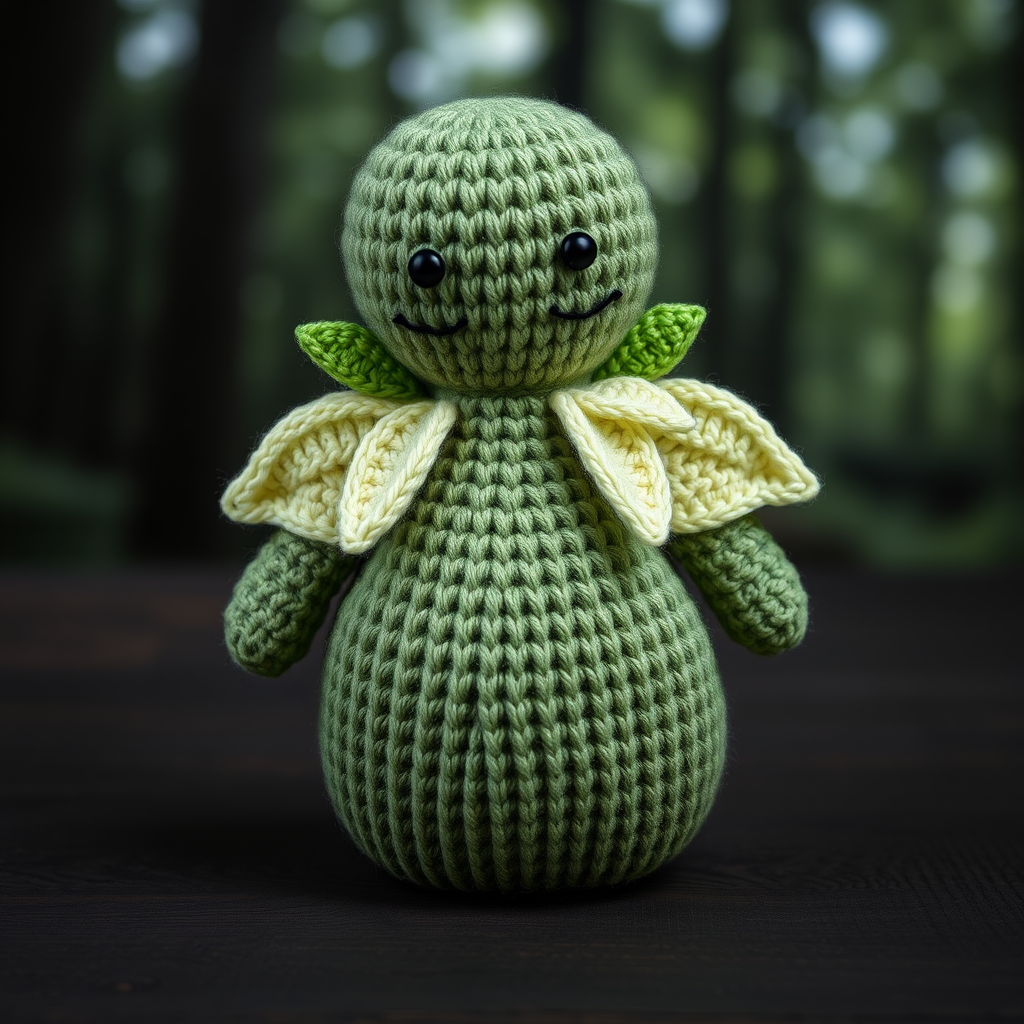
The Whispering Willow Wisp: A Free Knitted Glow-in-the-Dark Forest Spirit Amigurumi Pattern
Bring a touch of enchanted woodland magic to your shelf with this softly glowing, knitted forest spirit. Its delicate leaf-shaped wings and gentle smile make it the perfect cozy companion for dreamers and nature lovers alike. This beginner-friendly amigurumi project combines simple knit and crochet techniques to create a whimsical, handcrafted treasure that glows softly in the dark—a truly magical addition to any room.
Whether you're looking for a unique handmade gift, a piece of woodland decor, or simply a fun weekend project, the Whispering Willow Wisp is designed to delight. With clear instructions and minimal shaping, even those new to amigurumi will find this pattern approachable and rewarding. Let's gather our materials and bring this little forest guardian to life!
Materials Needed
Before you begin, make sure you have all the necessary supplies. The beauty of this project is that it uses readily available worsted weight yarn and standard tools. Here's your complete shopping list:
Yarn
- Sage Green (worsted weight cotton or acrylic blend) – for the head and upper body
- Moss Green (worsted weight) – for the lower body and neck
- Cream (worsted weight) – for the wings
- Glow-in-the-Dark Yarn (small amount) – or use glow-in-the-dark thread held together with cream yarn for the wings
- Black or Dark Brown Yarn – for embroidering the face
Tools & Notions
- US 4 (3.5 mm) Knitting Needles – for the body and wings
- US 3 (3.25 mm) Crochet Hook – for the small leaf details
- Stitch Marker – to track your rounds
- Yarn Needle – for sewing and weaving in ends
- Stuffing – polyester fiberfill or similar
- Scissors
Gauge: 22 stitches and 30 rows = 4 inches in stockinette stitch. Gauge is not critical for amigurumi, but maintaining consistent tension throughout will ensure your spirit comes out evenly shaped.
Step-by-Step Instructions
This pattern is worked in the round using a magic ring and increases/decreases to shape the body. Use a stitch marker to track your rounds. The entire project is knitted in one continuous piece from head to body, then the wings and leaves are added separately. Let's begin!
Head and Body (Knitted in One Piece)
Round 1: With sage green yarn, make a magic ring, work 6 single crochet (sc) into the ring. (6 stitches)
Round 2: Increase in each stitch around. (12 stitches)
Round 3: (Sc in next stitch, increase) around. (18 stitches)
Round 4: (Sc in next 2 stitches, increase) around. (24 stitches)
Round 5: (Sc in next 3 stitches, increase) around. (30 stitches)
Rounds 6-10: Sc in each stitch around. (30 stitches) – This forms the head. Keep your tension even for a smooth, round shape.
Round 11: (Sc in next 3 stitches, decrease) around. (24 stitches)
Round 12: (Sc in next 2 stitches, decrease) around. (18 stitches) – Begin stuffing the head firmly. Make sure it's nice and plump before continuing.
Round 13: Switch to moss green yarn. (Sc in next stitch, decrease) around. (12 stitches)
Round 14: Sc in each stitch around. (12 stitches) – This is the neck area. Keep it slightly less stuffed to allow for easy shaping.
Round 15: (Sc in next stitch, increase) around. (18 stitches)
Round 16: (Sc in next 2 stitches, increase) around. (24 stitches)
Round 17: (Sc in next 3 stitches, increase) around. (30 stitches)
Rounds 18-24: Sc in each stitch around. (30 stitches) – This is the body. Continue with the moss green yarn.
Round 25: (Sc in next 3 stitches, decrease) around. (24 stitches)
Round 26: (Sc in next 2 stitches, decrease) around. (18 stitches) – Stuff the body firmly. The body should be slightly softer than the head but still hold its shape.
Round 27: (Sc in next stitch, decrease) around. (12 stitches)
Round 28: Decrease around. (6 stitches) – Fasten off, leaving a tail. Weave the end through the remaining stitches and pull tight to close the opening. Weave in the end securely.
Wings (Knitted Flat, Make 2)
These delicate wings are knitted flat and shaped with simple decreases. For a subtle glow, hold a strand of glow-in-the-dark yarn together with the cream yarn as you knit.
Cast on 10 stitches with cream yarn (or cream + glow yarn held together).
Row 1 (Right Side): Knit all stitches.
Row 2: K1, k2tog (knit two together), knit to last 3 stitches, k2tog, k1. (8 stitches)
Row 3: Knit all stitches.
Row 4: K1, k2tog, knit to last 3 stitches, k2tog, k1. (6 stitches)
Row 5: Knit all stitches.
Row 6: K1, k2tog, knit to last 3 stitches, k2tog, k1. (4 stitches)
Row 7: Knit all stitches.
Row 8: K1, k2tog, k1. (3 stitches)
Row 9: K1, k2tog. (2 stitches)
Row 10: K2tog. (1 stitch) – Fasten off, leaving a long tail for sewing.
Repeat the entire wing pattern to create the second wing.
Leaf Accents (Crochet, Make 3 Small Leaves)
These tiny leaves add a charming collar around the neck. They're quick to crochet and give the spirit its woodland character.
With sage green yarn, chain 6.
Single crochet (sc) in the 2nd chain from the hook, half double crochet (hdc) in the next chain, double crochet (dc) in the next chain, hdc in the next chain, sc in the last chain.
Fasten off, leaving a tail for sewing. Repeat to make three leaves total.
Assembly
Now it's time to bring your forest spirit to life! Follow these steps carefully to assemble all the pieces.
Step 1: Attach the Wings
Sew the wings to the back of the body at the shoulder area, positioning them slightly angled upward. The wings should fan out gently from the body, like a moth at rest. Use the long tails left from the wings to secure them firmly.
Step 2: Add the Leaf Collar
Sew the three crocheted leaves around the neck area, overlapping them slightly to create a leafy collar. Position them so they cascade naturally, as if the spirit is wearing a garland of autumn leaves.
Step 3: Embroider the Face
Using black or dark brown yarn, embroider a simple smiling face. Create two small French knots for the eyes, placing them about 4-5 stitches apart on the head. Then, using a backstitch, create a gentle curved smile below the eyes. Keep the expression soft and peaceful—this is a friendly forest spirit!
Step 4: Add the Glow Effect
If you used glow-in-the-dark yarn for the wings, you're already done! If not, weave a few strands of glow-in-the-dark yarn through the wings and leaves to give a subtle glow in the dark. Alternatively, use a needle to thread glow-in-the-dark thread through the edges of the wings for a delicate luminescent outline.
Step 5: Final Touches
Weave in all ends securely, making sure no loose threads are visible. Gently shape the spirit by adjusting the stuffing if needed. Your Whispering Willow Wisp is now complete!
Tips for Perfect Results
- Consistent Tension: Keep your stitches even throughout. Amigurumi is forgiving, but consistent tension creates a smoother, more professional finish.
- Stuffing: Stuff firmly but not so much that the stitches stretch. The head should be slightly firmer than the body for a cute, balanced look.
- Glow-in-the-Dark Yarn: If you can't find glow-in-the-dark yarn, use glow-in-the-dark embroidery thread held together with your regular yarn. It works just as well!
- Customization: Feel free to experiment with different colors. A white or silver spirit would look stunning, or try autumn tones for a seasonal variation.
Your Whispering Willow Wisp is now ready to watch over your shelf, desk, or bedside table. With its gentle glow and whimsical charm, it's sure to become a beloved handmade treasure. Whether you keep it for yourself or gift it to a fellow nature lover, this little forest spirit carries a touch of magic wherever it goes.
Happy crafting, and may your needles always be swift and your yarn never tangle!


