Whimsical Ghost Worry Worm Free Pattern – Crochet a Cozy Companion
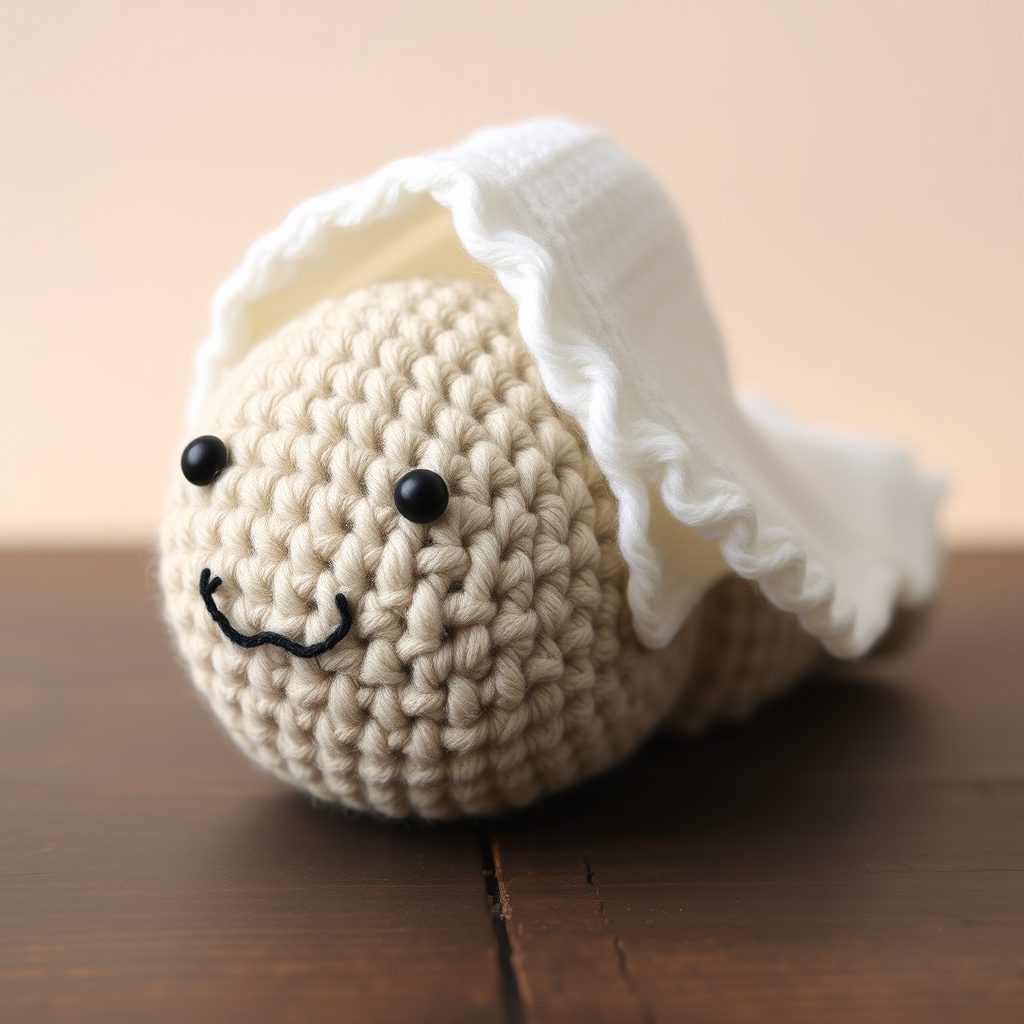
Meet the Ghost Worry Worm: Your New Cozy Companion
Have you ever wished for a little friend to hold onto your worries? Meet the Ghost Worry Worm, a squishy, charming amigurumi creation designed to do just that. This beginner-friendly crochet pattern uses soft, chunky yarn to create a textured, huggable companion that’s perfect for gifting, desk décor, or simply keeping close when you need a moment of calm. With its plump head, gently curved body, and a whimsical white veil, this little worm is as adorable as it is comforting. Best of all, it works up quickly with super bulky yarn, making it a satisfying weekend project for crocheters of all skill levels.
In this comprehensive guide, I’ll walk you through every step, from gathering your materials to adding those final, endearing facial details. By the end, you’ll have your very own Ghost Worry Worm, ready to absorb your anxieties and bring a smile to your face.
Materials Needed: Gather Your Supplies
Before we dive into the stitches, let’s make sure you have everything you need. This project is wonderfully simple, requiring just a few basic supplies.
Yarn
- Main Color (MC): Lion Brand Wool-Ease Thick & Quick (super bulky weight, 80% acrylic, 20% wool) in the shade 'Linen' – a soft, heathered light beige-gray. This forms the body of your worm.
- Contrast Color (CC): The same yarn in 'White' for the optional ghostly veil.
- Note: Any super bulky weight yarn will work beautifully. The key is to choose a soft, pliable yarn that will show off your stitches well.
Hook and Notions
- Crochet Hook: US Size K/10.5 (6.5 mm). This larger hook pairs perfectly with the chunky yarn to create a dense, sturdy fabric.
- Stitch Marker: Essential for keeping track of your rounds, as we’ll be working in a continuous spiral.
- Yarn Needle: For weaving in ends and sewing the pieces together.
- Polyester Fiberfill: For stuffing your worm to a firm, squishy perfection.
- Black Embroidery Floss or Yarn: For embroidering the sweet, simple face.
Gauge
4 sc x 4 rows = 2 inches. Gauge isn’t critical for this project, but it’s important to keep your stitches tight and consistent. This prevents the stuffing from peeking through the gaps in your work, ensuring a professional, polished finish.
Step-by-Step Instructions: Crocheting Your Ghost Worry Worm
This pattern is worked in continuous rounds (spiral) unless otherwise noted. Always use a stitch marker to mark the beginning of each round. Let’s get started!
Part 1: The Head and Body (Worked as One Piece)
We’ll begin with the head, which is worked from the top down and then shaped to form the body.
- Foundation: With your Main Color (MC) yarn, make a magic ring. If you’re not familiar with this technique, it creates a tight, adjustable circle that’s perfect for amigurumi.
- Round 1: Work 6 single crochet (sc) into the magic ring. Pull the tail to close the ring tightly. (6 stitches)
- Round 2: Work 2 sc into each stitch around. This is an increase round, doubling your stitch count. (12 stitches)
- Round 3: *Sc in the next stitch, 2 sc in the next stitch*; repeat from * to * around. (18 stitches)
- Round 4: *Sc in the next 2 stitches, 2 sc in the next stitch*; repeat from * to * around. (24 stitches)
- Round 5: *Sc in the next 3 stitches, 2 sc in the next stitch*; repeat from * to * around. (30 stitches)
- Rounds 6-10: Sc in each stitch around. These are straight rounds with no increases, creating the height of the head. (30 stitches)
- Round 11 (Decrease): *Sc in the next 3 stitches, sc2tog (single crochet 2 together)*; repeat from * to * around. This begins to shape the bottom of the head. (24 stitches)
- Round 12: *Sc in the next 2 stitches, sc2tog*; repeat from * to * around. (18 stitches)
- Stuff the Head: Now is the time to firmly stuff the head with polyester fiberfill. Make sure it’s plump and round, but not so overstuffed that it distorts the stitches.
- Round 13: *Sc in the next stitch, sc2tog*; repeat from * to * around. (12 stitches)
- Round 14: Sc2tog around. This will close the opening. (6 stitches)
- Finishing the Head: Fasten off, leaving a long tail (about 12 inches). Thread the tail through a yarn needle, then weave it through the front loops of the remaining 6 stitches. Pull tight to close the hole completely and secure. Do not cut this tail – you’ll use it later to attach the head to the body.
Part 2: The Body (Worm Tail)
Now we’ll create the worm’s body, which is a separate piece that tapers at the end.
- Foundation: With MC yarn, make a magic ring.
- Round 1: Work 6 sc into the magic ring. Pull tight. (6 stitches)
- Round 2: 2 sc in each stitch around. (12 stitches)
- Round 3: *Sc in the next stitch, 2 sc in the next stitch*; repeat from * to * around. (18 stitches)
- Rounds 4-8: Sc in each stitch around. This creates the main, plump section of the body. (18 stitches)
- Round 9: *Sc in the next stitch, sc2tog*; repeat from * to * around. This begins the taper. (12 stitches)
- Rounds 10-14: Sc in each stitch around. This creates the longer, tapering tail section. (12 stitches)
- Round 15: Sc2tog around. (6 stitches)
- Finishing the Body: Fasten off, leaving a long tail. Firmly stuff the body with fiberfill, ensuring the tail section is filled but still flexible. Thread the tail through the front loops of the remaining 6 stitches, pull tight, and secure. Do not cut this tail – it will be used for assembly.
Part 3: Assembly – Bringing the Pieces Together
With both pieces complete, it’s time to join them into one adorable worm.
- Positioning: Take the long tail from the head piece and thread it onto your yarn needle. Place the head on top of the body, aligning the closed ends. The head should sit centered and slightly overlapping the body’s rounded end.
- Sewing: Using a whip stitch or mattress stitch, sew the head securely to the body. Go around the seam at least twice to ensure a strong, invisible attachment. Weave in the end securely.
Part 4: The Ghostly Veil (Optional but Adds Charm)
This little hood gives your worm its ethereal, ghostly personality. It’s a simple tube that sits over the head.
- Foundation: With your Contrast Color (CC) yarn, chain 20. Join with a slip stitch to form a ring, being careful not to twist the chain.
- Round 1: Sc in each chain around. (20 stitches)
- Rounds 2-4: Sc in each stitch around. (20 stitches)
- Finishing the Veil: Fasten off, leaving a long tail. Place the veil over the head like a little hood, positioning it so it drapes softly. Sew it in place around the base of the head, just above the body. Weave in the end.
Part 5: The Face – Adding Personality
Now for the most important part: giving your worm its sweet, gentle expression.
- Placement: Using your black embroidery floss or yarn, locate the center front of the head. The eyes should be placed about 4 stitches apart, horizontally aligned.
- Eyes: Embroider two simple eyes. You can use French knots for a round, dot-like eye, or make a few small straight stitches for a more oval shape. Keep them small and neat.
- Smile: Directly below the eyes, embroider a small, gentle smile. Use a simple backstitch or a couple of straight stitches to create a subtle curve. Don’t make it too wide – a tiny, serene smile is perfect.
Part 6: Final Finishing Touches
- Weave in Ends: Carefully weave in all remaining loose ends using your yarn needle. Make sure they are hidden securely within the stitches.
- Shape and Fluff: Gently squeeze and mold your worm to ensure the stuffing is evenly distributed. Fluff the yarn with your fingers to give it a soft, cozy texture.
Congratulations! Your Ghost Worry Worm is complete. This little companion is ready to sit on your desk, perch on your nightstand, or be gifted to someone who needs a bit of comfort. The soft, chunky texture and sweet face make it an instant favorite. Happy crocheting!


