Whimsical Willow Bunny Teether Free Pattern – A Crocheted Woodland Comfort Toy
Whimsical Willow Bunny Teether Free Pattern – A Crocheted Woodland Comfort Toy
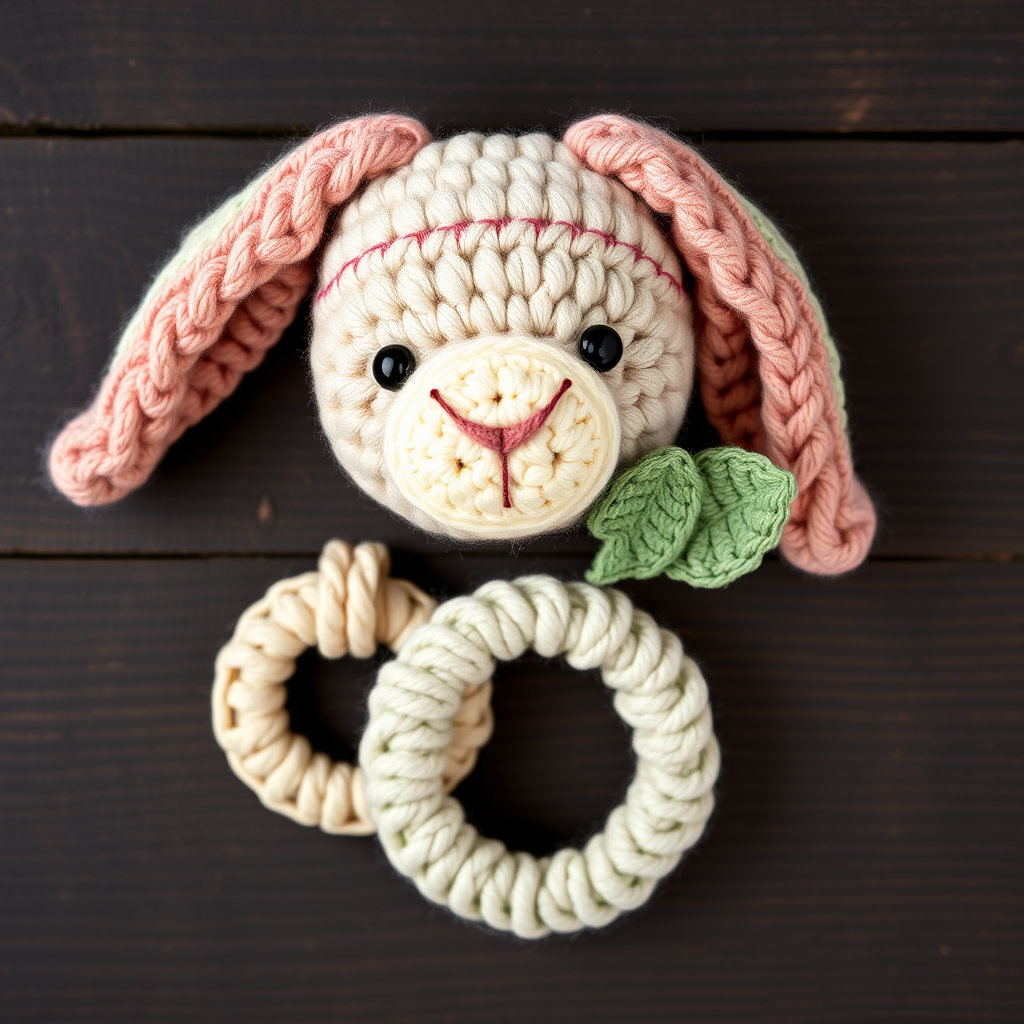
There is something truly special about creating a handmade gift for a little one—especially one that combines comfort, sensory play, and natural materials. The Whimsical Willow Bunny Teether is an heirloom-quality amigurumi project that pairs a soft, textured crocheted bunny head with two natural wooden rings, perfect for soothing sore gums and tiny grasping hands. This pattern is designed with beginners in mind, using simple single crochet stitches and straightforward shaping. The result is a charming woodland companion that feels both cozy and elegant, with a warm oatmeal base, dusty rose ears, and a sage leaf accent. Whether you're crafting for your own baby, a shower gift, or a special keepsake, this bunny teether is sure to become a treasured favorite.
In this comprehensive guide, I'll walk you through every step—from gathering your materials to the final finishing touches—so you can confidently create this adorable teether at home. Let's dive in!
Materials Needed
Before you begin, gather the following supplies. The yarn choice is key: a cotton/bamboo blend like Lion Brand Coboo provides a soft, breathable texture that's gentle on sensitive gums and durable enough for repeated use.
Yarn
- Main Color (Oatmeal): Lion Brand Coboo or similar cotton/bamboo blend – approximately 50g (for the bunny head and ring attachment)
- Ear Color (Dusty Rose): Lion Brand Coboo or similar – approximately 20g (for the ears)
- Accent Color (Sage): Lion Brand Coboo or similar – small amount (for the leaf)
- Muzzle Color (Cream): Small amount of worsted weight cotton yarn
Tools & Notions
- 3.5mm (E) crochet hook
- Yarn needle for weaving in ends and sewing parts together
- Stitch marker (to keep track of rounds)
- Polyester fiberfill stuffing (or a natural alternative like wool roving)
- Two 12mm wooden rings (food-safe, untreated—check for splinters and smooth them with fine sandpaper if needed)
- Optional: small wooden bead for the center of a flower accent (if you'd like to add extra detail)
Gauge & Tension
Gauge is not critical for this project, but aim for a tight tension to prevent the stuffing from showing through. A good rule of thumb is approximately 4 single crochet stitches x 4 rows = 1 inch. If your stitches are loose, try using a smaller hook (3.25mm) to achieve a denser fabric.
Abbreviations
Familiarize yourself with these standard crochet abbreviations before starting:
- MR: Magic ring (also called magic circle)
- sc: Single crochet
- inc: Increase (2 sc in the same stitch)
- dec: Decrease (sc 2 stitches together)
- sl st: Slip stitch
- ch: Chain
- st(s): Stitch(es)
Step-by-Step Instructions
Follow these detailed instructions carefully. Work in continuous rounds (do not join unless specified) and use a stitch marker to keep track of the beginning of each round.
Bunny Head (Make 1 in Oatmeal)
The head is worked from the top down, starting with a magic ring and increasing to create a round, plush shape.
Round 1: Make a magic ring, work 6 sc into the ring. Pull the tail to close tightly. (6 stitches)
Round 2: Work 2 sc in each stitch around (increase in every stitch). (12 stitches)
Round 3: *Sc in the next stitch, inc in the next stitch* – repeat from * to * around. (18 stitches)
Round 4: *Sc in the next 2 stitches, inc in the next stitch* – repeat from * to * around. (24 stitches)
Round 5: *Sc in the next 3 stitches, inc in the next stitch* – repeat from * to * around. (30 stitches)
Round 6: *Sc in the next 4 stitches, inc in the next stitch* – repeat from * to * around. (36 stitches)
Rounds 7-12: Sc in each stitch around (6 rounds of even single crochet). (36 stitches)
Round 13: *Sc in the next 4 stitches, dec* – repeat from * to * around. (30 stitches)
Round 14: *Sc in the next 3 stitches, dec* – repeat from * to * around. (24 stitches)
Stuff firmly: At this point, stuff the head with polyester fiberfill. Make sure it's packed tightly but not so much that it distorts the shape. The head should feel firm and round.
Round 15: *Sc in the next 2 stitches, dec* – repeat from * to * around. (18 stitches)
Round 16: *Sc in the next stitch, dec* – repeat from * to * around. (12 stitches)
Round 17: Dec around (decrease in every stitch). (6 stitches)
Finishing the head: Fasten off, leaving a long tail (about 12 inches). Thread the tail through a yarn needle, then weave it through the front loops of the remaining 6 stitches. Pull tight to close the hole, then secure with a knot. Weave the tail inside the head to hide it, trimming any excess.
Bunny Ears (Make 2 in Dusty Rose)
The ears are long and slightly tapered, with a lovely ribbed texture from the single crochet stitches. They're designed to be floppy and soft for little hands to grab.
Round 1: Make a magic ring, work 6 sc into the ring. Pull tight. (6 stitches)
Round 2: Inc in each stitch around. (12 stitches)
Rounds 3-8: Sc in each stitch around (6 rounds of even single crochet). (12 stitches)
Round 9: *Sc in the next 4 stitches, dec* – repeat from * to * around. (10 stitches)
Rounds 10-15: Sc in each stitch around (6 rounds). (10 stitches)
Round 16: *Sc in the next 3 stitches, dec* – repeat from * to * around. (8 stitches)
Rounds 17-20: Sc in each stitch around (4 rounds). (8 stitches)
Finishing the ears: Fasten off, leaving a long tail (about 8 inches). Flatten the ear so the seam is centered, and use the tail to whip stitch the bottom edge closed. This creates a neat, flat base for attaching to the head. Repeat for the second ear.
Attaching the ears: Position the ears on the top of the head, slightly apart (about 1 inch between them). Using the yarn needle and the tails, sew each ear securely to the head, stitching through the ear base and into the head fabric. Make several passes to ensure they're firmly attached, then weave in the ends.
Muzzle (Make 1 in Cream)
The muzzle is a small oval that sits on the front of the face, giving the bunny its sweet expression.
Round 1: Make a magic ring, work 6 sc into the ring. Pull tight. (6 stitches)
Round 2: Inc in each stitch around. (12 stitches)
Round 3: *Sc in the next stitch, inc in the next stitch* – repeat from * to * around. (18 stitches)
Finishing the muzzle: Fasten off, leaving a long tail (about 10 inches). Position the muzzle on the front of the head, centered between the ears and slightly below the midpoint of the face. Sew it in place using the tail, stitching around the edge of the muzzle and into the head. Weave in the ends.
Embroidering the face: Using a small piece of Oatmeal yarn, embroider a tiny 'Y' shape for the nose at the top center of the muzzle. Then, add two small straight stitches below the nose for the mouth (like a tiny 'w' or smile). Keep the stitches small and neat.
Eyes
For a safe, baby-friendly option, embroider the eyes rather than using plastic safety eyes. Using Oatmeal yarn, make two small 'x' stitches on either side of the muzzle, slightly above it. Position them symmetrically for a cute, alert expression. If you prefer safety eyes, ensure they are securely fastened with backing washers and are not a choking hazard for infants.
Wooden Ring Attachment
This is the functional part of the teether—the natural wooden rings provide a safe, satisfying surface for baby to chew on.
Step 1: Cut a length of Oatmeal yarn about 18 inches long. Thread it through a yarn needle.
Step 2: Insert the needle through the bottom of the bunny head, from the inside out, at the center bottom. Pull the yarn through, leaving a small tail inside the head.
Step 3: Thread the needle through one wooden ring, then insert it back into the head near the same spot. Pull tight so the ring sits snugly against the head.
Step 4: Repeat this process several times, creating a secure whip stitch that wraps around the ring and through the head fabric. Make sure the ring is firmly attached and can dangle freely.
Step 5: Repeat for the second ring, attaching it slightly to the side of the first so they hang independently. Weave in all ends securely.
Leaf Accent (Make 1 in Sage)
The leaf adds a whimsical woodland touch. It's a simple shape worked in rows.
Row 1: Chain 6.
Row 2: Starting in the 2nd chain from the hook: sc in the next stitch, hdc (half double crochet) in the next stitch, dc (double crochet) in the next stitch, hdc in the next stitch, sc in the last stitch. This creates a leaf shape that naturally curves.
Finishing the leaf: Fasten off, leaving a tail (about 6 inches). Sew the leaf onto the side of the bunny head, near the base of one ear, as a decorative accent. Weave in the ends.
Finishing Touches
Once all parts are attached, take a moment to inspect your work:
- Weave in all ends: Use your yarn needle to hide any remaining tails inside the head or along seams. Trim excess yarn.
- Check security: Gently tug on the ears, rings, and leaf to ensure everything is firmly attached. There should be no loose threads or parts that could come undone with use.
- Final shaping: Fluff the bunny head with your hands to give it a soft, round appearance. Adjust the ears so they flop naturally.
Your Whimsical Willow Bunny Teether is now complete and ready for little hands to explore! The combination of soft cotton yarn and natural wood makes this a safe, sensory-rich toy that babies will love. And because it's handmade, it carries a special warmth that no store-bought item can replicate.
I hope you enjoyed this pattern. Happy crocheting, and may your bunny bring endless comfort and joy to the little one in your life!


