Whisker Haven Cat Bed Cozy Free Pattern – Knit a Plush Feline Hideaway
Whisker Haven Cat Bed Cozy Free Pattern – Knit a Plush Feline Hideaway
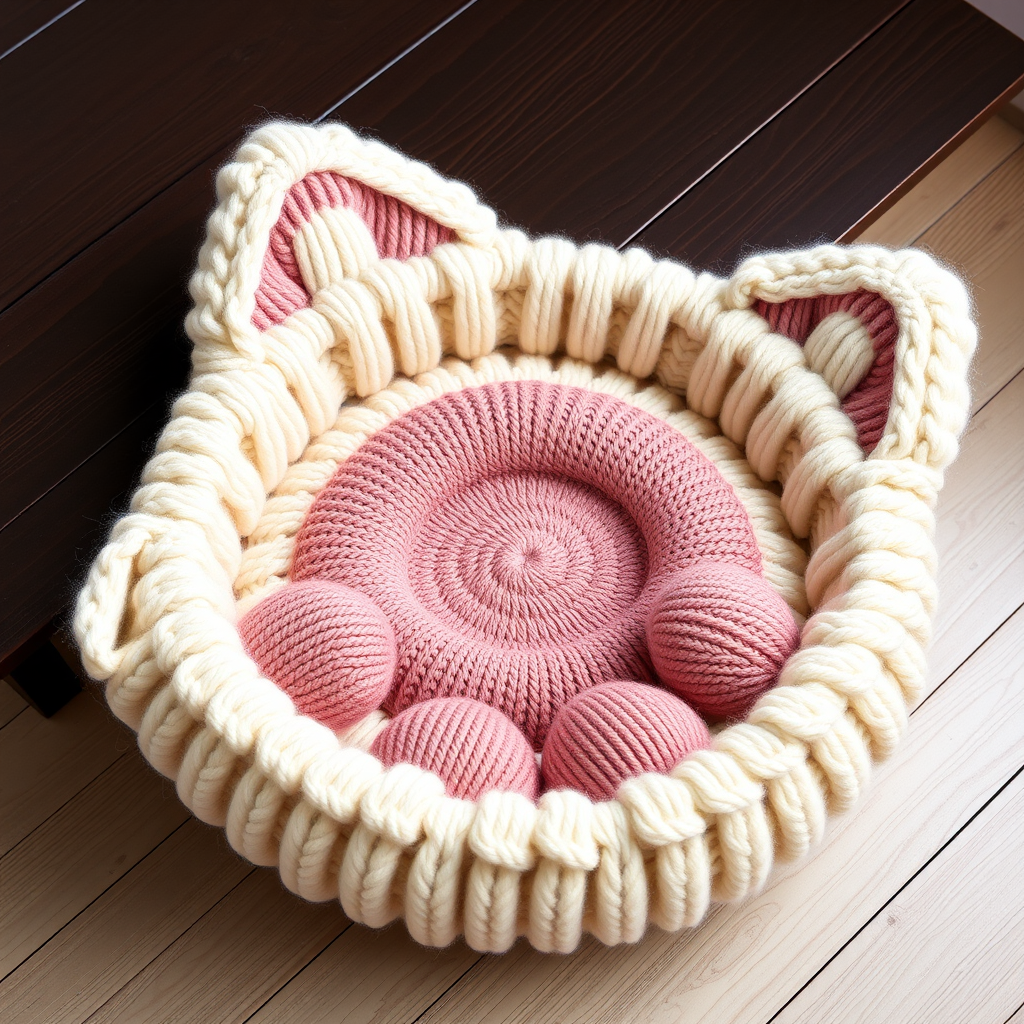
Transform your home into a feline paradise with this whimsical knitted cat bed that resembles a giant, soft paw print. This cozy hideaway offers your cat a warm, secure spot to curl up and nap in style. The chunky, plush texture of super bulky yarn makes this project quick to knit and irresistibly soft for your furry friend. Whether you're a seasoned knitter or a confident beginner looking for a fun weekend project, this pattern is designed to be approachable, detailed, and utterly rewarding. Let's create a special corner just for your beloved companion!
Materials Needed
Before you begin, gather the following supplies to ensure a smooth and enjoyable knitting experience. All materials are readily available at most craft stores or online yarn retailers.
- Yarn: Super bulky weight yarn (size 6) in three colors:
- Cream (main body) – approximately 400-500 yards
- Dusty rose (paw pads) – approximately 100-150 yards
- Soft gray (optional accent or contrast) – small amount
- Black (for embroidery details) – small amount
- Needles:
- US 11 (8.0 mm) circular knitting needles, 16-inch length
- US 11 (8.0 mm) double-pointed needles (for small sections like paw pads)
- Notions:
- Stitch markers (at least 2)
- Tapestry needle (for sewing and weaving ends)
- Scissors
- Measuring tape or ruler
Gauge: 10 stitches and 14 rows = 4 inches in stockinette stitch (knit every round). Always check your gauge to ensure the correct size and fit.
Step-by-Step Instructions
This pattern is knitted in the round to create a seamless, plush bed. The base is a large circle, the sides are built up, and the paw pad details are knitted separately and sewn on. Follow each step carefully, and you'll have a beautiful cat bed in no time.
Abbreviations
- CO: Cast on
- K: Knit
- P: Purl
- K2tog: Knit two together (decrease)
- M1: Make one (increase) – pick up the bar between stitches and knit through the back loop
- St(s): Stitch(es)
- Rnd(s): Round(s)
- BO: Bind off
Base of the Bed (make with cream yarn)
The base is worked in a continuous spiral, increasing evenly to create a flat circle. Use a stitch marker to keep track of the beginning of each round.
- Rnd 1: CO 8 sts. Join in the round, being careful not to twist. Place marker to indicate the start of the round.
- Rnd 2: K1, M1 around. (16 sts)
- Rnd 3: K around. (16 sts)
- Rnd 4: K2, M1 around. (24 sts)
- Rnd 5: K around. (24 sts)
- Rnd 6: K3, M1 around. (32 sts)
- Rnd 7: K around. (32 sts)
- Continue this pattern: Increase by 8 sts every other round (e.g., Rnd 8: K4, M1 around = 40 sts; Rnd 9: K around; Rnd 10: K5, M1 around = 48 sts; and so on) until you have 80 sts. This will create a circle approximately 16 inches in diameter.
- Work even: Knit every round for 6 more rounds without increasing. This creates a smooth, flat center for your cat to rest on.
Sides of the Bed (continue with cream yarn)
Now we'll create the walls of the bed. The purl round creates a natural fold line that defines the base from the sides.
- Fold line: Purl all sts in the next round. This purl ridge will be the point where the sides fold up.
- Next Rnd: Knit all sts.
- Continue knitting in the round (stockinette stitch) until the sides measure 6 inches from the purl fold line. Use a measuring tape to check the length periodically.
- Bind off: BO all sts loosely. To ensure a stretchy edge, bind off using a larger needle or a loose bind-off method (e.g., knit two together and pass over method). Weave in the yarn end securely.
Paw Pad Details (make with dusty rose yarn)
These pieces are knitted flat (back and forth) and then sewn onto the bottom of the bed. They mimic the pads of a cat's paw.
Large Pad (oval) – Make 1
- CO 6 sts with dusty rose yarn.
- Row 1 (RS): K across.
- Row 2 (WS): P across.
- Row 3: K1, M1, K to last st, M1, K1. (8 sts)
- Row 4: P across.
- Row 5: K1, M1, K to last st, M1, K1. (10 sts)
- Row 6: P across.
- Row 7: K1, M1, K to last st, M1, K1. (12 sts)
- Rows 8-13: Work even in stockinette (K on RS, P on WS) for 6 rows.
- Row 14: K1, K2tog, K to last 3 sts, K2tog, K1. (10 sts)
- Row 15: P across.
- Row 16: K1, K2tog, K to last 3 sts, K2tog, K1. (8 sts)
- Row 17: P across.
- Row 18: K1, K2tog, K to last 3 sts, K2tog, K1. (6 sts)
- BO all sts. This creates an oval shape.
Toe Pads (small ovals) – Make 4
- CO 4 sts with dusty rose yarn.
- Row 1 (RS): K across.
- Row 2 (WS): P across.
- Row 3: K1, M1, K to last st, M1, K1. (6 sts)
- Row 4: P across.
- Row 5: K1, M1, K to last st, M1, K1. (8 sts)
- Rows 6-9: Work even in stockinette for 4 rows.
- Row 10: K1, K2tog, K to last 3 sts, K2tog, K1. (6 sts)
- Row 11: P across.
- Row 12: K1, K2tog, K to last 3 sts, K2tog, K1. (4 sts)
- BO all sts.
Assembly
Now it's time to bring all the pieces together to create the paw print design on the bottom of the bed.
- Position the large pad: Place the large oval pad in the center of the bed's base (on the outside bottom, opposite the interior). Ensure it's centered and aligned nicely.
- Sew the large pad: Using a tapestry needle and dusty rose yarn, sew the pad securely to the base. Use a whip stitch or mattress stitch, making sure the stitches are hidden between the pad and the bed. Weave in the ends.
- Arrange the toe pads: Position the four small toe pads around the large pad, evenly spaced, to mimic a paw print. A typical cat paw has four toes arranged in an arc above the main pad. Place them about 1-2 inches away from the large pad, depending on your preference.
- Sew the toe pads: Sew each toe pad securely using the same method as the large pad. Weave in all ends.
- Add claw details (optional): Using black yarn and a tapestry needle, embroider small, curved claw marks on the top of each toe pad. This adds a charming, realistic touch. Simply stitch a few short lines radiating from the top edge of each pad.
Finishing
- Fold the sides up: Gently fold the sides of the bed up along the purl fold line. The purl ridge naturally creates a crisp fold, forming the walls of the bed.
- Shape the bed: If needed, lightly block the bed to help it hold its shape. You can use a spray bottle with water to mist the bed and then shape it with your hands. Allow it to dry completely.
- Final check: Weave in any remaining loose ends. Trim any excess yarn.
- Present to your cat: Place the bed in your cat's favorite napping spot. Add a soft blanket or cushion inside for extra comfort, and watch your feline friend enjoy their new cozy hideaway!
Your Whisker Haven Cat Bed is now complete! This plush, paw-print-shaped bed is sure to become your cat's favorite spot in the house. The chunky yarn and thoughtful design make it both a functional pet accessory and a charming piece of home decor. Happy knitting, and enjoy watching your furry friend curl up in their new handmade haven!


