Aurora Borealis Sweater Free Pattern – A Knitted Colorwork Yoke Pullover
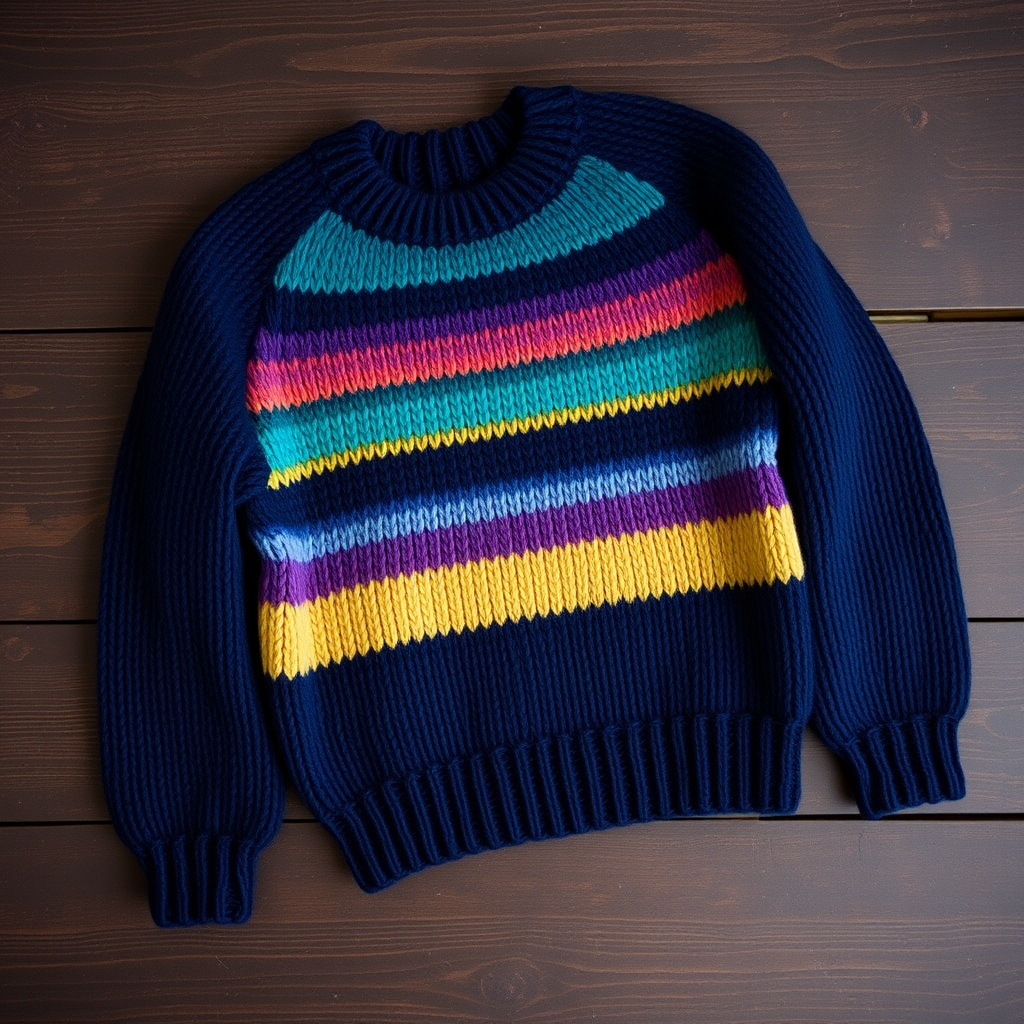
Wrap Yourself in the Northern Lights: The Aurora Borealis Sweater
Imagine wearing the night sky, with its swirling ribbons of teal, violet, and gold, draped over your shoulders. That's the magic of the Aurora Borealis Sweater—a stunning colorwork yoke pullover that transforms a simple knitted garment into a wearable canvas. This free pattern is designed for adventurous beginners and intermediate knitters alike, offering a rewarding project that builds your skills in stranded colorwork while creating a cozy, relaxed-fit sweater you'll reach for all season long. The deep navy base is the perfect backdrop for the gradient of colors that dance across the yoke, just like the real aurora. Let's cast on and create a piece of art you can wear.
Materials Needed: Your Palette for the Aurora
Before you begin, gather your supplies. This project uses worsted weight yarn, which is perfect for a warm, durable sweater that works up quickly.
- Yarn: Worsted weight yarn in 4 colors:
- MC (Main Color): Deep Navy – approximately 800 (900, 1000, 1100) yards
- CC1 (Contrast Color 1): Teal – approximately 150 (170, 190, 210) yards
- CC2 (Contrast Color 2): Purple – approximately 150 (170, 190, 210) yards
- CC3 (Contrast Color 3): Gold – approximately 100 (110, 120, 130) yards
- Needles:
- US 7 (4.5 mm) circular needles in 16" and 32" lengths (for the body and yoke)
- US 5 (3.75 mm) circular needles in 16" and 32" lengths (for ribbing)
- Double-pointed needles (DPNs) in US 7 (4.5 mm) and US 5 (3.75 mm) if you prefer to work sleeves in the round without magic loop.
- Notions: Stitch markers, stitch holders or waste yarn, tapestry needle for weaving in ends, and a tape measure.
Gauge: The Key to a Perfect Fit
To ensure your sweater fits as intended, take the time to check your gauge. 20 stitches and 26 rows = 4 inches in stockinette stitch on the larger needles (US 7). If your gauge is off, adjust your needle size accordingly—smaller needles for more stitches per inch, larger needles for fewer.
Step-by-Step Instructions: Knitting Your Aurora
This pattern is worked top-down, starting with the yoke and finishing with the body and sleeves. The colorwork chart is written out row by row, making it easy to follow even if you're new to stranded knitting. Let's get started!
Sizes & Finished Measurements
This pattern is written for sizes S (M, L, XL). The finished chest measurements are 36 (40, 44, 48)". Choose the size that gives you 2-4 inches of positive ease for a relaxed fit. All instructions are written for the smallest size, with larger sizes in parentheses.
Part 1: The Yoke (The Colorwork Magic)
Step 1: Cast On & Ribbing
With your smaller needles (US 5) and MC (Deep Navy), cast on 80 (88, 96, 104) stitches. Place a stitch marker to mark the beginning of the round and join, being careful not to twist your stitches. Work in a K1, P1 ribbing for 1.5 inches. This creates a neat, stretchy neckline.
Step 2: Increase for the Yoke
Switch to your larger needles (US 7). Work 2 rounds in stockinette stitch (knit every stitch).
Increase Round: *K4, M1 (make one)* repeat from * to end of round. You will now have 100 (110, 120, 130) stitches. Work 3 more rounds in stockinette stitch, knitting all stitches.
Step 3: The Colorwork Chart
Now for the fun part! You will work the colorwork chart below, which is written out in full. Each round is a horizontal band of color. Important: When changing colors, twist the yarns on the back of your work every few stitches to avoid long floats. Keep your tension loose but even.
Work Rounds 1-20 of the chart below:
- Round 1: *K5 MC, K1 CC1* repeat to end.
- Round 2: *K4 MC, K2 CC1*
- Round 3: *K3 MC, K3 CC1*
- Round 4: *K2 MC, K4 CC1*
- Round 5: *K1 MC, K5 CC1*
- Round 6: *K6 CC1, K1 CC2*
- Round 7: *K5 CC1, K2 CC2*
- Round 8: *K4 CC1, K3 CC2*
- Round 9: *K3 CC1, K4 CC2*
- Round 10: *K2 CC1, K5 CC2*
- Round 11: *K1 CC1, K6 CC2*
- Round 12: *K7 CC2, K1 CC3*
- Round 13: *K6 CC2, K2 CC3*
- Round 14: *K5 CC2, K3 CC3*
- Round 15: *K4 CC2, K4 CC3*
- Round 16: *K3 CC2, K5 CC3*
- Round 17: *K2 CC2, K6 CC3*
- Round 18: *K1 CC2, K7 CC3*
- Round 19: *K8 CC3, K1 MC*
- Round 20: *K7 CC3, K2 MC*
After completing Round 20, cut CC1, CC2, and CC3, leaving a 6-inch tail. Continue with MC only. You should now have 200 (220, 240, 260) stitches on your needles. The yoke is complete!
Part 2: Dividing for the Body & Sleeves
Step 4: Separate the Sleeves
Now you'll separate the body from the sleeves. Knit across the first 40 (44, 48, 52) stitches and place them on a stitch holder or waste yarn for the first sleeve. Cast on 6 new stitches for the underarm. Knit the next 60 (66, 72, 78) stitches for the front. Place the next 40 (44, 48, 52) stitches on a holder for the second sleeve. Cast on 6 stitches for the second underarm. Knit the remaining 60 (66, 72, 78) stitches for the back. You now have 132 (144, 156, 168) stitches for the body.
Step 5: Knit the Body
Place a marker for the new beginning of the round. Continue working in stockinette stitch (knit every stitch) with MC until the body measures 12 (13, 14, 15)" from the underarm. Switch to your smaller needles (US 5) and work in K1, P1 ribbing for 2 inches. Bind off loosely in pattern. This creates a comfortable, flexible hem.
Part 3: The Sleeves
Step 6: Knit the Sleeves
Place the stitches from one sleeve holder onto your larger needles (US 7). Pick up and knit 6 stitches from the underarm cast-on edge. Place a marker at the center of these underarm stitches to mark the beginning of the round. You will have 46 (50, 54, 58) stitches total.
Step 7: Decrease for the Sleeve
Work in stockinette stitch. To shape the sleeve, decrease 2 stitches every 6 rounds (knit 1, k2tog, knit to last 3 stitches, ssk, knit 1). Repeat this decrease round until you have 36 (40, 44, 48) stitches remaining. Work even (no decreases) until the sleeve measures 16 (17, 18, 19)" from the underarm. Switch to smaller needles (US 5) and work in K1, P1 ribbing for 1.5 inches. Bind off loosely. Repeat for the second sleeve.
Finishing Touches
Step 8: Weave in Ends & Block
Using your tapestry needle, carefully weave in all loose ends on the wrong side of the work. This is crucial for a professional finish, especially in the colorwork section. Finally, block your sweater to the specified measurements. Wet blocking is recommended for worsted weight wool or wool blends—soak the sweater in lukewarm water with a gentle wool wash, gently squeeze out excess water, and lay flat to dry, shaping it to the correct dimensions. This will even out your stitches and make the colorwork pattern pop.
Congratulations! You've just knitted a stunning, one-of-a-kind Aurora Borealis Sweater. This cozy, artistic piece is sure to become a favorite in your wardrobe, and you'll beam with pride every time you wear it. Happy knitting!



